


Bready or Not Original: Hazelnut Hand Cake [cake mix]
Doctor up a basic yellow cake mix box into an amazing Hazelnut Hand Cake!
![Bready or Not Original: Hazelnut Hand Cake [cake mix]](https://www.bethcato.com/blog/wp-content/uploads/2020/04/Hazelnut-Cake-Squares11_sm.jpg)
It’s called hand cake because it’s convenient to eat without a knife and fork. Heck, napkins are optional, if you don’t mind a dropped crumb or two.
![Bready or Not Original: Hazelnut Hand Cake [cake mix]](https://www.bethcato.com/blog/wp-content/uploads/2020/04/Hazelnut-Cake-Squares1_sm.jpg)
This cake has a mild chocolate flavor–milder than that of a typical chocolate cake, from a mix or not. Nutella (or use a store-brand equivalent, as I did) is whipped into the batter, with some extra chocolate chips adding a gentle layer of flavor.
![Bready or Not Original: Hazelnut Hand Cake [cake mix]](https://www.bethcato.com/blog/wp-content/uploads/2020/04/Hazelnut-Cake-Squares3_sm.jpg)
This thing is all about convenience. The cake comes together fast. Bakes fast. Give it some initial time to cool at room temp, then stash it in the fridge, and you can eat it even faster.
![Bready or Not Original: Hazelnut Hand Cake [cake mix]](https://www.bethcato.com/blog/wp-content/uploads/2020/04/Hazelnut-Cake-Squares7_sm.jpg)
The end result is a cake with a soft, high, very moist crumb. The scattered nuts and toffee add extra flavor and crunch.
![Bready or Not Original: Hazelnut Hand Cake [cake mix]](https://www.bethcato.com/blog/wp-content/uploads/2020/04/Hazelnut-Cake-Squares9_sm.jpg)
My husband’s co-workers inhaled this cake. One guy said it was the best Cato treat ever. Considering the goodies that come their way, that is high praise indeed.
Bready or Not Original: Hazelnut Hand Cake [cake mix]
Equipment
- 13x9 pan
Ingredients
- 1 box yellow cake mix
- 3 large eggs
- 2/3 cup water
- 2/3 cup Nutella or similar hazelnut spread
- 1/4 cup canola oil or vegetable oil
- 1/2 cup semisweet chocolate chips
- 1/2 cup chopped hazelnuts toasted or not
- 1/2 cup Heath toffee bits
- confectioners' sugar to dust top, optional
Instructions
- Preheat oven at 350-degrees. Line a 13x9-inch pan with foil and apply nonstick spray.
- In a large bowl, beat together the cake mix, eggs, water, hazelnut spread, and oil for several minutes, until thoroughly combined and no lumps remain. Fold in the chocolate chips, hazelnuts, and toffee bits. Pour batter into prepared pan.
- Bake for 25 to 30 minutes, until center is no longer jiggly and passes the toothpick test.
- Cool completely to room temperature; place in fridge to speed process along. Use foil to lift contents onto cutting board. If desired, sprinkle confectioners' sugar over top. Slice into pieces.
- Store in sealed container(s) at room temperature.
OM NOM NOM!
Read More
Bready or Not Original: White Chocolate Macadamia Nut Granola Bars [Gluten Free]
These delicious White Chocolate Macadamia Nut Granola Bars are perfect for breakfasts and snacks–and they are packed with protein and gluten-free, too!
![Bready or Not Original: White Chocolate Macadamia Nut Granola Bars [Gluten Free]](https://www.bethcato.com/blog/wp-content/uploads/2020/02/Wh-Choc-Mac-Nut-Granola-Breakfast-Bars-GF8_sm.jpg)
I love making no-bake batch breakfast recipes in the summer. No need to turn on the oven and heat up my kitchen! Or to fuss with making something every day!
![Bready or Not Original: White Chocolate Macadamia Nut Granola Bars [Gluten Free]](https://www.bethcato.com/blog/wp-content/uploads/2020/02/Wh-Choc-Mac-Nut-Granola-Breakfast-Bars-GF3_sm.jpg)
This recipe is even better because it is SO GOOD. I made it numerous times to experiment with ingredients and amounts. I prefer it with cashew butter and almond flour as it gives it a very cookie dough taste, but use what you have.
![Bready or Not Original: White Chocolate Macadamia Nut Granola Bars [Gluten Free]](https://www.bethcato.com/blog/wp-content/uploads/2020/02/Wh-Choc-Mac-Nut-Granola-Breakfast-Bars-GF7_sm.jpg)
To make this gluten-free, be sure to use GF quick oats from a place like Bob’s Red Mill. Also, DON’T use old fashioned/rolled oats. They are too dense. The time I tried that kind, I had to add a lot more nut butter and honey to make the mixture stick together.
![Bready or Not Original: White Chocolate Macadamia Nut Granola Bars [Gluten Free]](https://www.bethcato.com/blog/wp-content/uploads/2020/02/Wh-Choc-Mac-Nut-Granola-Breakfast-Bars-GF10_sm.jpg)
Make these on the weekend and your breakfasts are ready for the week! Just grab a bar from the fridge, eat, and enjoy!
![Bready or Not Original: White Chocolate Macadamia Nut Granola Bars [Gluten Free]](https://www.bethcato.com/blog/wp-content/uploads/2020/02/Wh-Choc-Mac-Nut-Granola-Breakfast-Bars-GF6_sm.jpg)
Bready or Not Original: White Chocolate Macadamia Nut Granola Bars [Gluten Free]
Ingredients
- 2 cups quick oats
- 1 cup almond flour or oat flour
- 1/4 cup macadamia nuts chopped
- 1 cup cashew butter or almond butter
- 1/2 cup honey
- 1/2 teaspoon salt
- 1 teaspoon vanilla extract
- 1/4 cup white chocolate chips
Instructions
- Line a 9x9 or 8x8 square pan with foil and apply nonstick spray. Set aside.
- In a bowl, measure out the quick oats, almond flour, and macadamia nuts. Also set aside.
- Place the cashew butter, honey, and salt in a large pot on the stove. Bring the temperature to medium, stirring everything until it is melted and combined. Remove from heat and stir in the vanilla extract.
- Pour the dry ingredients into the wet and stir until fully incorporated. Dump the mix into the prepared pan. Use a piece of waxed paper and a heavy glass to compress the contents into an even layer. Sprinkle white chocolate chips across the top and quickly press in by hand, as they will soften fast on the warm dough.
- Set pan in fridge to chill for at least 30 minutes.
- Use foil to lift square onto a cutting board. Slice into desired sizes. They keep in the fridge, in a sealed container, for as long as a week, and as long as a month in the freezer. If stacking, place wax paper between the layers.
OM NOM NOM!
Bready or Not Original: Cranberry Lemon Biscotti
This lemon-themed month needs some breakfast food. How about some Cranberry Lemon Biscotti?
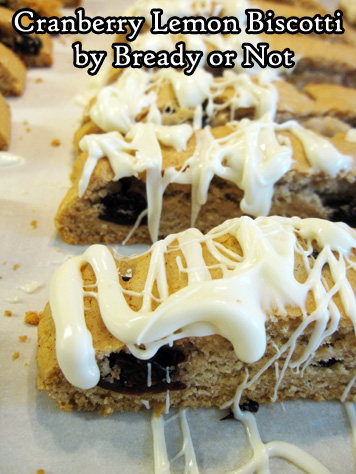
The lemon here isn’t hardcore. Zest throughout the dough adds freshness, and the dried cranberries are soaked in the juice to rehydrate. This gives the cranberries an especially pleasant zing.
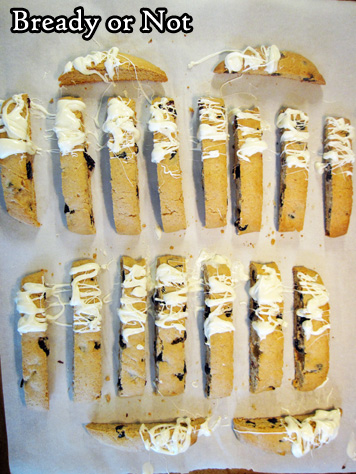
For years, I was intimidated by biscotti, but now I enjoy coming up with a couple new recipes a year. Really, the trickiest thing about this is how sticky the dough is when it’s time to shape it.
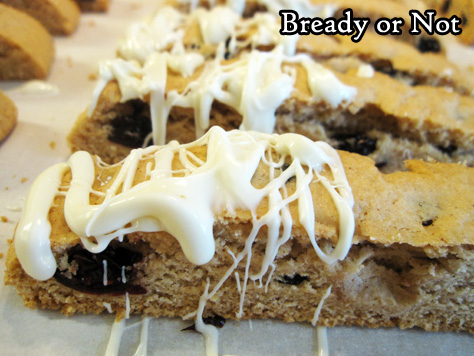
I like the addition of white chocolate drizzle to add a touch more sweetness, but that’s optional.
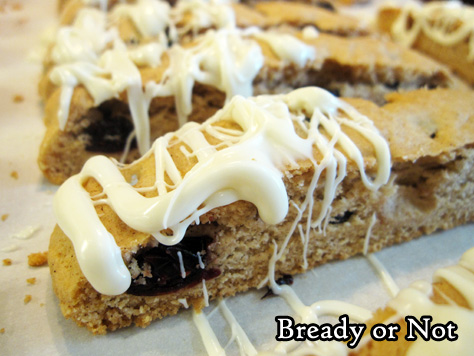
The end result is a biscotti with a bright, sunny flavor that complements plump, tart cranberries, all in crispy, bready form that’s especially good dunked in coffee or tea!
This recipe is midway through my April of lemon recipes!
Lemon Sour Cream Bundt Cake
Glazed Lemon Ginger Bars
Cranberry Lemon Biscotti [today]
Cream Cheese Stuffed Lemon Bundt Cake
Lemon Frangipane
Bready or Not Original: Cranberry Lemon Biscotti
Ingredients
- 1 lemon
- 3/4 cup dried cranberries
- 2 cups all-purpose flour
- 1 1/4 teaspoon baking powder
- 1 teaspoon ground cinnamon
- 1/4 teaspoon salt
- 2 eggs
- 3/4 cup white sugar
- 1/3 cup vegetable oil
- 1 teaspoon vanilla extract
- 1 teaspoon lemon extract
- 4 ounces white chocolate optional, to drizzle on top
Instructions
- Preheat oven at 350-degrees. Zest and juice lemon. Set aside zest, and soak cranberries in juice.
- Line a large baking sheet with parchment paper.
- In a medium bowl, mix together flour, baking powder, cinnamon, and salt. Set aside.
- In a large bowl, beat eggs with white sugar. Add oil, vanilla extract, lemon extract, and zest. Gradually mix in the dry ingredients.
- Drain lemon juice out of cranberries; discard juice. Fold cranberries into dough to equally distribute.
- Divide dough in half. Place each piece spaced out on parchment. Dough will be very sticky, so shape with plastic spatula or greased or floured hands into 1-inch high flat rectangular logs.
- Bake for 20 minutes. Remove from oven and let set for 5 minutes. Use a long bread knife and slice down--don't saw--into long, even cookies. Space out cookies upright, if possible, or lay on sides.
- Bake for another 20 to 25 minutes; if cookies are laying on sides, flip them to other side halfway through. Biscotti should be golden and somewhat crisp.
- Let biscotti sit out for anywhere from 30 minutes to several hours so that they can cool off and dry out even more.
- If adding white chocolate on top, melt chocolate in microwave or on stovetop (keep in mind, white chocolate can burn fast!). Use a fork to drizzle chocolate, or dip an end of each biscotti into the chocolate. Let set again for an hour or so, then pack into sealed bags or plastic containers.
- Biscotti can keep in sealed containers for as long as a month.
OM NOM NOM!
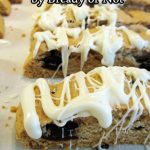
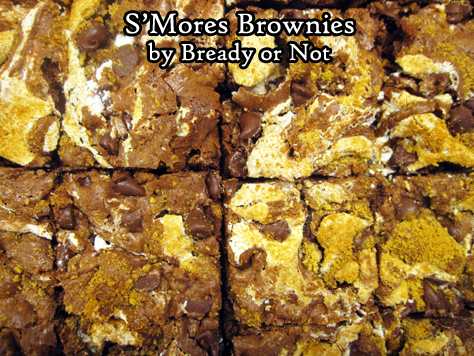
Bready or Not Original: S’Mores Brownies
Create luscious S’Mores in brownie-bar form with my original recipe for S’Mores Brownies!
I had a jar of marshmallow fluff I wanted to use. I deliberated what to use it for and hit upon S’Mores Brownies, but to my surprise, I didn’t find an existing recipe that used jarred fluff. Time to make my own recipe!
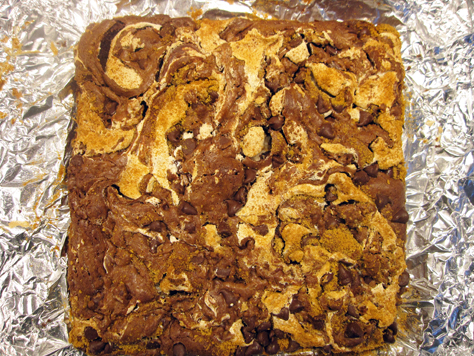
Using regular marshmallows to bake is delicious and all, but you also end up with caramelized, hollow sections. I wanted marshmallows to stay soft and gooey alongside the chocolate crumb. By golly, my idea worked!
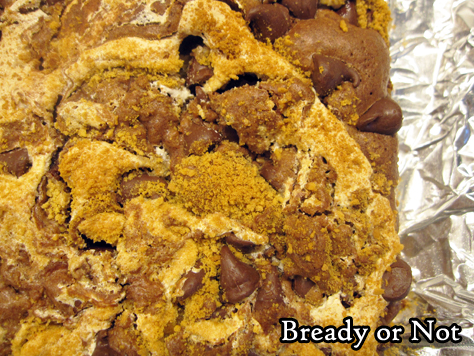
This is definitely a brownie for people who love chocolate. I loaded it with chocolate chips, inside and out. The graham cracker crumb and marshmallow complement it in a beautiful way.
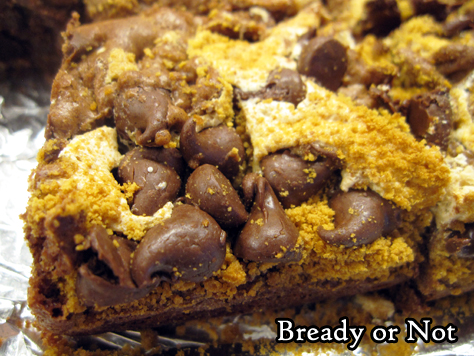
This will look messy as a batter. Marshmallow fluff is not the easiest stuff to work with. It’s lumpy and sticky. The good news is, as the pan bakes, the contents will even out. The resulting marble effect make it look as delicious as it tastes.
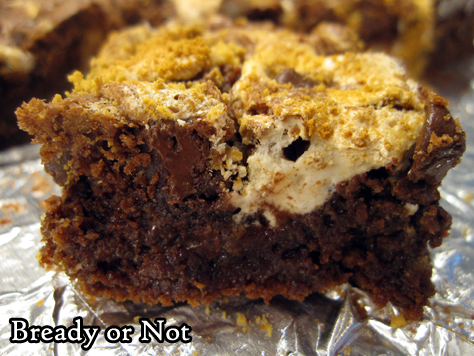
Store these brownies in a sealed container for days–and they can be frozen for longer, too.
Bready or Not Original: S'Mores Brownies
Ingredients
- 1/4 cup unsalted butter half cube
- 2 cups semisweet chocolate chips divided
- 1/2 cup white sugar
- 2 eggs room temperature
- 2/3 cup all-purpose flour
- 1/2 teaspoon baking powder
- 1/4 teaspoon salt
- 7 ounces marshmallow fluff one jar
- 1/2 cup graham cracker crumbs
Instructions
- Preheat oven at 350-degrees. Line an 8x8 or 9x9 pan with heavy foil and apply butter or nonstick spray.
- In a microwave safe bowl, heat the butter and 1 cup of chocolate chips in brief bursts until fully melted and smooth; watch it carefully and stir well between each burst. Stir in the white sugar, followed by eggs, flour, baking powder, and salt.
- Pour half the chocolate batter into the ready pan and spread into an even layer. Add small dollops of the marshmallow fluff across the top; it will be gloppy and sticky, so don't worry about getting it even.
- Sprinkle graham cracker crumbs over the fluff and batter. Drop dollops of the rest of the chocolate batter on top along with the remaining 1 cup chocolate chips. Even out a bit, then use a butter knife or narrow spatula to swirl the layers together for a marbled effect. It may be mountainous in some areas but it will even out as it bakes.
- Bake until the top is crinkled and edges are pulling away from the sides of the pan, about 25 to 30 minutes. Let cool at room temperature for an hour, then stash in the fridge for another few hours to completely cool.
- Use the foil to lift the contents onto a cutting board to slice into bars. Store in a sealed container in fridge, waxed paper between stacked layers to prevent sticking. Keeps for up to three days, or freeze for later enjoyment.
OM NOM NOM!
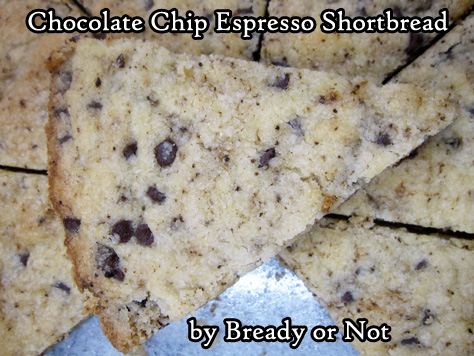
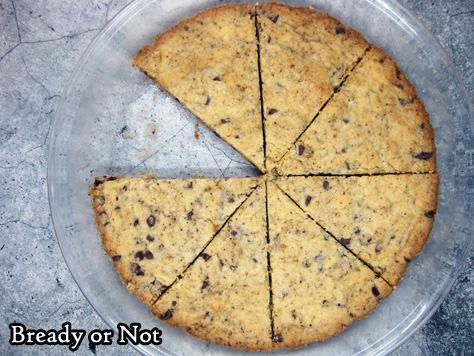
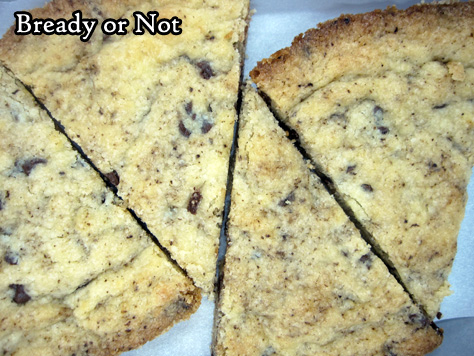
Bready or Not Original: Chocolate Chip Espresso Shortbread
Basic Scottish shortbread is one of the awesomest things in the world. It’s also a blank canvas for variations beyond count. Chocolate chips and a jolt of espresso add extra oomph to this new spin!
Pride O’ Scotland Shortbread was one of the first recipes I considered ‘mine’ as a teenager. It became the one thing I made each year for our family’s Thanksgiving potluck.
Appropriately, it’s also something I made for my husband the very first day I met him when I was 18. (Yes, he was an almost total stranger. Yes, I welcomed him with shortbread. Because that’s what I do.)
I considered the recipe sacrosanct the past two decades… and then I got an idea. Chocolate. Espresso powder. It had to be good, right? Or would it be a crumbly mess?

Yes indeed, it turned out to be delicious. No, it remained as cohesive as ever. Yay!
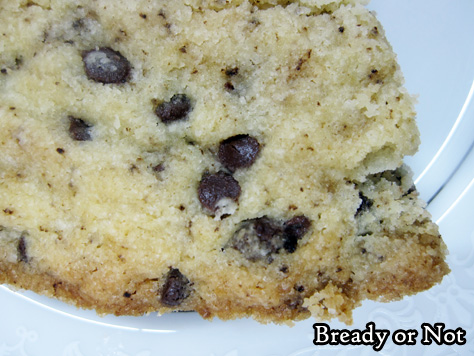
Espresso powder is fantastic along with chocolate; I include it in most every brownie recipe. The coffee flavor doesn’t come in strong (I actually hate coffee), but it make the chocolate taste bolder and more nuanced.
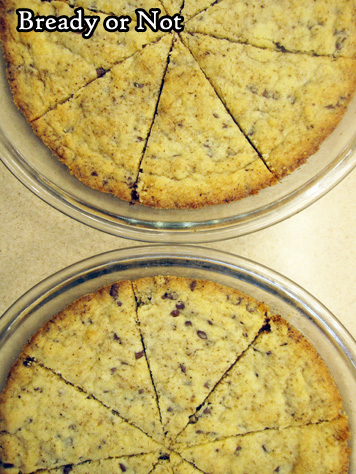
Bready or Not Original: Chocolate Chip Espresso Shortbread
Equipment
- two basic 9-inch pie plates
Ingredients
- 2 cups all-purpose flour
- 3/4 cups white sugar
- 1 teaspoon espresso powder
- 1/4 teaspoon salt
- 1 cup unsalted butter softened, 2 sticks
- 1 egg yolk
- 1 teaspoon vanilla extract
- 1/2 cup mini chocolate chips
Instructions
- Place flour, sugar, espresso powder, and salt in mixing bowl; add butter, egg yolk, and vanilla. Mix with fingers until dough holds together, then fold in the mini chocolate chips. Once chips are distributed, divide dough into two balls and press each ball into a pan. Flatten evenly with palms and prick surface all over with floured fork. Slash into wedges.
- Bake for 17 to 22 minutes, until the edges are golden brown. Remove from oven. Immediately cut again following slash marks and carefully run the blade around the edge of the crust to loosen the shortbread.
- Let shortbread cool. Cut again along slash marks and the crust, then remove wedges to eat. Shortbread keeps in sealed container for several days.
OM NOM NOM!
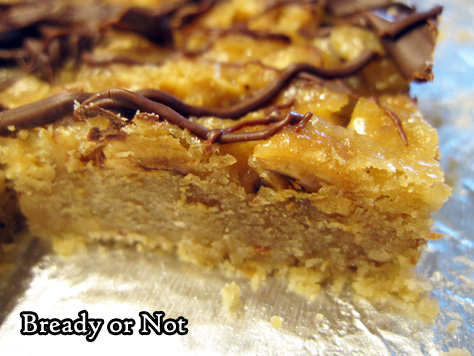
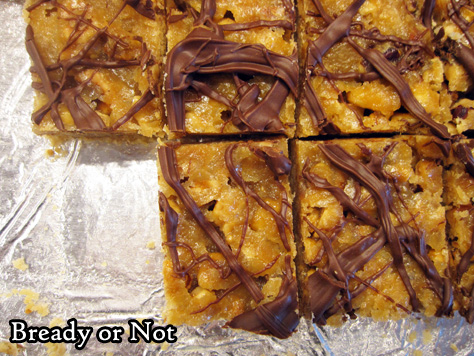
Bready or Not Original: Hazelnut Praline Bars
These delicious Hazelnut Praline Bars are a lot like praline candy, but it fantastic bar form.
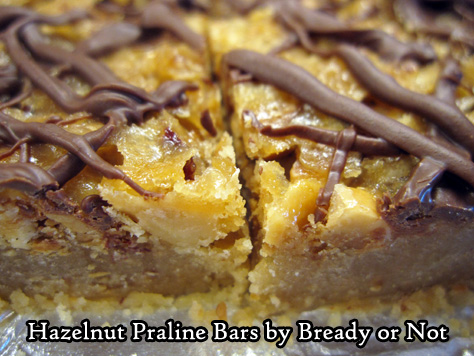
The top of these bars caramelizes. These things are very sweet, with the nuts rendered softly crunchy. The combination of textures is just divine.
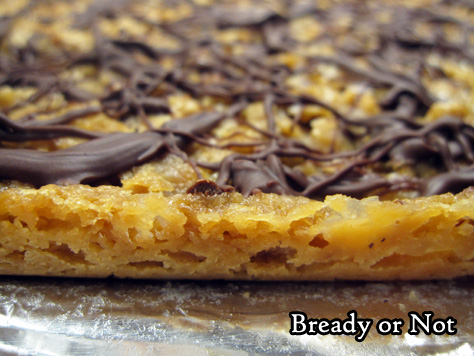
The slight drizzle of chocolate on top is the perfect accent, too. Funny how the tiniest bit of chocolate adds so much in terms of flavor.
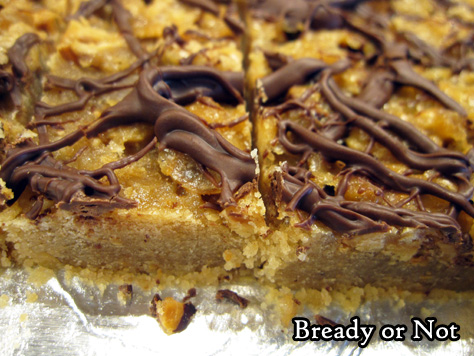
A 6 ounce bag of hazelnuts will be the perfect amount for both the crust and nut layer, too.
Can you use other nuts? I haven’t tried it in this recipe, but why not? Praline candy traditionally uses pecans, after all. I bet using other nuts–or a combo–would be fine.
Hazelnuts are sure delicious and fun, though!

Bready or Not Original: Hazelnut Praline Bars
Equipment
- 13x9 pan
- food processor
- small saucepan
Ingredients
Crust
- 1/2 cup hazelnuts
- 1 cup brown sugar packed
- 3/4 cup unsalted butter softened, 1 1/2 sticks
- 2 cups all-purpose flour
Nut Layer
- 1 cup hazelnuts
- 13 Tablespoons unsalted butter
- 1/2 cup brown sugar packed
Topping
- 1/2 cup milk chocolate chips
Instructions
- Preheat oven at 350-degrees. Line a 13x9-inch pan with foil and apply nonstick spray or butter.
- Place the 1/2 cup hazelnuts in a food processor. Process until finely ground.
- In a medium bowl, beat together the next two crust ingredients, the brown sugar and butter. Add the flour and ground hazelnuts. Press crust into pan; a piece of wax paper and a heavy glass makes it easy to form an evenly compressed layer. Bake for 10 minutes.
- In the meantime, put the remaining hazelnuts in the food processor and give them a quick pulse, just to coarsely chop them.
- As soon as the crust comes out, sprinkle the hazelnuts over the top. In a small saucepan, warm the butter and brown sugar to boiling at medium heat. Boil for a minute. Pour over hazelnuts.
- Bake for 15 to 18 minutes, until edges are bubbling and center is set. Cool completely.
- In a small microwave-safe bowl, zap the chocolate in 25 second bursts, stirring well between each pass, until it can be stirred smooth. Use a fork to drizzle the chocolate over the bars.
- Chill in fridge for 30 minutes, or until chocolate is set. Use the foil to lift contents onto a cutting board and slice into bars.
- Store in a sealed container at room temperature or in the fridge with waxed paper or parchment between the layers.
