


Bready or Not Original: Red Velvet Cookies
Last month I shared a recipe for Red Velvet Brownies in Two Sizes. Today, I share a Red Velvet Cookie recipe.

These things are just so pretty. Use enough food gel to achieve a vivid red that contrasts with the white chocolate chips. The cocoa in the dough comes through in flavor, as do the chips. Really, these are fantastic for chocolate lovers.

Two notes of caution: first of all, the dough needs to chill prior to baking, as it is quite sticky, and two, if you stack the baked cookies, they might stick together, so use something like waxed paper between the layers.

Bready or Not Original: Red Velvet Cookies
Equipment
- plastic wrap
- parchment paper
- cookie scoop or spoon
- waxed paper
Ingredients
- 2 cups all-purpose flour
- 2 Tablespoons unsweetened cocoa powder sifted
- 1/2 teaspoon baking soda
- 1/2 teaspoon baking powder
- 1/2 teaspoon salt
- 1/2 cup unsalted butter (1 stick) room temperature
- 1/2 cup white sugar
- 1/2 cup brown sugar packed
- 2 large eggs room temperature
- 1 teaspoon vanilla extract
- 1/4 cup vanilla yogurt or plain yogurt or sour cream
- red gel food coloring
- 1 bag white chocolate chips
Instructions
- Combine flour, cocoa powder, baking soda, baking powder, and salt in a medium bowl. Set aside.
- In a mixing bowl, beat together the butter and two sugars until they are pale and fluffy. Add the eggs one at a time followed by the vanilla. Gradually mix in the dry ingredients followed by the yogurt or sour cream. Add a few squirts of red gel food coloring, mixing in until the entirety of the dough is colored and reaches the desired depth of color. Measure out 1 1/2 cups white chocolate chips. Fold them into the dough. Reserve the rest of the bag for topping later.
- Wrap dough in plastic wrap and chill for at least 2 hours, or overnight.
- Preheat oven at 375 degrees. Line a baking sheet with parchment paper.
- Use a small cookie scoop or teaspoon to dole out round of dough spaced out on the sheet. Add a couple of the reserved white chocolate chips atop each round.
- Bake 10 to 12 minutes, until cookies are set, then let them rest on the sheet 5 to 10 minutes before transferring to a cooling rack.
- If stacking the cookies in a container, place waxed paper between the layers to prevent the cookies from slumping together. Cookies will keep well for at least 3 days stored in a sealed container at room temperature.
OM NOM NOM!
Bready or Not Original: Red Velvet Brownies in Two Sizes
I really think the pictures do justice to how incredible these Red Velvet Brownies are. They are beautiful to the eyes and delicious to the tongue.

I’m offering up this recipe in two sizes, too: a version for a smaller pan (8×8 or 9×9) and another for a full 9×13 pan. Note that even the small pan makes a lot of brownies. These are rich enough that they feel indulgent if you have a square about the size of a fudge serving.

Another nice thing: these keep for at least a week in a sealed container. I suppose further testing is in order to see if they keep beyond that!

Bready or Not Original: Red Velvet Brownies (8×8 or 9×9 size)
Equipment
- 8×8 or 9×9 pan
- aluminum foil
- nonstick spray or extra butter
Ingredients
- 1 1/4 cup all-purpose flour
- 3 Tablespoons cocoa powder sifted
- 1 Tablespoon cornstarch
- 1/4 teaspoon salt
- 3/4 cup unsalted butter (1 1/2 sticks) melted and cooled slightly
- 1 1/4 cups white sugar
- 2 large eggs room temperature
- 1 teaspoon vanilla extract
- gel red food coloring
- 1 teaspoon white vinegar
- 1 cup white chocolate chips
Instructions
- Preheat oven to 350 degrees. Line the pan with foil going up the sides. Apply nonstick spray or butter.
- In a small bowl, stir together flour, cocoa, cornstarch, and salt.
- In a large mixing bowl, beat together the melted butter and sugar. Add the eggs. Drip in the red food coloring, mixing it in, adding enough to reach the desired color. Add vanilla extract and vinegar. Gradually work in the dry ingredients, scraping the bottom of the bowl a few times. Fold in the white chocolate chips.
- Dollop batter into the pan. Use an uneven spatula to level out the surface. Bake for 28 to 30 minutes, until the middle passes the toothpick test.
- Let cool completely, speeding process in the fridge if desired. Use the foil to lift it onto a cutting board to cut into small bars.
- Store in a sealed container at room temperature. They keep for at least a week.
OM NOM NOM!
Bready or Not Original: Red Velvet Brownies (9×13 size)
Equipment
- 9×13 pan
- aluminum foil
- nonstick spray or extra butter
Ingredients
- 2 1/2 cups all-purpose flour
- 6 Tablespoons cocoa powder sifted
- 2 Tablespoons cornstarch
- 1/2 teaspoon salt
- 1 1/2 cups unsalted butter (3 sticks) melted and cooled slightly
- 2 1/2 cups white sugar
- 4 large eggs room temperature
- 2 teaspoons vanilla extract
- gel red food coloring
- 2 teaspoons white vinegar
- 11 ounces white chocolate chips 1 bag
Instructions
- Preheat oven to 350 degrees. Line the pan with foil going up the sides. Apply nonstick spray or butter.
- In a small bowl, stir together flour, cocoa, cornstarch, and salt.
- In a large mixing bowl, beat together the melted butter and sugar. Add the eggs. Drip in the red food coloring, mixing it in, adding enough to reach the desired color. Add vanilla extract and vinegar. Gradually work in the dry ingredients, scraping the bottom of the bowl a few times. Fold in the white chocolate chips.
- Dollop batter into the pan. Use an uneven spatula to level out the surface. Bake for 30 to 33 minutes, until the middle passes the toothpick test.
- Let cool completely, speeding process in the fridge if desired. Use the foil to lift it onto a cutting board to cut into small bars.
- Store in a sealed container at room temperature. They keep for at least a week.
OM NOM NOM!
Bready or Not Original: Toffee Blondies
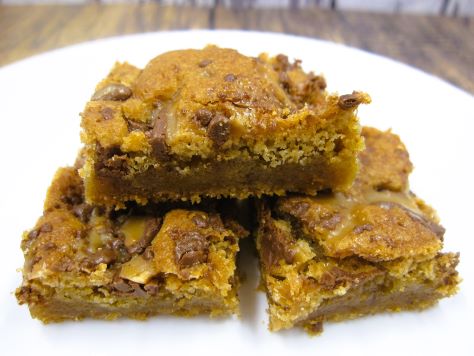
Why have a candy bar when you can have a chewy, luxurious treat that’s filled with candy bar pieces? These Toffee Blondies are a glorious combination of textures and sweetness.

If you can find it, use an 8 ounce bag of Heath Bits that include chocolate. All is not lost if that is unavailable, though. You can chop up normal Heath Bars, or use an all-toffee bag and add separate chocolate.

The result is a thick, chewy bar with crunchy little bits of toffee and pockets of chocolate. These things keep for days, too.
Bready or Not Original: Toffee Blondies
Equipment
- 9×13 pan
- aluminum foil
- nonstick spray
Ingredients
- 2 cups all-purpose flour
- 2 cups brown sugar packed
- 2 teaspoons baking powder
- 1/4 teaspoon salt
- 1/2 cup unsalted butter (1 stick) melted and cooled
- 2 large eggs room temperature
- 1 teaspoon vanilla extract
- 8 ounces Heath Bits with Chocolate
Instructions
- Preheat oven at 350 degrees. Line a 13×9 pan with foil and apply nonstick spray.
- In a bowl, mix together the flour, brown sugar, baking powder, and salt. Set aside.
- In a large bowl, beat the butter, eggs, and vanilla until smooth. Gradually mix in the dry ingredients. Fold in about 2/3 of the Heath Bits.
- Scoop the thick batter into the prepared pan and level out with an uneven spatula. Sprinkle the rest of the Heath pieces over the top.
- Bake for 24 to 27 minutes. Middle should be set and pass the toothpick test. Cool to room temperature, speeding the process in the fridge if desired.
- Use the foil to lift onto cutting board to slice into bars. Store in a sealed container at room temperature. They will keep for up to 3 days.
OM NOM NOM!
Bready or Not Original: Raspberry-Almond-Chocolate-Oatmeal Cookies
Merry Christmas to those of you who celebrate, and warm wishes to visitors of any or no faith!

The name for these cookies is a mouthful, but that list of ingredients lets everyone know that these aren’t standard Oatmeal Cookies. No, these Raspberry-Almond-Chocolate-Oatmeal Cookies are loaded with flavors and textures with nary a raisin in sight.
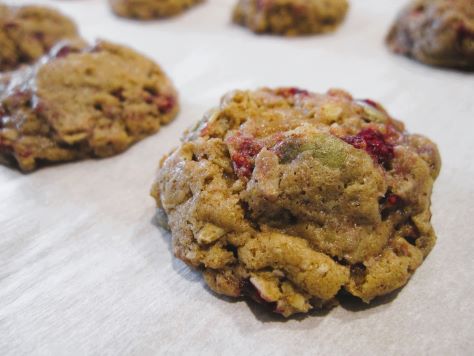
The chocolate is optional here, but I really do love that chocolate-raspberry combo. It adds some oomph (and results in a few more cookies). Only use mini chips, though, or you’ll likely have cohesion issues.
Bready or Not Original: Raspberry-Almond-Chocolate-Oatmeal Cookies
Equipment
- parchment paper
- kitchen shears
- small cookie scoop or teaspoon
Ingredients
- 3/4 cups frozen raspberries unthawed
- 1/4 cup unsalted butter room temperature
- 1/4 cup almond butter room temperature
- 1/2 cup brown sugar packed
- 1/4 cup white sugar
- 1 large egg room temperature
- 1 teaspoon vanilla extract
- 1/4 teaspoon almond extract
- 3/4 cup all-purpose flour
- 1/2 teaspoon baking soda
- 1/2 teaspoon ground cinnamon
- 1/4 teaspoon ground nutmeg
- 1/4 teaspoon salt
- 1 1/2 cups old fashioned rolled oats
- 1/4 cup pepitas
- 1/2 cup mini chocolate chips optional but awesome
Instructions
- Preheat the oven to 350 degrees. Line a baking sheet with parchment paper.
- Use kitchen shears to gently shatter apart the frozen raspberries into a measuring cup. Set cup in freezer again as the rest of the dough is formed.
- In a large bowl, beat together butter, almond butter, brown sugar, and white sugar until light and fluffy. Add in eggs, vanilla, and almond extract. Follow up with flour, baking soda, cinnamon, nutmeg, and salt. Stir in oats and pepitas until combined.
- If using, fold in the mini chocolate chips. Gently fold in frozen raspberries until evenly dispersed in the dough. Note that if an excess of raspberry bits are left until the end, the dough will be especially wet and harder to work with.
- Use a small cookie scoop or teaspoon to form balls about 1 inch apart onto the prepared baking sheet. Bake until cookies are set, 9 to 10 minutes. Chill remaining dough while a batch bakes.
- Allow cookies to cool 5 minutes on the baking sheet before removing to a wire rack to cool completely. Store in a sealed container at room temperature.
OM NOM NOM!
Bready or Not Original: Chewy Honey Peppermint Bark Cookies
I’ve shared a sequence of Peppermint Bark Cookies, but this one is my favorite: Chewy Honey Peppermint Bark Cookies.

The base “Chewy Honey” recipe here will be a familiar one to regulars on Bready or Not–or if you’ve met me at a convention at some point in about the past 10 years and had my Maple or Snickerdoodle versions. This new version is modified to incorporate lots of chopped peppermint bark candy.

As with the similar recipes, the quality of the peppermint bark will not only make a difference in taste but also the prettiness.

As with the other recipes in my “Chewy Honey” collection, these baked cookies will keep for weeks in a sealed container. That makes them great to mail as a holiday gift, but of course, be wary if you’re sending them to or from a warm destination. In an infernal place like Arizona (which I am so glad to be away from), it can still be hot, even into December!
Bready or Not Original: Chewy Honey Peppermint Bark Cookies
Equipment
- cookie scoop or spoon
- parchment paper
Ingredients
- 3/4 cup unsalted butter softened
- 1/2 cup light brown sugar packed
- 1/2 cup white sugar
- 2 Tablespoons honey
- 1 large egg room temperature
- 1 Tablespoon vanilla extract
- 1/2 teaspoon peppermint extract
- 1 cup bread flour
- 1 cup all-purpose flour
- 2 teaspoons cornstarch
- 1 teaspoon baking soda
- 1/2 teaspoon salt
- 1 1/2 cups peppermint bark chopped
- more peppermint bark pieces for topping
Instructions
- In a large bowl, beat butter until smooth. Add both sugars and honey; beat until creamy and fluffy. Scrape down sides of bowl, then mix in the egg and both extracts.
- In a separate bowl, combine the dry ingredients: bread flour, all-purpose flour, cornstarch, baking soda, and salt. Sift together.
- Slowly stir together the wet ingredients and flour mix until just combined. Fold in the peppermint bark. Encase dough in plastic wrap and stash in the fridge for several hours or days; dough can also be frozen at this stage.
- When ready to bake, preheat the oven at 350 degrees. Place parchment paper on cookie sheet. Use a teaspoon or tablespoon to space out cookies on the pan. Press additional peppermint bark pieces into the tops of the dough balls.
- Small cookies bake 9 to 12 minutes; larger cookies bake in 11 to 13 minutes. Once removed from the oven, let set on baking sheet for about 10 minutes before transferring to a rack to cool completely.
- Stored cookies will keep in a sealed container for weeks. They are excellent for travel or shipping.
OM NOM NOM!
Bready or Not Original: White Chocolate-Peppermint Bark Cookies
Last week, I posted a Peppermint Bark Cookies recipe modified from Bake from Scratch Magazine. This week, I share a reworked version of the White Chocolate Macadamia Nut Cookies I’ve made for about two decades. This White Chocolate-Peppermint Bark Cookies recipe includes white chocolate melted into the dough, resulting in a smooth, sweet cookie that gets only better with the addition of peppermint bark.

A whole bag of white chocolate chips is included in this recipe. A cup is melted for the dough; the rest is added as chips, right along with the coarsely chopped peppermint bark.

These cookies are incredible. I preferred them over last week’s take, though both are excellent.

Modified from Bready or Not: White Chocolate Macadamia Nut Cookies.
Bready or Not Original: White Chocolate-Peppermint Bark Cookies
Equipment
- microwave-safe small bowl
- cookie scoop or spoon
Ingredients
- 10 ounces white chocolate chips divided
- 2/3 cup white sugar
- 11 Tablespoons unsalted butter room temperature
- 1 teaspoon vanilla extract
- 1/2 teaspoon peppermint extract
- 2 large eggs room temperature
- 2 1/2 cups all-purpose flour
- 1 teaspoon baking soda
- 1 teaspoon cream of tartar
- 2 cups peppermint bark coarsely chopped, divided (about 12 ounces)
Instructions
- Preheat oven to 325 degrees. Place 1 cup of white chocolate chips in a microwave safe bowl. Microwave on 50% power in short increments, 20-25 seconds, and stop to stir between passes until the chips blend smoothly; take care, as it can burn fast! Set aside to cool.
- In a large mixing bowl, beat together the sugar, butter, vanilla, and eggs until they are creamy. Mix in the melted chips. Stir in flour, baking soda, and cream of tartar. Fold in the remaining chips and 1 cup of peppermint bark.
- Use a tablespoon cookie scoop or spoon to place dough in rounded lumps on cookie sheet. Using the reserved stash of peppermint bark, press a few pieces onto the top of each dough ball. Bake 10 to 12 minutes, until the tops just begin to turn light golden brown. Immediately add a few more pieces of peppermint bark onto the top of each cookie. Cool on the sheet for several minutes, then move to a rack to set for about 3 hours; this process can be speeded up by briefly placing cookies in the fridge.
- Store in a sealed container at room temperature. Best eaten within 5 days.
