


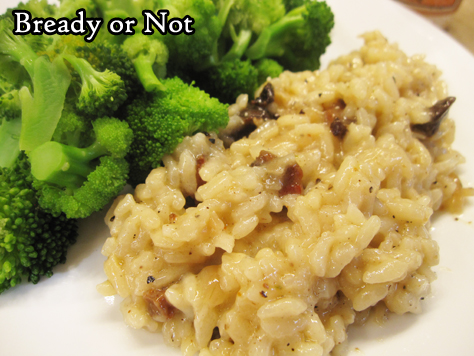
Bready or Not Original: Pancetta Risotto
This Pancetta Risotto is a fantastic meal for two people, or a delicious side for a group. It’s time-consuming but very straightforward to make.
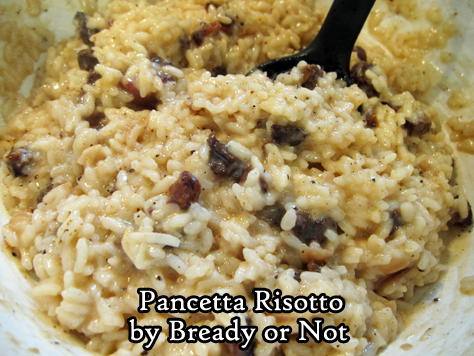
I confess, I spent years being intimidated by the very idea of a risotto. I would see it done on cooking shows. So much stirring! When I finally got up the gumption to give it a try, I found risotto wasn’t hard at all. It really is about lots of stirring.
This recipe here is my fancy occasion recipe, especially when I have some good pancetta on hand, such as the kind carried by Smoking Goose Meatery out of Indianapolis.

As for the wine, I’ve tried this with fancier Sauvignon Blanc from Total Wine (Cloudy Bay from New Zealand) as well as a $6 Trader Joe’s Coastal Sauvignon Blanc. Both versions turned out great! You don’t need to go all-out, but get something that is (hopefully) drinkable with the finished meal.
Bready or Not Original: Pancetta Risotto
Equipment
- large stock pot
- medium saucepan
Ingredients
- 8 oz pancetta diced
- 1 Tablespoon dried shallots or fresh shallot, finely minced
- 3 cloves garlic minced
- 1 1/4 cups Arborio rice
- 1 cup dry white wine Sauvignon Blanc works well
- 4 cups chicken broth or chicken stock, equal to a 32 oz box or 2 cans
- 1/2 cup shredded Parmesan or Pecorino Romano or Grana Padano, plus more to top rice
- salt and pepper to taste
Instructions
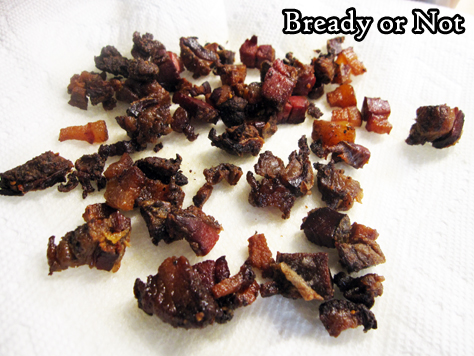
- In a large stock pot, cook the pancetta for 10 to 12 minutes, until it starts to turn brown and crispy. At the same time, on another stove burner, use a medium sauce pan to bring the chicken broth to a very low simmer.
- Use a slotted spoon to transfer pancetta to a paper towel-lined plate; set aside. Add dry shallots and garlic to the fat in the big pot. Sauté for two minutes. Add the Arborio rice and a pinch of salt. Sauté another 2 minutes, until the rice looks glossy with translucent edges.
- Add the white wine and stir until it is absorbed. Add chicken broth in 1/2 cup increments, stirring well after each addition until it is absorbed. After about 12 to 15 minutes, when most of the broth has been added, begin to taste the rice. The goal is a chewy, al dente consistency. Add more broth as needed, and remember to turn off the burner for the broth pot when it is empty.
- When the rice is creamy and al dente, stir in the pancetta and cheese. Taste the risotto again, adding more salt and pepper as needed. Serve with the remaining white wine.
OM NOM NOM!
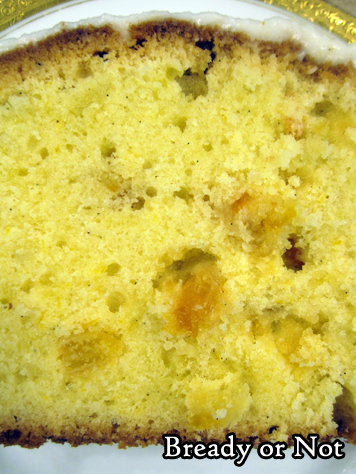
Bready or Not: Glazed Citrus Loaf Cake
For times when you want some cake, not a huge cake, this Glazed Citrus Loaf Cake is about perfect.
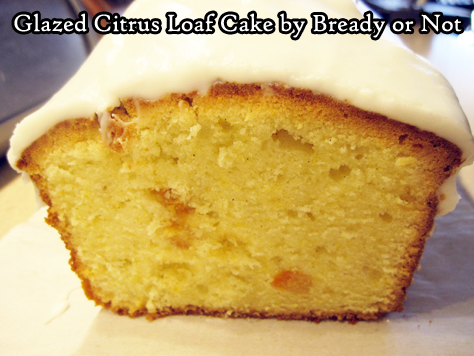
It’s not some huge thing to store. It doesn’t take forever to make. It’s easy to slice up, individually wrap, and freeze portions for later.
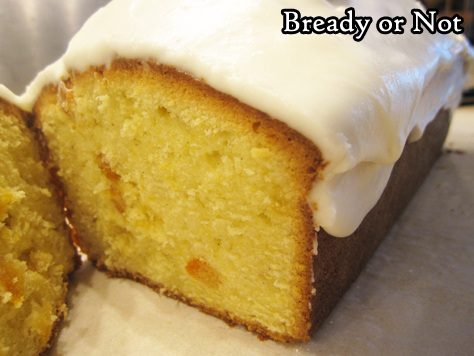
Plus, it’s delicious. The cake is like a pound cake, soft and moist, with lemon and orange zest throughout. The bits of candied orange add a different texture in the mix.
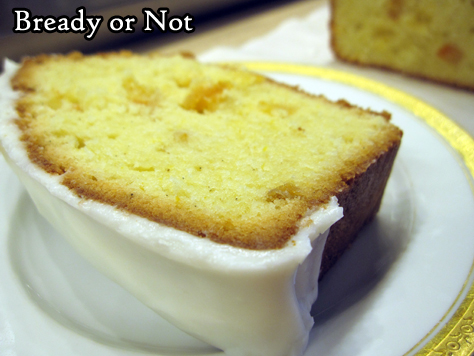
Then there’s that luscious glaze. It’s not a heavy frosting, but a boost of sweetness to balance the zing of the citrus.
This is a great spring and summer kind of kind, one that tastes fresh and bright!
I modified this recipe from my favorite food magazine, Bake from Scratch, the March/April 2020 issue.
Bready or Not: Glazed Citrus Loaf Cake
Equipment
- 9x5 loaf pan
- parchment paper
Ingredients
Loaf
- 1 cup unsalted butter (2 sticks) softened
- 1 1/4 cups white sugar
- 2 medium lemons
- 1 medium orange
- 4 large eggs room temperature
- 2 teaspoons vanilla bean paste
- 2 cups cake flour
- 3/4 teaspoon kosher salt
- 1/4 teaspoon baking powder
- 1/3 cup milk room temperature
- 1 teaspoon cake flour
- 1/2 cup candied orange slices finely chopped
Vanilla Glaze
- 1 1/2 cup confectioners' sugar plus more if needed
- 2 Tablespoons half & half or heavy cream
- 2 Tablespoons unsalted butter melted
- 1 teaspoon vanilla extract
- 1/4 teaspoon kosher salt
Instructions
- Wash, dry, and zest both lemons and orange. Set aside the fruit for another use.
- Preheat oven at 325-degrees. Cut a piece of parchment paper to fit into a loaf pan and extend up the long sides, like a sling. Apply nonstick spray in pan, then press in parchment and add more spray. Set aside.
- In a big bowl, beat butter, sugar, and zests together until they are fluffy, scraping the sides of the bowl often. Add eggs one by one, followed by the vanilla paste. The batter may look a bit curdled.
- In a separate medium bowl, combine the flour, salt, and baking powder. Gradually add it into the butter mix along with the milk. Batter will now be thick.
- In a small bowl, toss together the candied orange bits and the teaspoon of cake flour to coat. Fold it into the batter.
- Pour everything into the prepared loaf pan and even out the top.
- Bake for 40 minutes. Rotate pan in oven. Bake for another 40 minutes. Test the middle with a toothpick for doneness, and bake for another 5 to 20 minutes, until the toothpick comes out clean.
- Let loaf cool in pan for 10 minutes, then use the parchment to lift it onto a rack to cool completely.
- Make the vanilla glaze by mixing together all the ingredients until they are smooth and at a thick, pourable consistency. Immediately drizzle and smear over the top of the cake, letting excess artfully drip over the sides. Let glaze set for 30 minutes, then slice in.
- Wrap cake and keep at room temperature. It can also be cut into individual slices and frozen for later enjoyment.
OM NOM NOM!
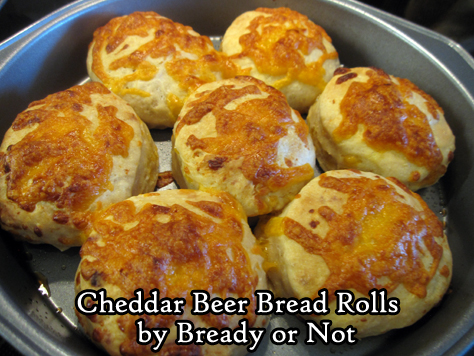
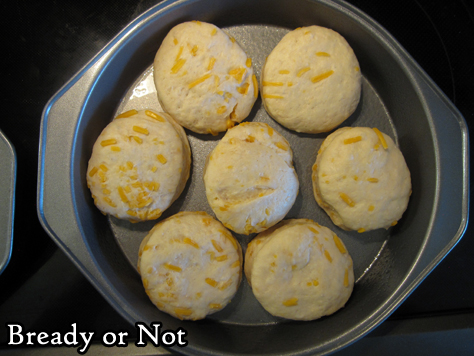
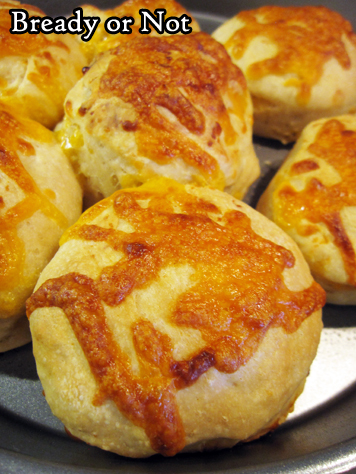
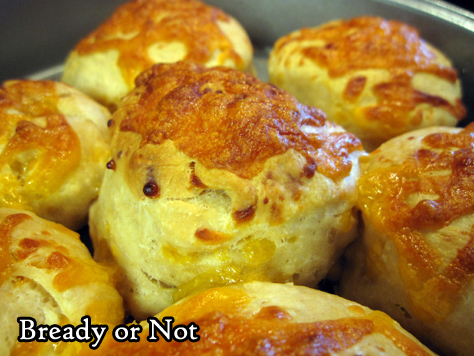
Bready or Not: Cheddar Beer Bread Rolls
These Cheddar Beer Bread Rolls taste as good as they look. Seriously.
When the pandemic sent everything topsy-turvy in spring 2020, my husband ended up working from home more often. That meant I needed to feed him more often.
So, like so many people, I started baking more bread. These rolls were among the first of my experiments, and they were a major hit.
The original recipe from New York Times Cooking made a huge batch of rolls. I needed enough rolls to feed one guy, with a extras frozen for later.
I rewrote the recipe to delicious results. I used a Guilt Lifter beer to make these, which lent a refreshing hoppy flavor. A heavier and darker beer will create heavier and darker flavor. Try different beers to suit your tastes and match your meal.
Bready or Not: Cheddar Beer Bread Rolls
Equipment
- 2 8-or 9-inch cake pans
- 2.5-inch round cutter
- plastic wrap
- basting brush
Ingredients
- 2 Tablespoons unsalted butter divided
- 3 cups all-purpose flour or bread flour
- 1/2 Tablespoons instant yeast
- 1 teaspoon coarse kosher salt
- 2 Tablespoons honey
- 1 cup beer room temperature
- 1 cup shredded cheese 120 grams
Instructions
- Divide the two tablespoons of butter in half, separating them to soften at room temperature.
- In a stand mixer with a bread hook attachment, stir together the flour, yeast, and salt. Follow up with 1 tablespoon of softened butter, honey, and beer. Mix on low speed for 4 minutes, scraping the bowl as needed. Increase the speed to medium for another 2 minutes, pulling the dough from the hook a few times. Add about half the cheese, reserving the rest to go on top later. Mix the cheese until it's distributed through the dough.
- Lightly grease a large bowl. Transfer the dough there and cover with plastic wrap or a towel to let it rise until it's about doubled in size, about an hour.
- Grease the two cake pans. Prepare a lightly floured surface and tip the dough onto it. Pat the dough out into a thick, even layer. Use the cutter to slice out rolls. Place them not quite touching in the pans. Reform scraps as much as possible to shape into more rolls. The rolls likely won't quite fill both pans.
- Cover pans with plastic wrap and set in a warm place to rise again for 35 to 45 minutes. They may not increase a lot in size, but they should look puffy.
- Preheat oven at 400-degrees.
- Pull out remaining pat of butter and cheese. Brush the soft butter over the rolls, and follow up with a sprinkling of cheese. Try to keep the cheese from touching the edge of the pan, where it could burn.
- Place both pans in the oven and bake until the rolls are browned and cheese is melted, 15 to 20 minutes. A digital thermometer in a center roll should read 190-degrees at minimum.
- Let cool for at least 10 minutes before (carefully) pulling apart and serving.
- Rolls can keep in a sealed bag at room temperature for up to 2 days. They can also be frozen and thawed for later enjoyment. They taste best hot. For best results, wrap them in foil and bake at 400 for about 10 minutes to warm them through.
OM NOM NOM!
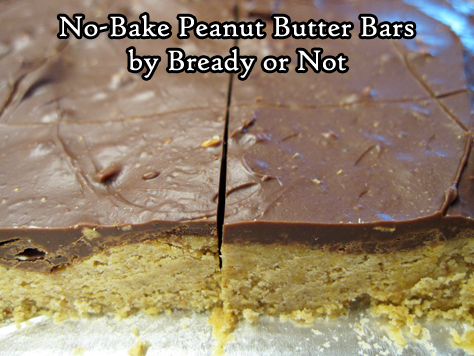
Bready or Not Original: No-Bake Peanut Butter Bars
When you need a dessert in a hurry, these delicious No-Bake Peanut Butter Bars are the way to go.
I especially enjoy this recipe because it doesn’t involve the oven, which is a wonderful thing during Arizona summers.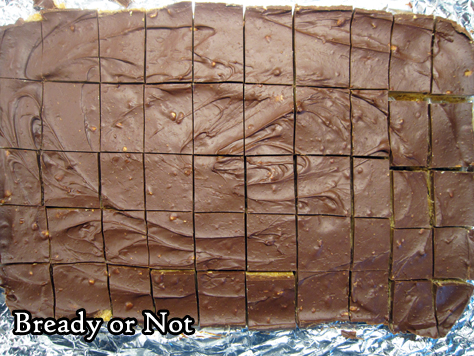
These bars come together in minutes thanks to a microwave, and they only need a few hours to set. You end up with an entire casserole dish of candy bars. Yum.
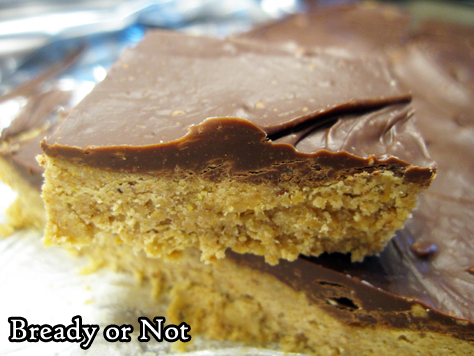
Use crunchy or creamy peanut butter. I used a jar from Trader Joe’s that had flaxseeds mixed in, and my son didn’t like it. This recipe gave me a way to use it up by sending the result with my husband to work!
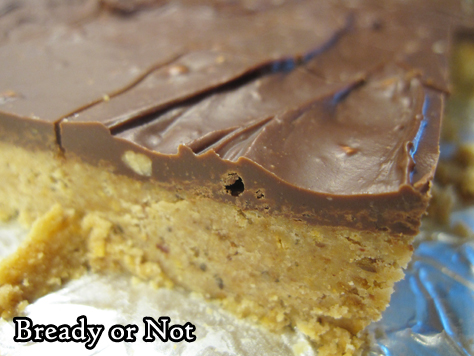
This would be an easy recipe to dress up, too. Add sprinkles, nuts, or cacao nibs atop the chocolate. Have fun with it!
Bready or Not Original: No-Bake Peanut Butter Bars
Equipment
- 13x9 pan
- large microwave-safe bowl
- uneven spatula
Ingredients
Bars
- 2 cups peanut butter crunchy or smooth
- 1 cup unsalted butter 2 sticks
- 2 cups graham cracker crumbs
- 2 cups confectioners' sugar
Ganache
- 1 1/2 cups chocolate chips semisweet, dark, milk, or a mix
- 1/4 cup peanut butter crunchy or smooth
Instructions
- Line a 13x9 pan with foil and apply nonstick spray or butter.
- In a large microwave-safe bowl, melt together the peanut butter and butter by zapping in short increments and stirring well between each pass. Once they mix together, stir in the graham cracker crumbs and confectioners' sugar. Spread the mixture into the prepared pan. Use a hands or maybe a piece of waxed paper and a heavy glass to compress the layer as much as possible.
- Use the same microwave-safe bowl to bowl for the chocolate chips and peanut butter, again zapping in brief increments and stirring well between each burst. Once they can mix together smoothly, dump dollops atop the layer in the pan. Use an uneven spatula to even out the chocolate to the edges.
- Chill in the fridge for at least 2 hours.
- Use the foil to lift the contents onto a cutting board. Let sit for about 10 minutes, enough time to soften the chocolate so that it doesn't shatter when sliced. Use a long knife or sharp bench knife to cut bars. If desired, cut off edges first to produce neater pieces to share.
- Store bars in a sealed container in the fridge with waxed paper between the layers. Keeps for days.
OM NOM NOM!
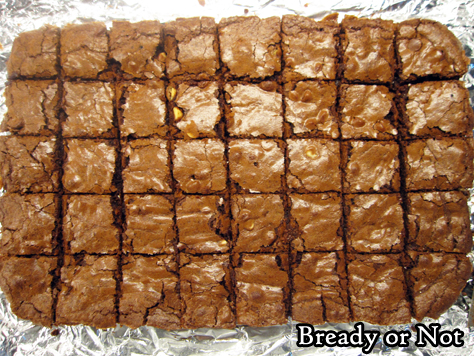
Bready or Not: Triple-Chocolate Brownies
These Triple-Chocolate Brownies are loaded with three kinds of chocolate, cocoa, and a unique blend of flours: all-purpose along with chickpea flour.
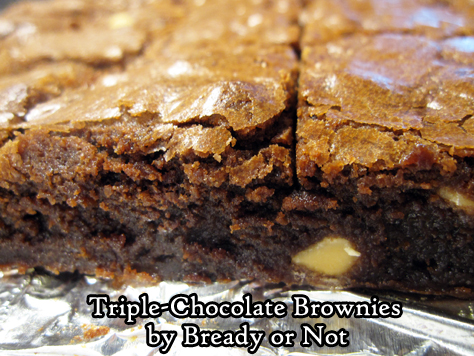
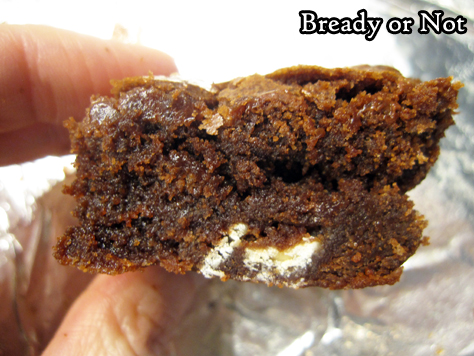
What does the chickpea flour do for the recipe? Well, it handles moisture differently. That makes these dense, moist, in a texturally more complex way than the usual all-wheat-flour brownies.
The flavor is also more complex. Soon after baking, these brownies taste almost like they have breakfast cereal mixed in. You can tell something is different.

Like a lot of chocolate baked goods, though, these taste better after a day. In these brownies, that means the complicated flavors deepen. They taste more chocolaty, more delicious.
If you don’t want to fuss with a big bag of chickpea flour, check out your local grocery or natural goods stores that have flours in bins. In the Phoenix area, that includes Sprouts and WinCo.
Once you make these brownies, though, you may want to make them again soon, so maybe a larger amount of chickpea flour isn’t a bad thing.
Modified from February 2020 Bake from Scratch/Bob’s Red Mill lesson.
Bready or Not: Triple-Chocolate Brownies
Equipment
- 9×13 baking pan
Ingredients
- 1 1/2 cups semisweet chocolate divided
- 1 1/4 cups milk chocolate chips divided
- 1 cup unsalted butter 2 sticks, cubed
- 1 cup white sugar
- 1 cup brown sugar packed
- 1 1/4 cups all-purpose flour
- 1/2 cup chickpea flour
- 1/4 cup Dutch process cocoa powder sifted
- 2 teaspoons kosher salt
- 1 teaspoon espresso powder
- 4 large eggs room temperature, lightly beaten
- 2 teaspoons vanilla extract
- 1/2 cup white chocolate chips
Instructions
- Preheat oven at 325-degrees. Line a 13×9 pan with foil and apply nonstick spray or butter.
- Using a double boiler on the stove top or a microwave-safe bowl in the microwave, melt together 1 cup of dark chocolate/semi-sweet chocolate chips, 3/4 cup milk chocolate chips, and butter. Heat until it can be stirred smooth. Remove from heat and stir in all of the sugar. Set aside.
- In a medium bowl, mix together both flours, cocoa powder, salt, and espresso powder. Set aside.
- Return to the chocolate bowl. Mix in the eggs and vanilla. Gradually fold in the dry ingredients, and follow up with the rest of the three kinds of chocolate chips. Spread the batter evenly in the prepared pan.
- Bake until the center passes the toothpick test, about 35 to 40 minutes. Cool completely at room temperature or speed the process in the fridge. Use the foil to lift the contents onto a cutting board. Slice into bars.
- Store in an airtight container in the fridge up to a week. Like many chocolate baked goods, these brownies will actually taste better after the first day as the flavor intensifies.
OM NOM NOM!
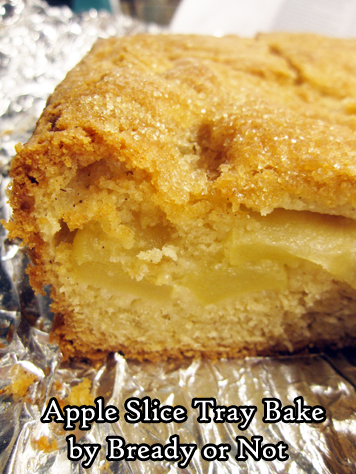
Bready or Not: Apple Slice Tray Bake
This Apple Slice Tray Bake would simply be an Apple Cake to most Americans. Whatever you call it, it’s packed with apples and delicious.
This is third consecutive recipe I’ve modified from the Bake from Scratch Magazine July/August 2020 Ireland-themed issue. I still have a few more things I want to try in the coming months, too!

I’ve found that French, Irish, and British apple cake recipes tend to be lighter on sugar and spices than typical American recipes. The focus is really on the apples.
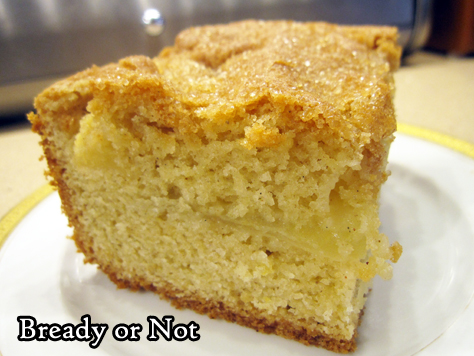
I used Honeycrisps here, which are one of my favorite apples to eat outright or bake with! Two big apples will work.
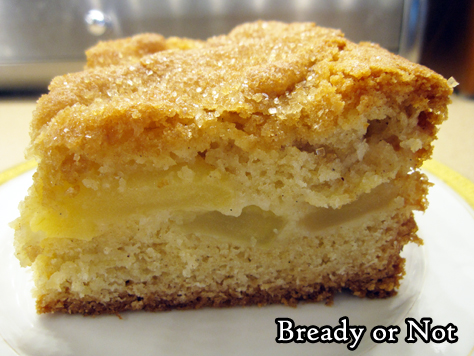
This bakes up light, lofty, and cakey, with a sugar-crusted top and a lovely flavor of apples throughout. The pieces freeze and thaw very well, too, meaning you can enjoy this like it is fresh but spread over days or weeks!
Bready or Not: Apple Slice Tray Bake
Equipment
- 9×9 baking pan
- uneven spatula
Ingredients
Apple layer:
- 2 large baking apples Honeycrisp work well
- 1 Tablespoon lemon juice
- 1 Tablespoon white sugar
Cake:
- 1 1/4 cups unsalted butter (2 and a half sticks) room temperature
- 1 1/2 cups white sugar
- 4 large eggs room temperature
- 1 1/2 teaspoons vanilla bean paste or substitute vanilla extract
- 3 cups all-purpose flour
- 3/4 teaspoon salt
- 4 1/2 teaspoons baking powder
- 1/2 teaspoon cinnamon
- 1/8 teaspoon allspice
- 2 Tablespoons turbinado sugar
Instructions
- Preheat oven at 350-degrees. Line a 9×9 pan with foil and apply nonstick spray.
- Peel and core the apples, then slice to about 1/4-inch thickness. Place slices in a large bowl and toss them with lemon juice and 1 Tablespoon white sugar, until apples are coated. Set aside.
- In a big mixing bowl, beat butter and white sugar for several minutes, until blended and fluffy. Add eggs, one at a time, mixing in well and scraping bowl afterward. Add vanilla. The batter may look curdled, but that’s okay.
- In a separate bowl, stir together flour, salt, baking powder, cinnamon, and allspice. Gradually mix the dry ingredients into the wet.
- Spread about half of the batter into the pan, using an uneven spatula to form an even layer. Arrange apple slices, flat side down, to cover the batter entirely. Top with the remaining batter, using the uneven spatula again to even out as much as possible. Sprinkle turbinado sugar all over the top.
- Bake until the middle of the cake passes the toothpick test, which will be from 1 hour to 1 hour and 15 minutes. Cover pan with foil about halfway through to prevent it from browning too much.
- Let cool in pan for an least 10 minutes, then use foil to lift cake onto a cutting board. Slice into squares. Tastes best warmed and at room temperature. Pieces can also be shrouded in plastic wrap and frozen for later enjoyment.
