


Bready or Not Original: Spiced Maple Macadamia Nut Cookies
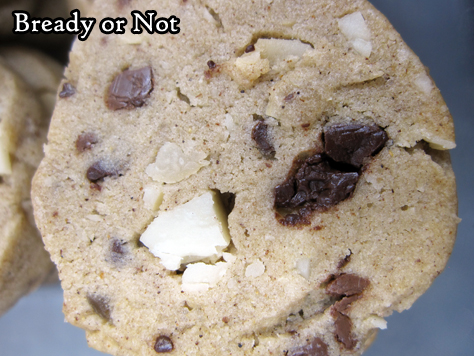
These Spiced Maple Macadamia Nut Cookies mix maple sweetness and warm spices and chocolate with the wonderful crunch of macadamias. They are perfect for fall–and throughout the year.
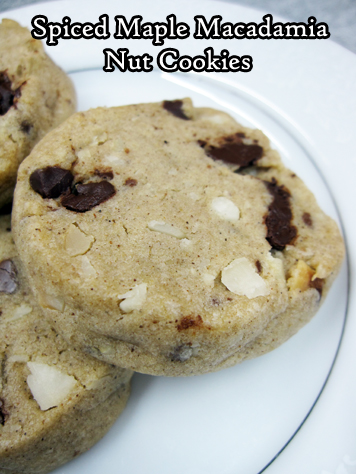
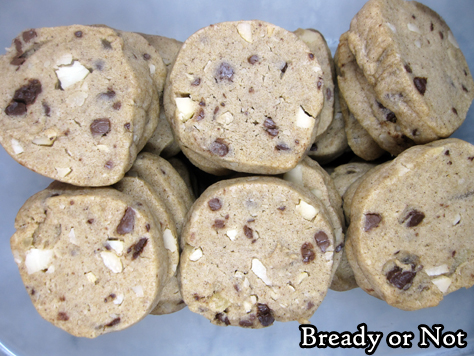
A food processor will be a big help in this recipe. The nuts and chocolate need to be in fine slivers. If the chunks are too big, the sliced cookies won’t be cohesive.
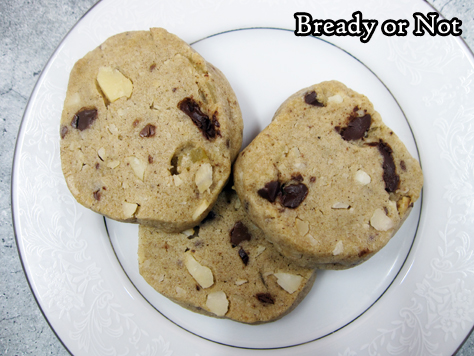
These are fridge cookies. Form the dough into tube shapes, wrap up well, then stash them in the fridge or freezer. Then thaw, slice, and bake when you need cookies.
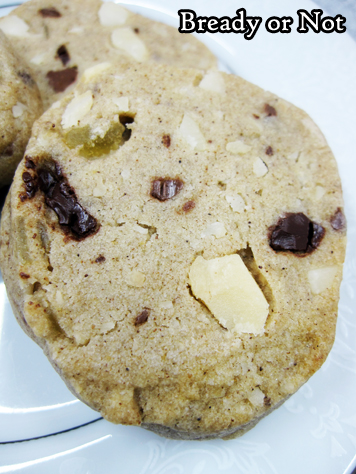
If you do the full batch at once, you’ll likely get a lot of cookies, depending on your tube size and how you slice them. I got about 70 cookies.
These are perfect cookies to warm up your belly on a cool autumn or winter night (or in Arizona, to make-believe in such a temperature shift).
Bready or Not Original: Spiced Maple Macadamia Nut Cookies
Equipment
- food processor
Ingredients
- 1 1/2 cups unsalted butter 3 sticks, room temperature
- 1/2 cup white sugar
- 3/4 cup real maple syrup
- 4 cups all-purpose flour
- 3 teaspoons ground ginger
- 3 teaspoons ground cinnamon
- 1 teaspoon allspice
- 1/2 teaspoon ground cloves
- 1 teaspoon salt
- 1 1/2 teaspoons baking soda
- 1 cup macadamia nuts
- 3/4 cup chocolate chips semisweet or dark or mixture
- 1/3 cup candied ginger finely chopped
Instructions
- In a food processor or by knife, finely chop macadamia nuts, followed by the chocolate chips. Set aside. (If these are not in fine pieces, the dough will fall apart when sliced.)
- In a large bowl, cream together butter and sugar until light and fluffy. Beat in maple syrup.
- In a separate bowl, stir together the flour, spices, salt, and baking soda. Gradually work this into the creamed mixture. Fold in the nuts, chocolate, and candied ginger until incorporated.
- Divide dough in half and shape into foot-long logs. Encase in plastic wrap. Chill at least two hours, or freeze for later baking.
- Preheat oven at 350-degrees. Unwrap log and cut dough into 1/4-inch thick medallions, reshaping with fingers as needed. Place spaced out on parchment-covered cookie sheet.
- Bake for 10 to 12 minutes, until set with a firm, golden base. Cool on pan for 5 minutes then move to rack to completely cool.
- Cookies keep for at least 3 days in sealed containers at room temperature.
OM NOM NOM!
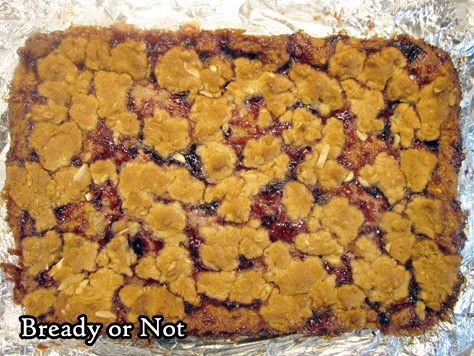
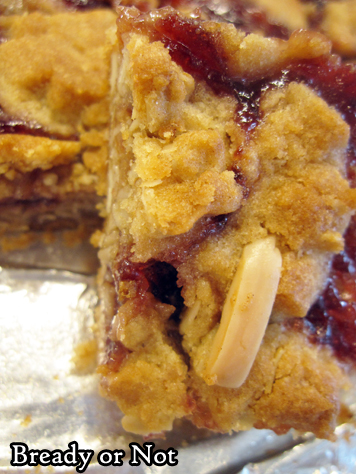
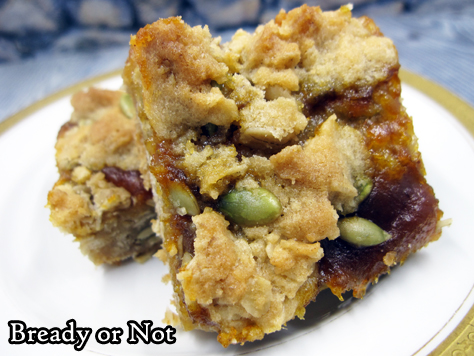
Bready or Not Original: Chewy Filled Bars
I present to you my Chewy Filled Bars: a versatile recipe that can use any number of fruit preserves, fruit butters, or other sweet filling, combined with different nuts or seeds, all to unique, delicious result.
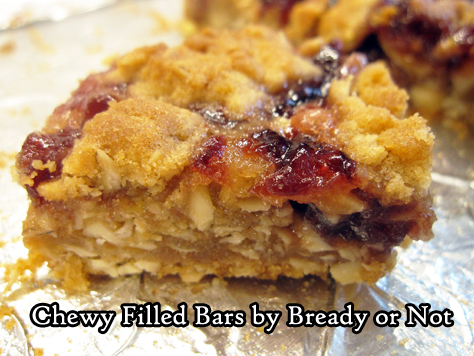
These pictures display the recipe using Sprouts Cherry Preserves (with slivered almonds and almond extract) and Sprouts Maple Pumpkin Butter (with pepitas and almond extract).
However, I also made the same recipe using Trader Joe’s cinnamon bun filling (with chopped pecans and vanilla extract) and Apple Cider Spread (with chopped walnuts and vanilla extract). Every single version was awesome.
The jarred filling I used varied from 12 to 14 ounces. All worked well, though the Cinnamon Bun Filling required a 40 minute bake to set. I liked mixing in different nuts or seeds to pair with the filling, but you could also omit that ingredient completely, if desired.
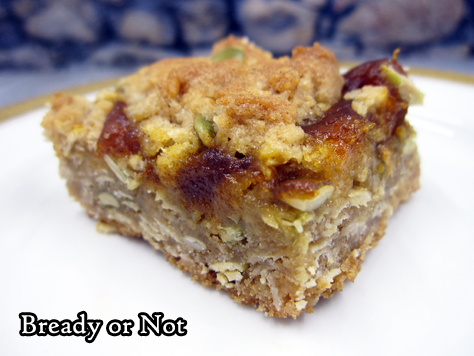
No matter the mix-ins, the result is a pleasantly thick, chewy bar that is just sweet enough.

Bready or Not Original: Chewy Filled Bars
Equipment
- 13x9 pan
Ingredients
- 1 cup unsalted butter room temperature
- 2 cups brown sugar packed
- 2 teaspoons baking powder
- 1 large egg
- 1 teaspoon almond extract or substitute vanilla extract
- 2 cups all-purpose flour
- 2 cups old-fashioned rolled oats
- 1/2 cup slivered almonds or sliced almonds or substitute other nuts or seeds
- 12 to 14 ounce fruit preserves or fruit butter or other sweet filling; possibilities include cherry preserves, pumpkin butter, cinnamon bun filling, etc
Instructions
- Preheat oven at 350-degrees. Line a 13x9 pan with aluminum foil and apply nonstick spray or butter.
- In a large bowl, beat butter until creamy. Add brown sugar and baking powder. Follow up with egg and almond extract. Gradually mix in flour, oats, and sliced almonds.
- Set aside 1 cup of dough. Press the rest into the bottom of the prepared pan. A piece of waxed paper and heavy glass will help to compress it into a form, even layer. Spread preserves over top. Crumble the reserved dough over the fruit.
- Bake for 30 to 35 minutes, until top is lightly brown and no longer wobbly in the middle. Completely cool at room temperature, speeding process in the fridge, if desired. Use foil to lift contents onto cutting board to slice up.
- Store in sealed containers with waxed paper or parchment between the layers. Keeps at room temperature for days, and can also be frozen for weeks.
OM NOM NOM!
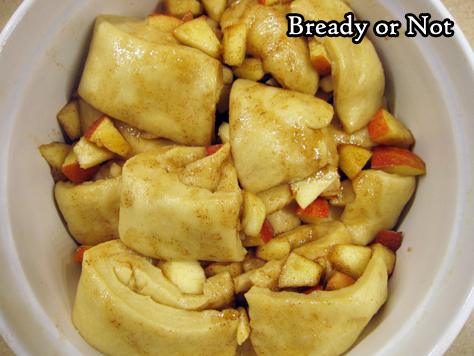
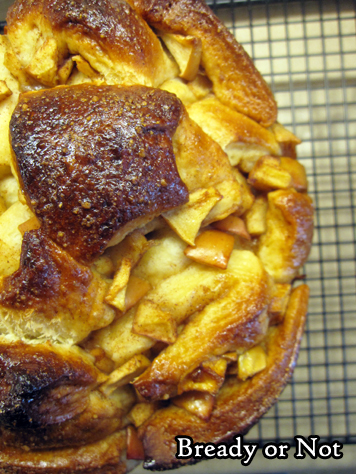
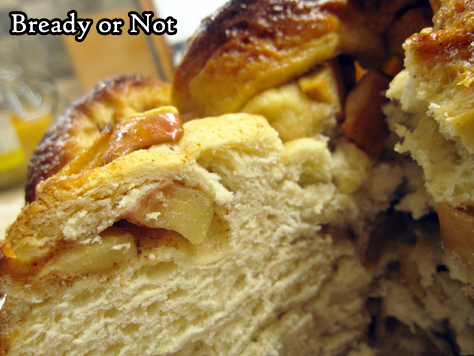
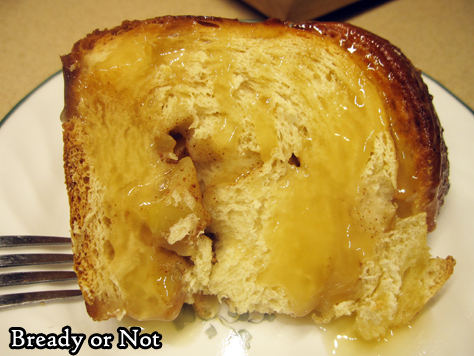
Bready or Not: Harvest Apple Challah
Welcome autumn with this big beautiful Harvest Apple Challah, packed with fruit and spice.
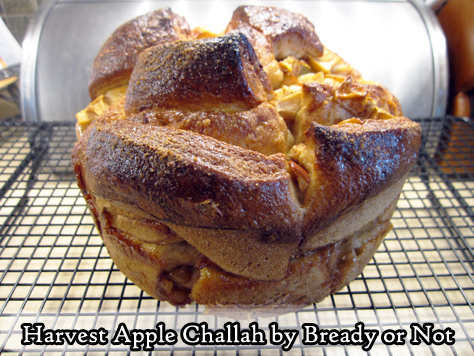
This recipe might look intimidating, but let me assure you, it’s not. The cutting stage is supposed to be messy.
Take comfort that this is not a loaf that is supposed to look tidy. The end goal is rustic–and delicious.
Challah is an enriched dough. Eggs and honey add extra richness plus soft texture.
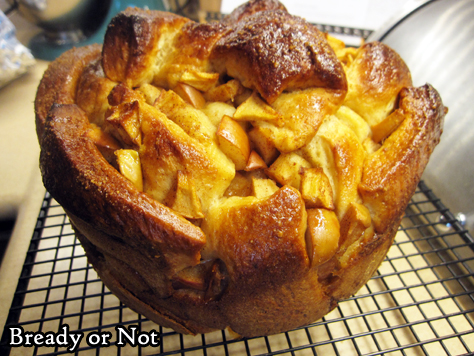
The final result is best served warm with an additional dollop or drizzle of honey. Use the good stuff here! I found that using the toaster oven for 5 to 7 minutes was about perfect for thick slices of bread.
I also found that this bread was great to freeze in slices. Pull out frozen pieces to thaw overnight, and breakfast is quick, convenient, and delicious the next morning!
Modified from a recipe at King Arthur Flour.
Bready or Not: Harvest Apple Challah
Equipment
- deep 9-inch round cake pan or casserole dish
- bench knife
- kitchen thermometer
Ingredients
Dough
- 1/2 cup lukewarm water
- 6 Tablespoons vegetable oil
- 1/4 cup honey
- 2 large eggs room temperature
- 4 cups all-purpose flour
- 1 1/2 teaspoons salt
- 1 Tablespoon instant yeast or active yeast
Filling
- 2 medium apples
- 1/2 teaspoon cinnamon
- 1/4 cup white sugar
Topping
- 1 large egg
- coarse sugar optional
- honey for serving optional
Instructions
Make the dough
- Mix together the dough ingredients by hand or using a mixer with dough hook, until well-incorporated and not stiff. Place dough in a greased bowl to let rise about 2 hours, or until puffy; if poked with a finger, the dent in the dough should remain and not bounce back.
- Prepare a deep round cake pan or casserole dish (at least 4 inches) by greasing thoroughly.
- Also lightly grease a large stretch of counter top or table. Gently deflate dough and transfer to the surface, and flatten dough to an 8x10-inch rectangle.
Prepare the filling
- Core the apples but leave on the peels. Chop apples into chunks about 1/2 to 3/4-inch in size. Should equal about 3 cups total. Toss pieces in cinnamon and sugar.
Assemble the bread
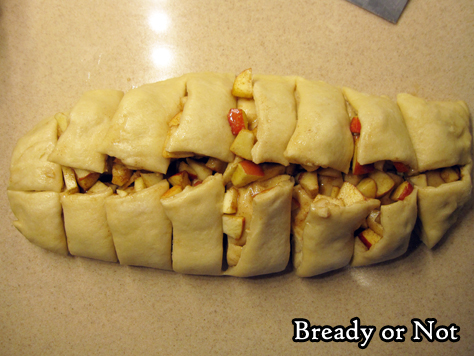
- Spread half the apples in the center of the dough. Fold one short edge over the apples to cover them, and press down the edge to seal them inside.
- Place the remaining apples on top of the existing apple-dough mound. Cover these apples with the other flap of dough, patting again to seal. It's okay if it is bulging and messy!
- Use a bench knife or paring knife to cut the dough down the middle, long-ways. Then cut again along the long side, edge to edge, to create a series of broad, messy stacks of dough with apples overflowing onto the surface.
- Start transferring pieces of dough and scattered apples into the prepared pan, forming a bottom layer, then keep stacking more dough and fruit on top until everything is in the pan.
- Cover loosely with plastic wrap, and let rise for another hour, until it is puffed again.
- Preheat oven at 325-degrees, with a rack in the lower third of the oven.
- Uncover the dough. Brush the top with an egg beaten with a tablespoon of water. If desired, sprinkle coarse sugar all over the top.
- Bake for 55 to 65 minutes, until the top is deep brown. As the dough is so thick, if a kitchen thermometer is available, use it to test the middle; bread should be at least 190-degrees.
- Set pan of bread on a rack to cool for 10 minutes. Carefully remove bread from pan.
- Serve challah warm, ideally with extra honey drizzled on top. Store covered at room temperature up to 4 days. Bread can also be sliced and frozen.
OM NOM NOM!
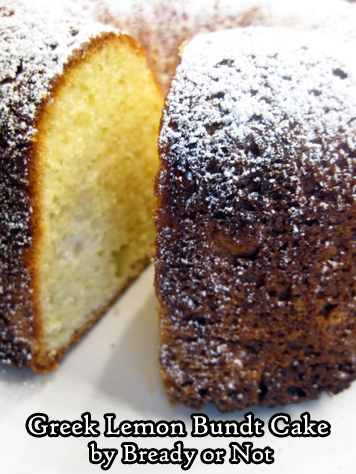
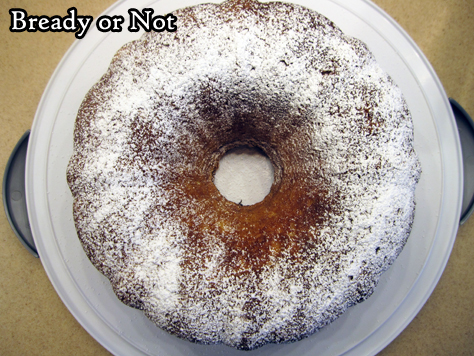
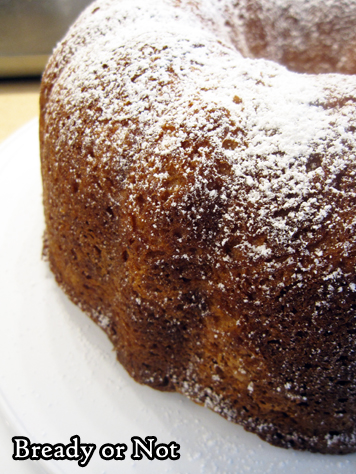
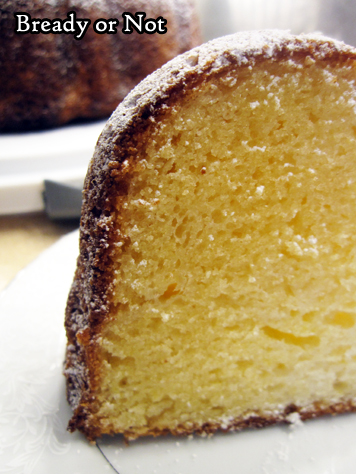
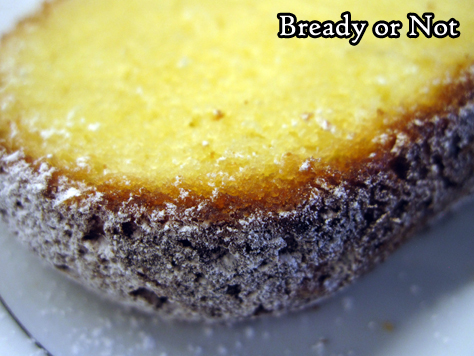
Bready or Not Original: Greek Yogurt Lemon Bundt Cake
This Greek Yogurt Lemon Bundt Cake bakes up fluffy and light, with a fresh tang of lemon.
I’m not going to lie: this cake is going to dirty a lot of dishes, including two large bowls. The extra work makes for delicious results, though.
The texture of this cake is what makes it special. The Greek yogurt adds moisture, while the six eggs–with whites separated and beat to stiff peaks–adds a lot of loft.
My batter bowl ended up being full to the top and tricky to mix. I was worried that my bundt pan would overflow during baking and kept an eye on it, but it ended up being fine. Even so–be wary of your own pan.
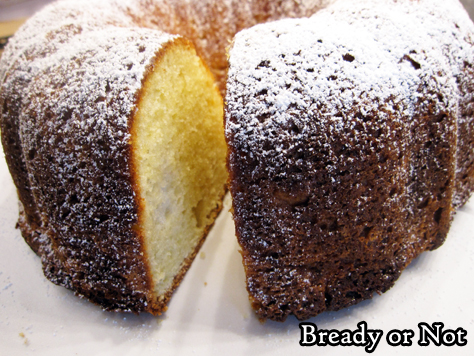
The baked cake is fancy and simple all at once. This needs no glaze. A sprinkling of confectioners’ sugar makes the cake prettier without adding any heavy sweetness.
This cake is great for travel, either sliced or whole, because there’s nothing about it that can melt or ooze. I imagine it freezes well in slices, too, but I didn’t try that with this particular cake.
Bready or Not Original: Greek Yogurt Lemon Bundt Cake
Equipment
- 10-cup minimum bundt pan or tube pan
Ingredients
- 3 cups cake flour or substitute 3 cups all-purpose flour with 6 Tablespoons removed
- 1 teaspoon baking soda
- 1/4 teaspoon salt
- 6 large eggs room temperature, separated
- 2 cups white sugar
- 1 cup unsalted butter (2 sticks) room temperature
- 2 medium lemons finely grated and juiced
- 1 cup Greek yogurt plain or vanilla
- confectioners' sugar optional, to dust over finished cake
Instructions
- Preheat oven at 350-degrees. Grease and flour the bundt or tube pan.
- In a bowl, stir together the flour, baking soda, and salt. Set aside.
- In a large bowl, beat egg whites until soft peaks form. Slowly add in 1/2 cup of the white sugar and continue beating until stiff, glossy peaks form. Their mass will increase immensely.
- In another large bowl, beat together the butter, remaining 1 1/2 cups white sugar, egg yolks, 1 Tablespoon lemon zest, and 3 Tablespoons lemon juice. If using electric mixer, beat on medium until everything is creamy and pale yellow, which takes about 3 to 5 minutes.
- Add the dry mixture to the yolk bowl, alternating with the addition of the Greek yogurt, until both are incorporated. Gently fold in the egg whites; this will create an enormous amount of airy batter.
- Pour and scoop into prepared pan. Bake for 50 to 60 minutes; if the pan is full to the top, keep an eye on it in case it overflows. Cook until the middle passes the toothpick test. Let cool for 10 minutes, then invert cake onto a wire rack to completely cool.
- Store beneath a cake dome or otherwise covered, at room temperature. Before serving, dust with confectioners' sugar, if desired.
OM NOM NOM!
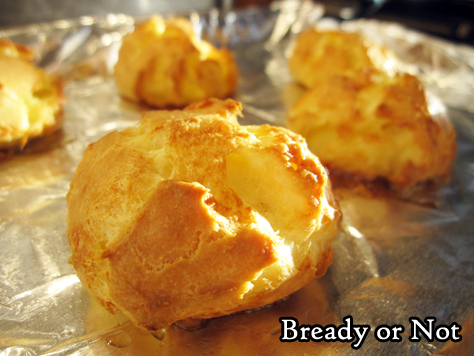
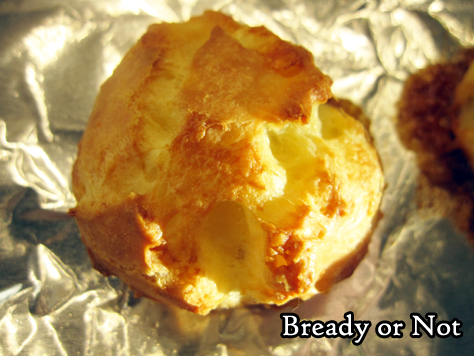
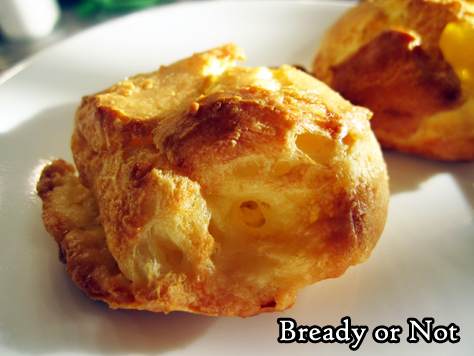
Bready or Not: Gougeres (French Cheese Puffs)
Eat your cheese in delicious, airy form in Gougeres, aka French cheese puffs!
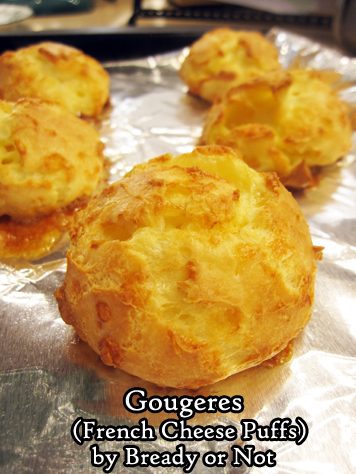
This is a savory version of pate a choux, the dough used for cream puffs and eclairs. In this case, though, you fold in a generous amount of grated cheese.
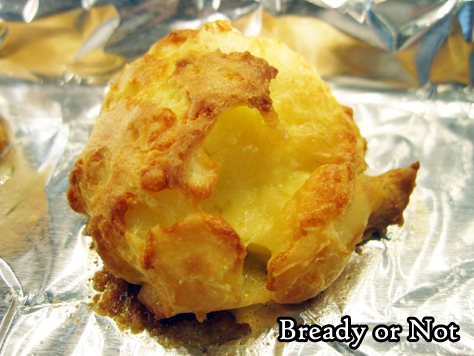
What kind of cheese? Go for ones that grate and melt. Traditional choices would include Gruyere or Comte, or be a rebel like me and use English cheddar. (Scandalous, I know.)
I modified this recipe from Dorie Greenspan’s version in her lovely tome Around My French Table. I felt like I learned something new every time I baked up a serving of these puffs, and I wanted to include all that info to prevent people from repeating my mistakes.
Such as, see the aluminum foil in these pictures? Don’t use that. Do parchment instead. I didn’t take pictures of how I mangled these gougeres, which were hopelessly stuck to the foil despite a spray of Pam.
The recipe results in about 30 puffs. These things keep well, unbaked and frozen, but only for about a month. After that, the puff declines and an eggy taste is more pronounced.
Bready or Not: Gougeres (French Cheese Puffs)
Equipment
- baking sheets
- parchment paper
- tablespoon scoop
- mixer
Ingredients
- 1/2 cup whole milk or half & half
- 1/2 cup water
- 8 Tablespoons unsalted butter (1 stick) cut into 4 pieces
- 1/2 teaspoon salt
- 1 cup all-purpose four
- 5 large eggs room temperature
- 1 1/2 cups coarsely-grated cheese (6 ounces) such as Gruyere, Comte, Emmenthal, or cheddar
Instructions
- If baking now, position racks in oven to be at the top and bottom. Preheat oven at 425-degrees. Line two large baking sheets with baking mats or parchment paper; do not use aluminum foil.
- If preparing the gougeres now, with plans to freeze and bake later, line a pan with waxed paper and clear some space in the freezer so the puffs can set.
- Place milk, water, butter, and salt in a medium saucepan. Bring to a fast boil. Add flour all at once, then lower heat. Promptly start stirring batter with a wooden spoon or sturdy whisk. The dough will come together, but keep stirring with vigor for another couple minutes until the dough is very smooth and looks dryer.
- Drop the dough into the big bowl of a stand-mixer or a bowl where a hand mixer can be used. (Or, if mixing by hand, be ready for an arm work-out.) Let the dough set for a couple minutes, then add the eggs one by one. Beat, beat, beat that batter, fully incorporating each egg before adding the next. If it separates, that's okay--keep beating it! It needs to reach a stage where it is thick and shiny. Beat in the grated cheese.
- The batter must be immediately doled out onto pans to either bake or freeze. Use a tablespoon or tablespoon-sized scoop to measure out the batter; if baking, space out about two inches apart.
- Slide baking sheets into oven. Immediately lower temperature to 375-degrees. Bake for 12 minutes, then rotate pans from front to back, top to bottom. Continue baking another 12 to 15 minutes, until gougeres are golden and firm. Note that they will not puff until the end of the bake. Serve promptly.
- If freezing some or all of the gougeres, freeze on waxed paper, then place in a freezer bag or lidded container. Bake straight from the freezer--do not thaw them! Place on parchment or a greased surface to cook, with gougeres in a central location in the oven. Eat frozen gougeres within a month, as they will otherwise taste increasingly eggy and have less rise.
OM NOM NOM!
Bready or Not Original: Hazelnut Hand Cake [cake mix]
Doctor up a basic yellow cake mix box into an amazing Hazelnut Hand Cake!
![Bready or Not Original: Hazelnut Hand Cake [cake mix]](https://www.bethcato.com/blog/wp-content/uploads/2020/04/Hazelnut-Cake-Squares11_sm.jpg)
It’s called hand cake because it’s convenient to eat without a knife and fork. Heck, napkins are optional, if you don’t mind a dropped crumb or two.
![Bready or Not Original: Hazelnut Hand Cake [cake mix]](https://www.bethcato.com/blog/wp-content/uploads/2020/04/Hazelnut-Cake-Squares1_sm.jpg)
This cake has a mild chocolate flavor–milder than that of a typical chocolate cake, from a mix or not. Nutella (or use a store-brand equivalent, as I did) is whipped into the batter, with some extra chocolate chips adding a gentle layer of flavor.
![Bready or Not Original: Hazelnut Hand Cake [cake mix]](https://www.bethcato.com/blog/wp-content/uploads/2020/04/Hazelnut-Cake-Squares3_sm.jpg)
This thing is all about convenience. The cake comes together fast. Bakes fast. Give it some initial time to cool at room temp, then stash it in the fridge, and you can eat it even faster.
![Bready or Not Original: Hazelnut Hand Cake [cake mix]](https://www.bethcato.com/blog/wp-content/uploads/2020/04/Hazelnut-Cake-Squares7_sm.jpg)
The end result is a cake with a soft, high, very moist crumb. The scattered nuts and toffee add extra flavor and crunch.
![Bready or Not Original: Hazelnut Hand Cake [cake mix]](https://www.bethcato.com/blog/wp-content/uploads/2020/04/Hazelnut-Cake-Squares9_sm.jpg)
My husband’s co-workers inhaled this cake. One guy said it was the best Cato treat ever. Considering the goodies that come their way, that is high praise indeed.
Bready or Not Original: Hazelnut Hand Cake [cake mix]
Equipment
- 13x9 pan
Ingredients
- 1 box yellow cake mix
- 3 large eggs
- 2/3 cup water
- 2/3 cup Nutella or similar hazelnut spread
- 1/4 cup canola oil or vegetable oil
- 1/2 cup semisweet chocolate chips
- 1/2 cup chopped hazelnuts toasted or not
- 1/2 cup Heath toffee bits
- confectioners' sugar to dust top, optional
Instructions
- Preheat oven at 350-degrees. Line a 13x9-inch pan with foil and apply nonstick spray.
- In a large bowl, beat together the cake mix, eggs, water, hazelnut spread, and oil for several minutes, until thoroughly combined and no lumps remain. Fold in the chocolate chips, hazelnuts, and toffee bits. Pour batter into prepared pan.
- Bake for 25 to 30 minutes, until center is no longer jiggly and passes the toothpick test.
- Cool completely to room temperature; place in fridge to speed process along. Use foil to lift contents onto cutting board. If desired, sprinkle confectioners' sugar over top. Slice into pieces.
- Store in sealed container(s) at room temperature.
OM NOM NOM!
Read More
