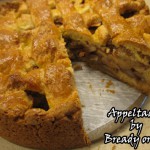
Bready or Not: Appeltaart
I love my traditional Caramel Apple Pie recipe, but this deep-dish apple pie is something extraordinary! It uses a springform pan.
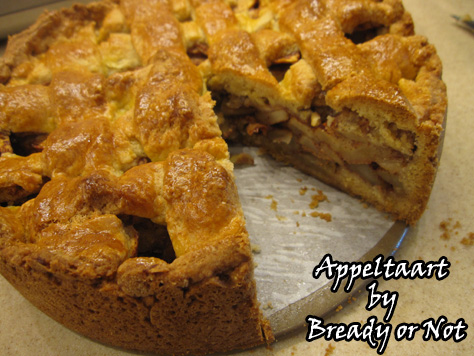
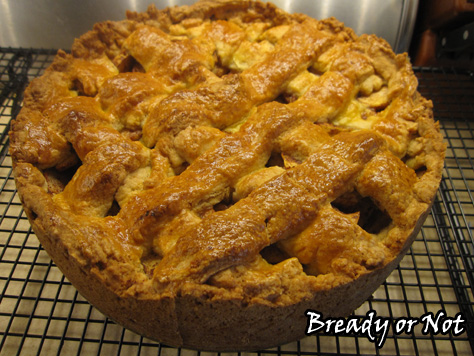
Brace yourself for a lot of pictures. This is one of those rare times when my end result looked exactly like the photo in the magazine.
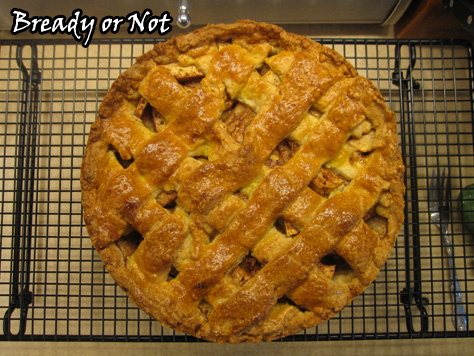
It’s a photogenic pie, isn’t it?
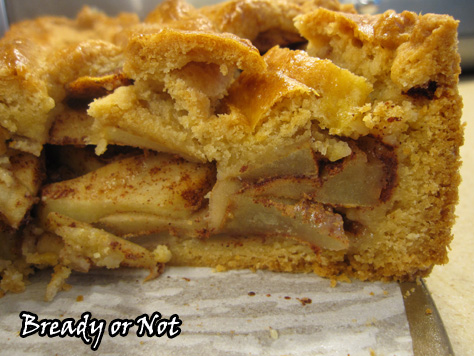
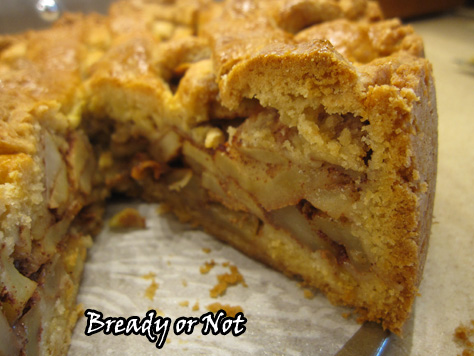
This Appeltaart is as delicious as it looks, too. My husband and my dad are hardcore apple pie lovers. It’s probably one of their all-time favorite foods. This pie rated VERY highly for both of them.
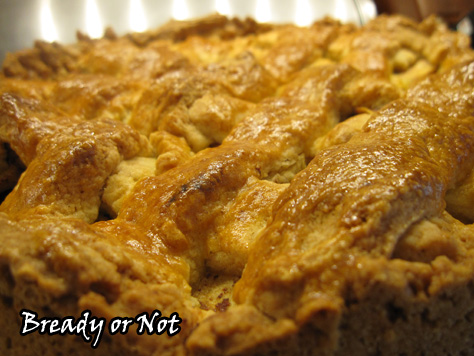
The directions look long, but really, it’s not an intimidating pie. I know a lot of folks hate rolling out pie crusts–well, this is the recipe for you! You press most of the dough into the pan and then slice strips for the lattice on top.
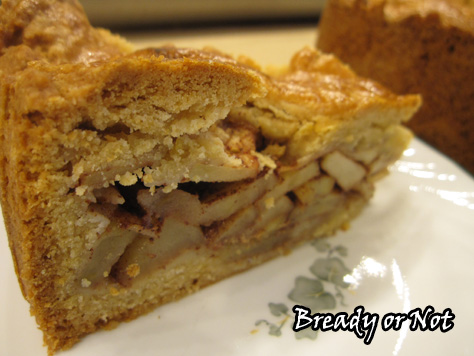
The original recipe had raisins in it–which was blasphemous to my family. I omitted the raisins and added more cinnamon.
It would be easy to modify the recipe more. Add a drizzle of caramel or dulce de leche. Try adding some nutmeg, cloves, or cardamom. Or if the making the lattice top worries you, tuck that dough away for other purposes, and throw together a crumb topping. Or instead of cutting strips for the lattice, roll out the dough and use small cookie cutters shaped like leaves or other things.
Whatever you do, I bet you’ll be amazed at the Appeltaart. This will be the showcase for your holiday dessert table… and something special to make all year round.
Modified from a recipe in Martha Stewart Living magazine; also online.
Bready or Not: Appeltaart
Ingredients
Dough
- 2 1/4 cups all-purpose flour plus more for surface
- 1 Tablespoon baking powder
- 1 teaspoon salt
- 1/2 cup light brown sugar packed
- 3/4 cup unsalted butter 1 1/2 sticks, cut into small pieces, plus more for pan
- 1 large egg
- 2 Tablespoons water
- 1 teaspoon pure vanilla extract
Filling
- 2 1/4 pounds Granny Smith apples peeled, cored, and cut into chunks (6 cups)
- 1/4 cup white sugar
- 3 teaspoons cinnamon
- pinch salt
- 2 teaspoons fresh lemon juice
- 1 1/2 Tablespoons all-purpose flour plus more as needed
- 1 large egg lightly beaten
Instructions
Dough:
- In a bowl, stir together the all-purpose flour, baking powder, salt, and brown sugar. Add the butter and work it in until only pea-size pieces are visible.
- In a small bowl, whisk together the egg, water, and vanilla, then pour into the dry mix. Mix until the dough makes a ball. Form about two-thirds of the dough into one disk and remaining third of dough into another disk. Separately wrap each portion in plastic wrap. Refrigerate them until firm, about 1 hour.
Filling:
- Toss together the apples, granulated sugar, cinnamon, salt, lemon juice, and 1 1/2 tablespoons flour. Set aside but stir every so often as you make other preparations.
- Preheat the oven to 350-degrees. Prepare a 9-inch round springform pan by cutting parchment paper to fit the circle inside. Use butter or Pam to adhere the parchment in the pan, then fully grease the top of the parchment and the sides of the pan.
- Lightly flour a surface. Take out your large dough disk and roll it out. It's okay if it's fragmented. Take the pieces and press them into the bottom and up the sides of the pan. Sprinkle some flour over the dough.
- Use a slotted spoon to transfer the apple filling into the crust; you'll discard any leftover juice. Roll out the other dough disk to be about 1/4-inch thick. Use a pizza cutter or knife to cut the dough into thick strips. Lay half of the strips over the filling, then do the other half crossing the other way. Press the edges of the strips into the crust at the sides.
- Lightly beat the egg and brush the lattice with the egg wash.
- Bake the pie until the crust is golden brown and apples are tender when stabbed with a fork, about 1 hour 10-20 minutes. Check it at the 40 minute point and cover it with foil if it starts to look too dark.
- Let it cool on a wire rack until sides of tart pull away from pan, about 30 minutes. Unsnap the springform pan and remove the side circle; keep the appeltaart on the base for convenient serving. Let it cool for an least an hour before cutting in.
- OM NOM NOM!
Read More
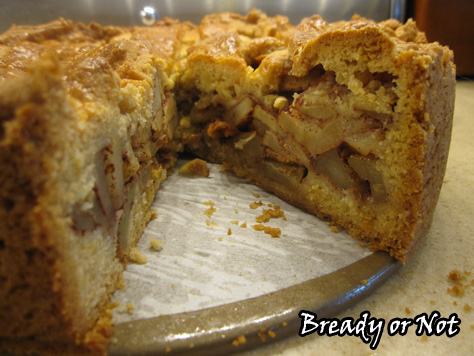
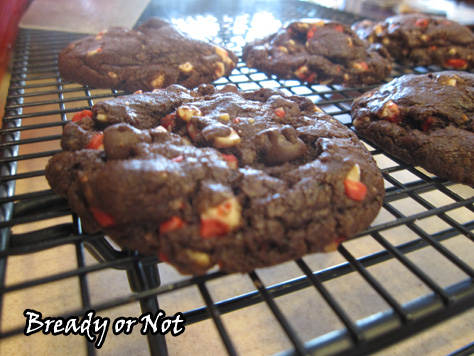
Bready or Not: Cocoa Peppermint Cookies
I bake a wide variety of things and send the goodies along with my husband to his work. When the guys there say, “These cookies are among the best ever,” that makes me take notice.

I first found this recipe on a bag of Andes Baking Chips, dubbed with the long name of “Andes Double Chocolate Peppermint Crunch Cookies.” Whew. I modified it by taking out the nuts (they just don’t pair well with peppermint, I think) and compensating by adding more mint chocolate chips. Because you can’t go wrong with that.
I chilled the dough, since that often produces better cookies, and I was surprised at how much this dough still spread. Be sure you space out those dough balls!
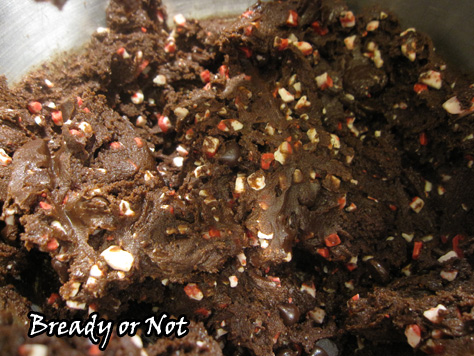
These cookies would be fantastic for a holiday cookie exchange or to give as a gift. The Andes chips look fantastically festive against the backdrop of rich dough… and you know what? They taste darn good, too.
Modified from a recipe found on Andes Peppermint Crunch Chips package; also found online.

Bready or Not: Cocoa Peppermint Cookies
Ingredients
- 1 cup unsalted butter 2 sticks
- 2 Tablespoons espresso powder
- 2 cups plus 2 Tablespoons all-purpose flour
- 3/4 cup baking cocoa sifted
- 1/2 tsp baking soda
- 1/2 tsp salt
- 1 cup brown sugar packed
- 1/2 cup white sugar
- 2 large eggs room temperature
- 1 teaspoon vanilla extract
- 1 package Andes Peppermint Crunch Baking Chips 10 oz
- 4 ounces semi-sweet chocolate chips or milk chocolate or chopped candy bars
- 1 cup mint chocolate chips
Instructions
- In a small saucepan on low heat, melt the butter with the espresso powder, stirring often. When the two are incorporated, remove the pan from heat and set aside to cool for an hour.
- In a medium bowl, sift together the main dry ingredients: flour, cocoa, baking soda and salt.
- Now it's time for the big mixing bowl. Pour in the cooled butter mixture, then add the white sugar, brown sugar and vanilla extract. Beat at medium speed for a few minutes until it's all creamy. Beat in the eggs, one at a time. Gradually work in the flour mixture a bit at a time until it's just blended. Now stir in the Andes Chips and the extra chocolate.
- Wrap the dough in plastic wrap and stash it in the fridge to chill for a few hours or days, or even freeze it.
- When it's time to bake, preheat oven to 350-degrees.
- Drop the dough in rounded tablespoons about two inches apart on a greased or parchment-lined baking sheet; note that this dough does spread, even when the dough is chilled.
- Bake for 10 to 12 minutes. Let them rest of the cookie sheet a few more minutes to set, the transfer to a wire rack to finish cooling.
- OM NOM NOM!
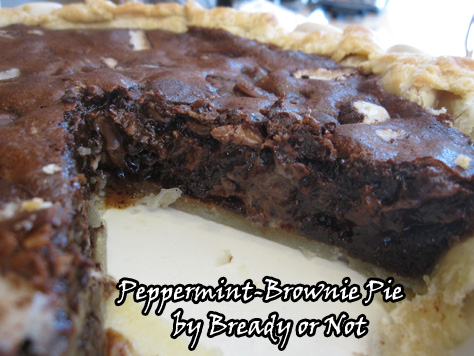
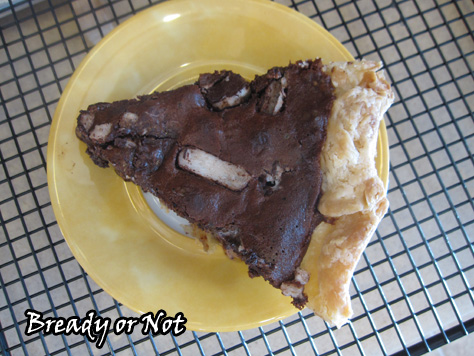
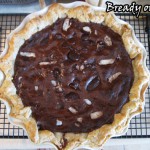
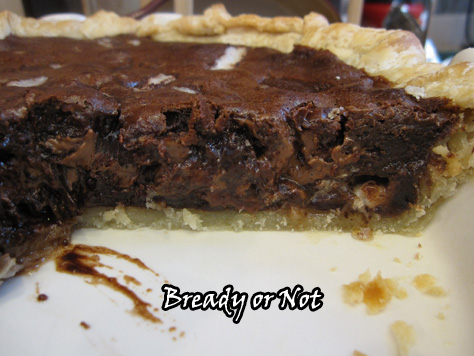
Bready or Not: Peppermint-Brownie Pie
You could just make normal brownies, sure, but it’s an indisputable fact that everything is better in pie form.
Back in March, we were in Tucson for the Book Festival on Pi Day. To my amazement, pie was hard to find. We ended up driving a good distance to a Village Inn, where they had already run out of most pies. Our selections ended up being fine, but my husband was tormented by a tabletop ad for a mint brownie pie that was not available.
“Don’t worry,” I told him. “I’ll make one for you.”
This ended up being more of a challenge than I expected. I ended up looking at a number of recipes until I found a good base recipe to modify. I wanted a strong mint flavor and for it to not necessarily LOOK Christmassy. I wanted a pie that could be made year-round.
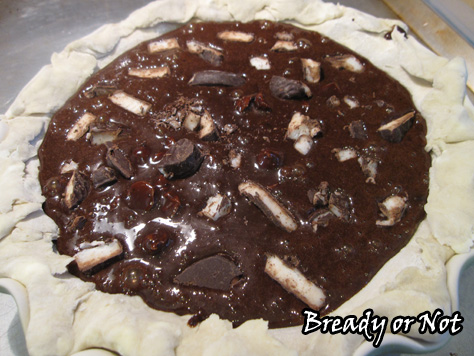
I already had some York Patties stashed away, courtesy of post-holiday clearance sales, so I had the very candy to mix into my recipe, too.

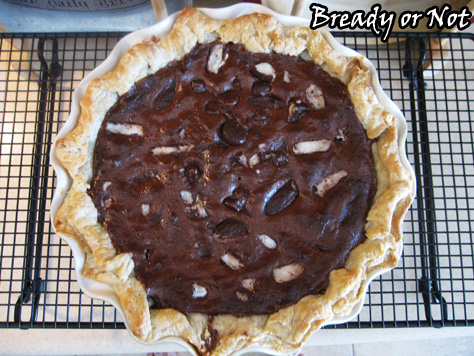
The end result was peppermint-brownie perfection. I used my homemade pie crust (shown below as well) and was pleased that the brownie contents didn’t make the crust get soggy or hard.
If you love mint brownies, if you love pie, welcome to your new bliss.
Modified from Culinary Concoctions by Peabody.
Bready or Not: Basic Pie Crust
Ingredients
- 3 cups all-purpose flour
- 1 Tablespoon sugar
- 1 teaspoon fine salt
- 1 cup unsalted butter 2 sticks, cold, cut into cubes
- 3/4 cup ice water
Instructions
- Make dough hours in advance or the night before. In a medium mixing bowl, whisk together the flour, sugar, and salt. Add in the cold butter cubes, and either use a pastry blender or pulse the ingredients in a food processor until the butter is pea-sized.
- Pour in the cold water and pulse/mix together until the dough forms a loose ball. I like to use my hands at this point. The dough may be sticky, but it will firm up well.
- Pour dough onto a floured surface. Divide into two balls and fallen them into discs. Wrap each disc in parchment paper, then in plastic wrap. Refrigerate at least one hour before placing in pie dish, or freeze for up to 3 months.
- Roll out the refrigerated dough into a 12-inch round. Press it into a 9-inch dish, trimming the excess and pinching the edges. Wrap loosely with plastic wrap and freeze at least two hours before using, or keep frozen up to three months.
Bready or Not: Peppermint-Brownie Pie
Ingredients
- 14 oz sweetened condensed milk
- 1/4 cup unsalted butter half stick, cut into pieces for quicker melting
- 1/2 cup unsweetened baking cocoa sifted
- 3 eggs room temperature
- 3 Tablespoons all-purpose flour
- 2 tsp espresso powder optional but awesome
- 1 tsp vanilla extract
- 1/2 tsp peppermint extract
- 1 cup milk chocolate chips
- 1 cup York Peppermint Patties chopped
- 1 pie shell make your own or use a store bought crust
Instructions
- Set out the pie crust atop a cookie sheet. Chop up the York patties and place half of them in the crust.
- In a medium sauce pan, place the milk, butter, and cocoa powder. Warm on low heat. Stir occasionally so the mixture doesn't stick and scorch. Remove from heat when all ingredients are melted and mixed together fully. Set aside to cool for 15 minutes.
- Preheat the oven at 350-degrees.
- In a large bowl, lightly beat the three eggs. Temper them by adding a couple spoonfuls of the chocolate mixture and mixing. Do this three times. Finally, stir the remaining chocolate into eggs.
- Add the flour, espresso powder, vanilla extract, and peppermint extract. Fold in chocolate chips.
- Pour brownie batter into the pie shell and then top with remaining chopped York Patties.
- Bake for 30-40 minutes on the cookie sheet, until a knife in the center comes out clean. Let set to cool for several hours. Store covered with foil in the fridge.
- OM NOM NOM!
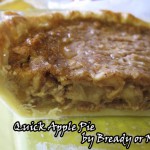
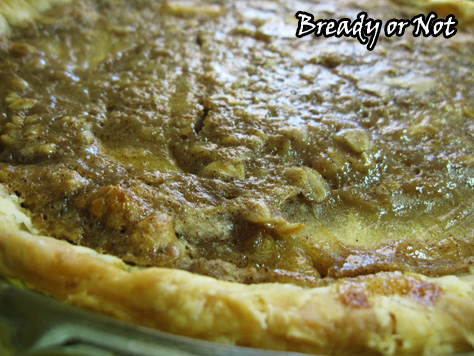
Bready or Not: Quick Apple Pie
I’m all about making goodies from scratch, but sometimes speedy shortcuts are the way to go. Thanksgiving is tomorrow, after all.
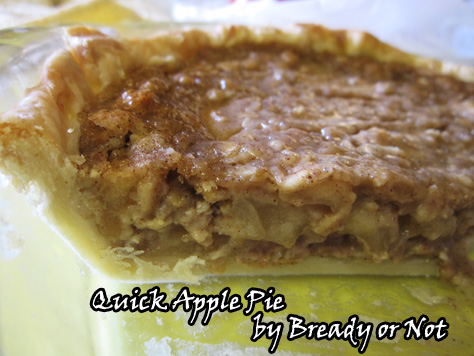
This apple pie comes together in about ten minutes. The big shortcut element is a can of pie filling. Mind you, I haven’t used pie filling in about a decade, and I was amazed at how much faster the process went. Peeling, coring, and slicing apples takes up time.
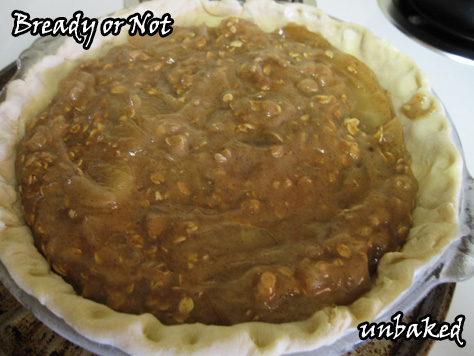
I used a Comstock apple caramel can. I did miss the firmer texture of fresh-cut apples, but the overall pie was just fine.
My husband described it as being “like a big oatmeal-apple cookie.”
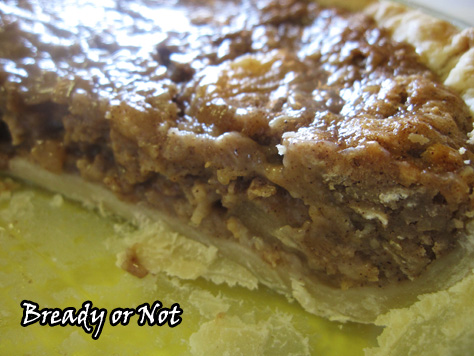
I used my homemade crust recipe–shown below–but use a store-bought type if you need to. It’s holiday time. Time is precious.
Pie is precious, too.
Modified from Caramel Apple Crumble Pie at Averie Cooks.
Bready or Not: Basic Pie Crust
Ingredients
- 3 cups all-purpose flour
- 1 Tablespoon sugar
- 1 teaspoon fine salt
- 1 cup unsalted butter 2 sticks, cold, cut into cubes
- 3/4 cup ice water
Instructions
- Make dough hours in advance or the night before. In a medium mixing bowl, whisk together the flour, sugar, and salt. Add in the cold butter cubes, and either use a pastry blender or pulse the ingredients in a food processor until the butter is pea-sized.
- Pour in the cold water and pulse/mix together until the dough forms a loose ball. I like to use my hands at this point. The dough may be sticky, but it will firm up well.
- Pour dough onto a floured surface. Divide into two balls and fallen them into discs. Wrap each disc in parchment paper, then in plastic wrap. Refrigerate at least one hour before placing in pie dish, or freeze for up to 3 months.
- Roll out the refrigerated dough into a 12-inch round. Press it into a 9-inch dish, trimming the excess and pinching the edges. Wrap loosely with plastic wrap and freeze at least two hours before using, or keep frozen up to three months.
Bready or Not: Quick Apple Pie
Ingredients
- 1/4 cup unsalted butter half stick, melted
- 1 large egg room temperature
- 3/4 cup white sugar
- 1/4 cup brown sugar packed
- 1 1/2 teaspoons vanilla extract
- 1 teaspoon cinnamon heaping
- 1/4 teaspoon allspice
- 1/4 teaspoon ground cloves
- 1/4 teaspoon salt optional and to taste
- 3/4 cup all-purpose flour
- 3/4 cup old-fashioned rolled oats
- 21 ounce canned apple pie filling
- 9 inch frozen pie crust homemade or store-bought
Instructions
- Preheat oven to 350F. Set out the pie shell on a cookie sheet.
- In a large microwavable bowl, melt the butter. Allow it to cool for about 5 minutes, then stir in the sugars, vanilla, cinnamon, allspice, cloves, and salt. Whisk in the egg until batter is smooth.
- Add the flour and oats until just combined, then gently fold in the apple pie filling. Pour everything into the pie shell; it will come up to the brim.
- Bake for 50 to 60 minutes, or until top has set. Allow it to cool at least 30 minutes before slicing.
- Pie keeps for days, covered by foil in the fridge.
- OM NOM NOM!
Bready or Not Guest: Bishop O’Connell with Beef & Guinness Vegetable Soup
 Today I am happy to welcome Bishop O’Connell as my Bready or Not guest. He’s delivering a perfect winter recipe: Beef & Guinness Vegetable Soup! He’s also about to deliver his third book published through Harper Voyager Impulse. Three Promises comes out on December 8th! That gives you plenty of time to read the first two books in the American Faerie Tale series so you’re ready for the next.
Promises bind, but some promises break…
From the author of The Stolen and The Forgotten comes a collection of stories between the stories, a glimpse of the American Faerie Tale series characters in a whole new light.
For more than fifty years, Elaine has lived the life of an outcast elf, stripped of her rank and title in the fae court. Surrounded by her beloved collection of stolen artwork, we may just learn the secret behind her exile, and the one promise too important to break…It’s the day we’ve all been waiting for – Caitlin and Edward are getting married! But few weddings ever go without a hitch. Old promises were broken, and new vows will be made…
In The Stolen, Brendan vowed to help Caitlin rescue her young daughter from the Dusk Court, even if it meant sacrificing himself. Alone and in torment, he has come to accept his fate. Until an unexpected visitor finds her way into his life…Plus, an exclusive bonus story about the mysterious Legion of Solomon.
Preorder the ebook now for 99-cents; available December 8th:
HarperCollins
Amazon
Barnes & Noble
Google Play
iTunes
Kobo
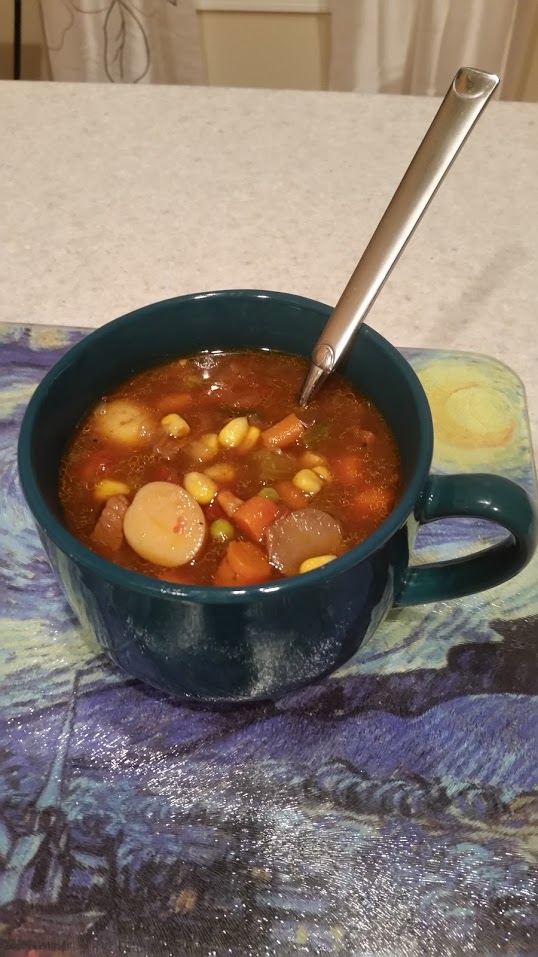
Beef & Guinness Vegetable Soup
This could very easily make a stew, but I prefer it as a soup. It’s hearty and great to freeze and reheat when you want something tasty on a cold day. You can use a 6 quart soup pot, but it will fill right to the top, so be careful, 8 quart is ideal.
Ingredients:
1 lbs stew beef – cut into small pieces
2 medium sweet white onions – diced
1 lbs new potatoes – cut into quarters (even small ones should be cut in half)
1 lbs baby carrots – cut into small pieces
6 celery stocks (no leaves) – diced
1 lbs bag of frozen peas
1 lbs bag of frozen sweet corn
1 large can (16oz) fire roasted diced tomatoes
16oz beef stock
16oz vegetable stock
Salt
White Pepper
Optional: dill, celery salt, garlic salt, chives.
3 pints of Guinness – at room temperature
 It’s best to use the Guinness that doesn’t have a widget in it (see image). If you can only get the bottles or cans that do have the widget (nitrogen injection device) then open the bottles/cans and let them sit for a while before starting.
Put the soup pot over a medium high heat and add a couple teaspoons of olive oil and cook down the onions. When they start to turn translucent, add the stew beef, stirring regularly. By the time to beef has browned on the outside, the onions should be starting to caramelize. Add the Guinness and let it reduce to 1/3. Yes, 1/3, this will take a while (30 mins or so).
While this is happening two things will happen. First, you’ll see a thick froth develop and it will get large, especially if your pints had the widget. Don’t panic, this is normal and you can reduce it by stirring. The second thing that will happen is you’ll notice a very strong barley smell from the pot. Again, don’t worry, it will taste much better when it’s done than it smells at this stage.
When the Guinness has reduced add all the remaining ingredients, but add the stock last. Elsewise you’ll get a LOT of splashing. Once everything is in there, stir and bring to a slow boil. Reduce the heat and simmer for 2-3 hours, and enjoy the wonderful smell that will fill your kitchen. Add salt and pepper to taste, but keep in mind potatoes absorb salt and there are a lot of them so don’t worry if it seems like you’re adding a lot of salt. You can also, obviously, hold off and season when served to individual tastes. When finished, it freezes for 6-8 months without any concern, probably longer than that but I’ve never gotten it to last longer than that.
Goes great a cold hard cider and some fresh, crusty bread (buttered of course). You can go “full Irish” and have a Magners Cider (Bulmers in Ireland) and some soda bread. I’m actually not a big fan of soda bread (don’t tell!) but the cider compliments the flavor of the soup nicely.


 Bishop O’Connell is the author of the American Faerie Tale series, a consultant, writer, blogger, and lover of kilts and beer, as well as a member of the Science Fiction & Fantasy Writers of America. Born in Naples Italy while his father was stationed in Sardinia, Bishop grew up in San Diego, CA where he fell in love with the ocean and fish tacos. While wandering the country for work and school (absolutely not because he was in hiding from mind controlling bunnies), he experienced autumn in New England. Soon after, he settled in Manchester, NH, where he writes, collects swords, revels in his immortality as a critically acclaimed “visionary” of the urban fantasy genre, and is regularly chastised for making up things for his bio. He can also be found online at A Quiet Pint, where he muses philosophical on life, the universe, and everything, as well as various aspects of writing and the road to getting published.
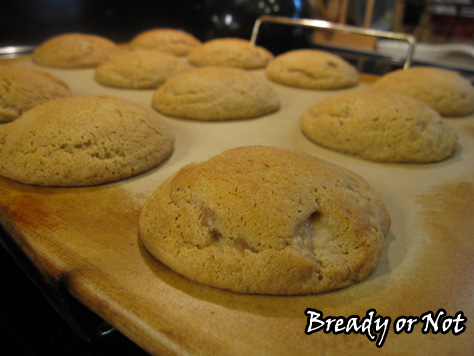
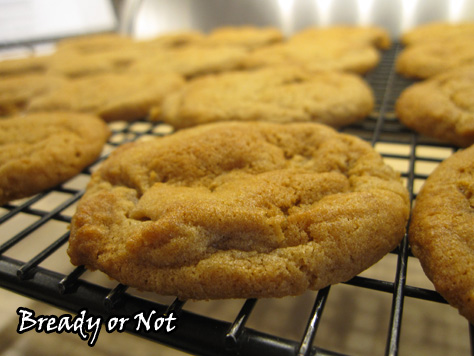
Bready or Not: Chewy Honey Maple Cookies
If you’re looking for a recipe for chewy cookies that will keep well for days of travel or to ship as a gift, I present to you these Chewy Honey Maple Cookies.
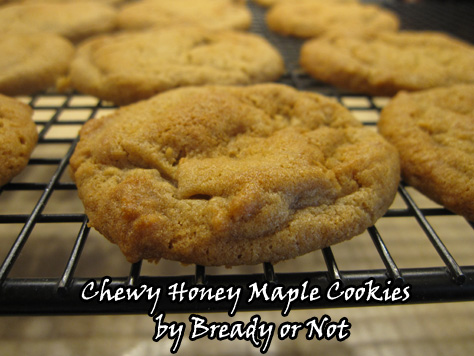
These are sweet without being too sweet. The honey and maple pair well together, and the texture is soft and oh-so-good.
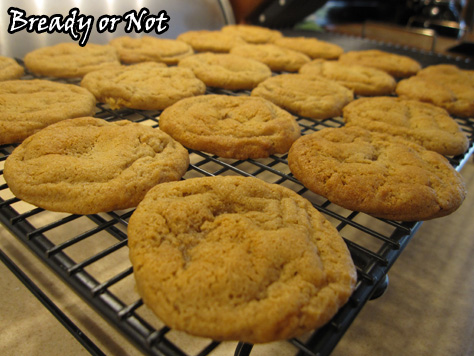
One of the reasons these turn out lofty and chewy is because it uses bread flour. If you don’t have bread flour, you can use all-purpose for the full two cups, but you’ll likely use some cookie-loft.
Make these this holiday season. I bet you’ll have a new favorite cookie.
Greatly modified from Soft and Chewy Brown Sugar Maple Cookies at Averie Cooks.

Bready or Not: Chewy Honey Maple Cookies
Ingredients
- 3/4 cup unsalted butter 1 1/2 sticks, softened
- 1 cup light brown sugar packed
- 1/4 cup honey
- 1 large egg room temperature
- 2 teaspoons vanilla extract
- 1 1/2 teaspoons maple flavor
- 1 cup bread flour or all-purpose flour, but cookies will be less chewy
- 1 cup all-purpose flour
- 2 teaspoons cornstarch
- 1 teaspoon baking soda
- 1/2 teaspoon salt
- maple sugar or turbinado sugar for the tops, optional
Instructions
- In a large bowl, beat the butter until smooth. Add the sugar and honey and beat until creamy and fluffy, about 3 minutes. Scrape down the sides of the bowl and then mix in the egg, vanilla extract, and maple flavor.
- In a separate bowl, combine the dry ingredients: bread flour, all-purpose flour, cornstarch, baking soda, and salt. Sift together.
- Slowly stir together the wet and dry ingredients until just combined. Wrap the dough in plastic wrap and stash in the fridge for several hours or days.
- When you're ready to bake, preheat the oven to 350-degrees. Use greased stoneware, parchment paper, or silpat mats. If you want to add some sparkle to the cookies, place some maple sugar or turbinado sugar in a saucer and dip in the tops of the dough balls. The cookie dough, even straight from the fridge, has a soft Play Doh-like consistency, so it will spread some when it bakes; keep this in mind when you space the cookie dough balls.
- Teaspoon-sized cookies need to bake 9 to 12 minutes; Tablespoon-sized take 11 to 13 minutes. Let set on cookie sheets for 10 to 15 minutes before moving to a rack to cool completely.
- Cookies will keep in a sealed container for weeks; store between layers of waxed paper or parchment. They are excellent for travel or shipping.
- OM NOM NOM!