


Bready or Not: Crescent Rolls
Crescent Rolls are a classic yeast bread side. This recipe guides you through the steps to make these tear-apart hot bready bits of heaven.

As I grew up, the only fresh crescent rolls I got to have came out of a can, and they were a real treat. Those still have a major advantage in convenience.

Here’s the thing, though–from-scratch rolls do take a while to make, but this recipe makes a big batch (24) and they are fantastic to freeze. That means if you dedicate a day to bread-making, you can portion out your rolls and freeze a bunch to last for weeks.
That also involves some measure of self-control, because these Crescent Rolls are AMAZING.
These things are enriched, meaning they include both milk and butter. That gives them a soft, tender texture inside. They are also brushed with butter before and after baking, because butter makes everything better.
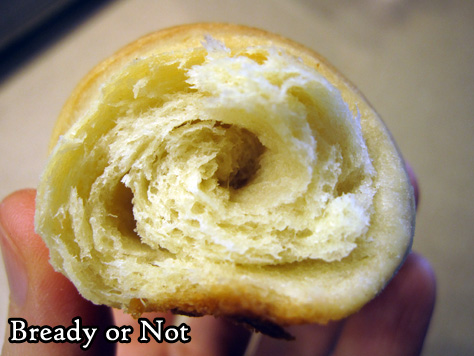
There’s nothing quite like unspooling a hot, steamy Crescent Roll, the dough flaking apart between your fingertips.
Recipe modified from Bake from Scratch November-December 2018.
Bready or Not: Crescent Rolls
Equipment
- kitchen scale
- two large baking sheets
- parchment paper
- pizza cutter
- pastry brush
Ingredients
- 4 1/4 cups bread flour
- 1 Tablespoon plus 1 1/2 teaspoons instant yeast
- 1 Tablespoon kosher salt
- 1 cup milk
- 1/2 cup unsalted butter 1 stick
- 2 Tablespoons white sugar
- 2 Tablespoons honey
- 1 large egg room temperature
- 1 large egg yolk room temperature
- 1/4 cup unsalted butter half stick, melted
Instructions
- Using a stand mixer with a dough hook attached, combine the flour, yeast, and salt.
- Use a microwave or stove top to warm the milk, butter, sugar and honey to about 120-degrees (if it gets above that, give it a few minutes to drop down). Add the warm milk mixture to the flour until just combined, scraping the bowl as needed. Follow up with the egg and egg yolk, and continue to beat for about 6 more minutes. The dough should be smooth and elastic.
- Add nonstick spray to a large bowl. Drop in the dough, flipping it to grease the surface all over. Cover with a towel or plastic wrap and let rise in a warm spot until it is doubled, about 45 minutes.
- Line two baking sheets with parchment paper.
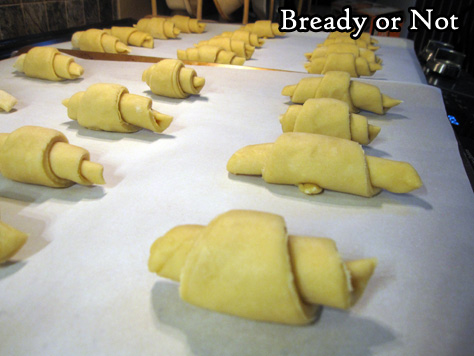
- Punch down the dough in the bowl. Lightly flour a work surface. Use a food scale to weigh the dough; divide it in half. Keep one of the halves covered while the other is rolled out to a foot-wide circle. Use a pizza cutter or knife to slice it into twelve triangles, like a pizza.
- To form a crescent roll, start at the wide end of a dough piece and roll it up, tucking and pressing the pointed tip underneath. Set spaced-out on a prepared pan. Repeat to form more rolls. Cover with a towel or plastic wrap to rise another 45 minutes to an hour.
- Near the end of the rise, preheat the oven at 375-degrees. Melt the half stick of butter and brush about half over the rolls.
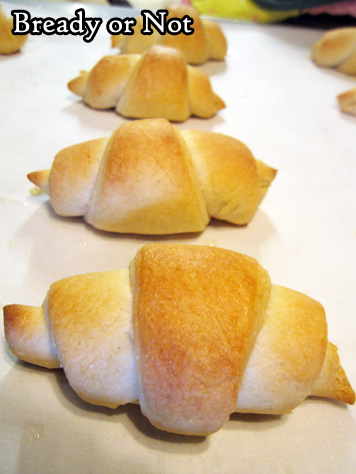
- Place both sheets on racks inside oven and bake for 7 minutes. Switch placement of baking sheets on the racks. Bake for another 5 to 8 minutes, until they are a nice golden brown. Brush on the rest of the butter.
- Eat immediately, while warmed, or at room temperature. Crescent rolls will keep in a sealed bag for at least 2 days, and can also be frozen for later enjoyment.
OM NOM NOM!
Bready or Not Original: Comte Pull-Apart Rolls
Bread is awesome. Cheese is awesome. Combine them to achieve a special kind of awesome, especially in the case of these Comte Pull-Apart Rolls.

These rolls are tender, soft, and inherently savory. They are perfect to go along with roasts.
First of all, the cheese. If you live in a cheese-deprived area as I do, Comte may not be available (or is only available at Christmas, sigh) or is prohibitively expensive. Really, you can use any cheese you like here, but I advise using one with a savory note. Another alpine cheese or a bandage-wrapped cheddar would do the trick.

My recipe is based on one featured in the Nov/Dec 2018 issue of Bake from Scratch. I made significant modifications, the foremost being that I halved the recipe so that it would only produce 12 rolls.

This recipe isn’t as fussy as some homemade rolls, but it still takes some time and effort. I was very worried because my first rise was so low, but my rolls rose beautifully once they were formed. That’s the rise that really matters!

If you want to give your second rise a boost, use this trick: preheat your oven at 200-degrees. Shape your rolls or bread. Stick the dough in the oven without any plastic wrap or cover. Immediately turn the oven OFF. Set a timer for 30 to 40 minutes or longer; this will depend on the oven, so experiment. Once the bread has nicely puffed from the heat, remove it from the oven, then preheat it again for the full bake.

These rolls can be eaten at room temperature or warm, but for me, they really are far better hot. I want them to melt butter!
Bready or Not Original: Comte Pull-Apart Rolls
Equipment
- 9×9 pan
- parchment paper
- kitchen scale
- pastry brush
Ingredients
- 1/2 cup warm milk (105-110 degrees F), can substitute half & half
- 1/2 cup warm water (105-110 degrees F)
- 1/2 Tablespoon active dry yeast
- 1 large egg room temperature
- 2 Tablespoons white sugar
- 1/4 cup unsalted butter melted and divided
- 1/2 Tablespoon kosher salt
- 2 3/4 cup bread flour
- 2 Tablespoons dried parsley or other dried herbs
- 4 ounces grated Comte cheese 100 grams
- flaked salt for garnish, optional
Instructions
- In a stand mixer, place the warm liquids and yeast. Let stand for about 10 minutes, until the yeast is nice and foamy. Add the eggs, sugar, 2 Tablespoons of melted butter, and salt. Gradually beat in the flour, cheese, and parsley, until everything is well combined.
- Cover the bowl to let the dough rise for about an hour.
- Line a 9×9 pan with parchment paper cut to crisscross and extend up all four sides. Apply nonstick spray.
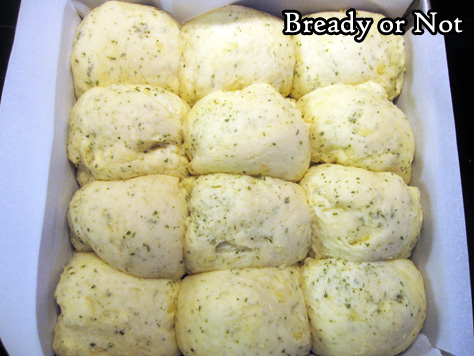
- Lightly flour a surface. Turn out the dough onto it. Use the kitchen scale to weigh the dough. Divide it into 12 equal portions, forming each into a tidy ball. Place in rows within the prepared pan, each roll touching. Cover the pan to let rolls rise for another 40 minutes to an hour.
- Preheat oven at 375-degrees. Brush rolls with remaining 2 Tablespoons butter and add a sprinkle of flaked salt, if desired.
- Bake rolls for 13 minutes. Check them. If they are getting quite brown, cover the pan with foil. Bake for another 13 to 15 minutes.
- Serve rolls at room temperature or warm.
OM NOM NOM!
Bready or Not: Sally Lunn Bread in a Bundt Cake Pan
When I had the opportunity to visit the city of Bath in England in 2019, I knew the absolutely necessary stop for lunch was Sally Lunn Eating House, known for centuries for the Sally Lunn bun. I first learned of it from a history spot on the Great British Bake Off.
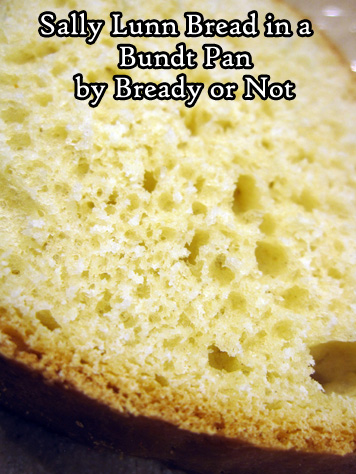
The bun has some mystery and history to it, but what is certain is that it is rather brioche-like and delicious. Upon coming home, I set about trying several recipes for a homemade version. The results were meh–until this one, which is odd because this bread is also very different.
The true Sally Lunn bun is a bun, made in a specialized bun mold. This recipe makes an enriched bread, mixed in a food processor, and risen and baked in a bundt pan. The result is a lush, sweet bread. The flavor and feel is right, even if the shape is radically different.

Though it has a browned crust, the bread itself is still somewhat delicate. It requires thick slices, which isn’t a bad thing at all, because it’s so soft and delicious.
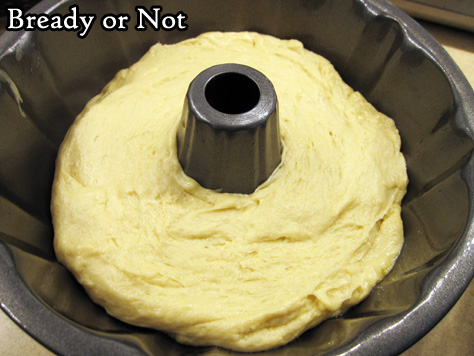
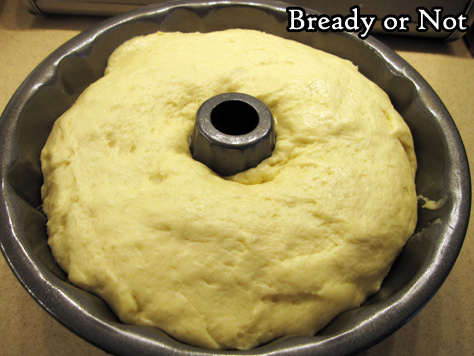
I don’t often share process photos on Bready or Not, but I think for this recipe, they will help. First of all, here’s what the bread looked like with the batter just placed in the bundt pan.
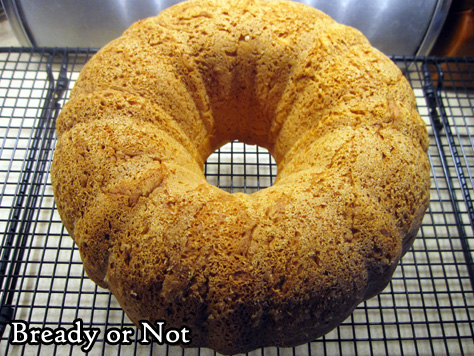
Here it is after the second rise!
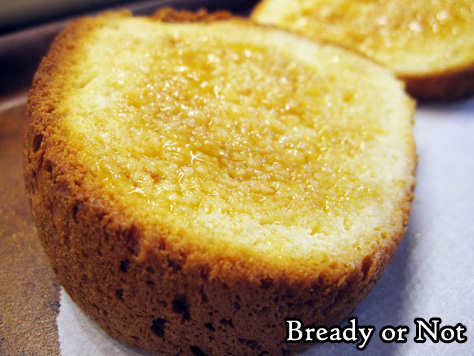
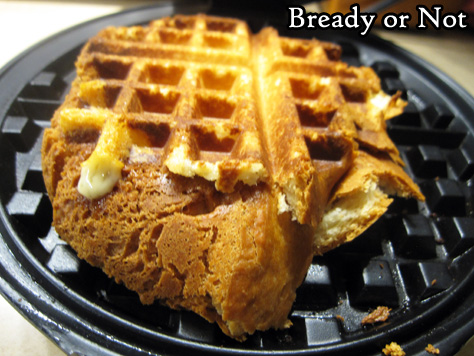
We found that the bread needed to be eaten hot, with toasted being the best. Since the pan made a big loaf–18 thick slices–I had plenty of bread to experiment with. I hit on the idea of using it for grilled cheese sandwiches using the waffle iron. This is THE BEST way to make grilled cheese, by the way.
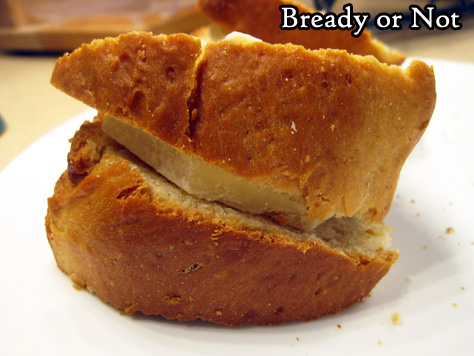
This shot shows how thick the bread was. I was still able to compress it in the waffle iron just fine, where in a matter of minutes, I created a no-fuss crispy, buttery masterpiece.
Bready or Not: Sally Lunn Bread in a Bundt Cake Pan
Equipment
- large food processor
- large bundt pan
Ingredients
- 1/2 cup milk
- 1/2 cup water
- 3 1/2 to 4 cups all-purpose flour
- 1/3 cup white sugar
- 1 teaspoon salt
- 2 1/4 teaspoon instant yeast
- 1/2 cup unsalted butter 1 stick, room temperature
- 3 large eggs room temperature
Instructions
- Warm the milk and water together, by microwave or stovetop, to about 100-degrees.
- Fit a plastic dough blade inside the food processor. Add 2 cups flour, the sugar, salt, and yeast. Pulse a few times. Add the milk-water, butter, and eggs, and pulse more. Add 1/2 cup more flour. Pulse again. Add the rest of the flour, pulsing until the dough becomes stiff.
- Cover mixer bowl with lid or plastic wrap and let dough rise at room temperature for about an hour. It should double.
- Remove plastic wrap, if using, and affix lid. Pulse a few times to beat down again–but be warned, the dough is so thick, the processor might jump around. Stay right there. The dough only needs a few seconds of pulses.
- Thoroughly grease the bundt pan. Pour in the batter and smooth it out to an even level. Cover pan with plastic wrap or a towel and let the dough rise until it has doubled again, about 50 minutes.
- Preheat oven at 325-degrees.
- Bake for 50 minutes. The loaf should look golden brown on top, and a digital thermometer plunged into the middle of the bread should read at least 190-degrees.
- Let loaf cool in pan about 20 minutes, then invert onto a rack to cool more. The bread is fragile to cut and requires thick slices. This Sally Lunn loaf is best eaten warm, especially toasted. It can also be cut into individual slices and frozen for later enjoyment.
OM NOM NOM!
Bready or Not Original: Bread Machine Cheesy Soft Dinner Rolls
I upgraded my original Soft Dinner Roll recipe in the most Beth Cato way possible: I added loads of cheese!

I don’t simply mix cheese into the dough like with a standard cheesy roll or biscuit recipe. Nah, that’s too mundane. I tried a take on lamination–the French technique wherein butter is layered to create flaky layers in pastry. But with cheese.

It worked out, in a beautiful way. In these pictures, you see a fine Vermont Cheddar. I highly recommend using an orange cheese (Cheddar, or if you are blessed, something like Red Leicester) because the finished rolls look amazing. White Cheddar would be great for flavor, too, though it would blend in more.

I wrote this recipe for bread machines, but it would be easy to modify to make by hand. Just let the dough have an initial rise for about an hour, mix the first portion of cheese in, then let it rise again before the lamination stage.

Bready or Not Original: Bread Machine Cheesy Soft Dinner Rolls
Equipment
- bread machine
- jelly roll pan or baking sheet
Ingredients
- 1 cup warm water about 110 degrees
- 1/4 cup vegetable oil
- 2 Tablespoons white sugar
- 3 cups bread flour
- 1 teaspoon kosher salt
- 2 1/4 teaspoons instant yeast or 1 packet instant yeast
- 6 ounces cheddar cheese shredded
Instructions
- Add ingredients EXCEPT cheese into the bread machine. That often means the liquids first. Set the machine on dough cycle and start; this should run for about 2 hours. Once the dough starts mixing, sprinkle in about half the cheese. If necessary–and if safely possible, dependent on the machine–use a spatula to press cheese into the dough. Let dough cycle continue until done.
- Prepare a cookie sheet or jelly roll pan by greasing with butter or nonstick spray.
- Pat out dough on an even lightly-greased surface. It’s time to add the rest of the cheese using a process roughly like French butter lamination.
- Sprinkle a handful of cheese over the lower portion of dough. Fold top part over it, then fold dough the other way, creating a fat dough ball. Pat out dough again. Repeat process again one or two more times, until only a handful of cheese is left.
- Pat out dough again. Use a small round cutter to slice out portions of dough. Place them in the prepared pan, spaced so they don’t quite touch. Sprinkle the remaining cheese on top. Cover pan with plastic wrap or a light towel and let rise again in a warm spot for 30 minutes to 1 hour, until rolls become puffy and double in size.
- Preheat oven at 350-degrees.
- Bake rolls for 15 to 22 minutes. If they begin to brown too much, cover with foil halfway through. Let rolls cool a few minutes before serving.
- Completely cooled rolls can be frozen in gallon freezer bags for several months. Sealed rolls will keep well at room temperature for at least 6 days. They are good eaten at room temperature, but are best briefly warmed in the oven.
*OM NOM NOM!*
Bready or Not: Swedish-Style Cardamom Buns
These Swedish-Style Cardamom Buns are as delicious as they are beautiful, and that’s saying a lot.

This enriched dough is light and luscious, and almost melts in the mouth. It’s also somewhat tricky to work with as the dough warms quickly as the rolls are formed. I was dismayed as the dough became tacky as I did the final rolls, but you know what?
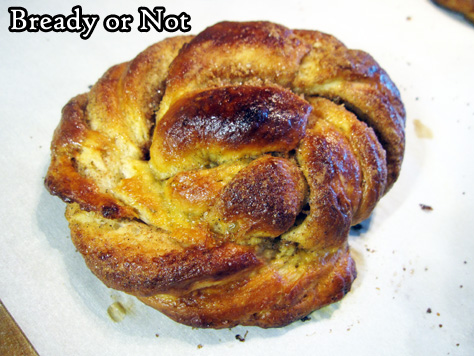
These rolls are beautiful as they are. Sure, Paul Hollywood would criticize them for not all being the exact same, but I’m not on Great British Bake Off–and neither are you. Embrace the wabi-sabi of these rolls, the perfection in imperfection.
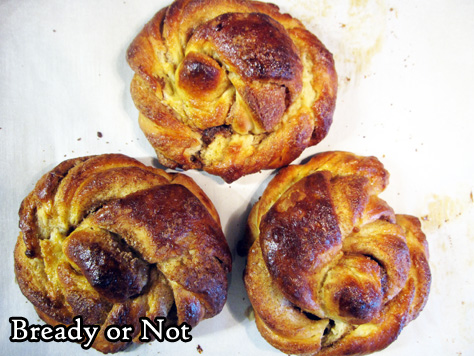
Plus, when it comes down to it, the flavor and texture are fantastic. The buttery crumb is perfect with a likewise buttery center swirl that’s packed with cardamom and cinnamon.

These buns taste best when slightly warm. Eat them fresh, and after that, give them a quick toast in the oven to wake up the flavor.

The buns will keep for up to 3 days at room temperature, but be sure they are in a sealed container. They can also be frozen and thawed later, no problem.

Make these buns to really impress guests–and yourself. Like me, I bet you’ll find this recipe to be a keeper.
Modified from Saveur Magazine Volume 4 2018.
Bready or Not: Swedish-Style Cardamom Buns
Equipment
- stand mixer
- parchment paper
- kitchen brush
Ingredients
Dough
- 1/2 cup cold milk or half & half
- 1 Tablespoon instant yeast
- 3 large eggs room temperature
- 1 teaspoon pure vanilla extract or vanilla bean paste
- 3 1/4 cups all-purpose flour plus more as needed
- 1/4 cup white sugar
- 1 1/4 teaspoons kosher salt
- 2 sticks unsalted butter (16 Tablespoons) cold, cut into cubes
Filling
- 1/4 cup white sugar
- 1/4 cup light brown sugar packed
- 1 Tablespoon ground cardamom
- 1 teaspoon ground cinnamon
- 1/2 stick unsalted butter (4 Tablespoons) softened
Instructions
- In a small bowl, whisk together the milk, 2 of the eggs, and the vanilla. Set aside.
- In the bowl of a stand mixer with a paddle attachment affixed, mix together the flour, sugar, and salt. Mix in the chilled butter cubes until they are broken down to the size of peas, which will take a minute or two. Keep the mixer running as the milk mixture is drizzled in. Everything should come together as dough.
- Turn out dough onto a lightly floured surface. Knead it into a ball and wrap it tightly in plastic wrap. Chill it in fridge for at least 6 hours, or a full day.
- About 2 1/2 hours before the buns are to be served, prepare to shape them. Line 2 baking sheets with parchment paper. In a small bowl, mix together the filling’s two sugars, cardamom, and cinnamon. In another bowl, beat the remaining egg with a splash of water and set it aside.
- Lightly flour a large, clean work surface and a rolling pin. [Note for bakers who have hot kitchens: you may need to move fast here, as high-butter content dough can be finicky as it warms.] Roll out the dough into a 12×16 rectangle. Use an uneven spatula or the back of a spoon to evenly spread the softened butter over the surface, leaving a 1-inch border along the top and bottom edges.
- Sprinkle the sugar and spice mixture over the butter. Brush the edges with the beaten egg; set aside the egg to use again for a wash in a short while. Fold the dough in half so that the two egg-washed edges meet. Then use a knife, pizza cutter, or bench knife to make ten even slices perpendicular to the fold.
- One at a time, pick up a strip at the two short ends and twist them each in opposite directions while pulling and stretching gently. Coil the strand to make a bun, tucking the outermost end underneath the round. Set on prepared sheet and continue to form more with several inches of space between them.
- Cover formed buns with plastic wrap and set aside to rise until puffed, about 1 1/2 hours.
- Preheat oven at 400-degrees and situate racks inside to have five inches of space between them.
- Remove the plastic wrap and brush the buns with the remaining egg wash. Bake for 12 minutes, then swap the pan positions in the oven, then bake another 8 to 12 minutes. Buns should be a consistent brown, and a digital thermometer discreetly plunged into a center roll should be over 190-degrees.
- Let rolls cool slightly before indulging. Rolls will keep for up to 3 days in a sealed container at room temperature, and will taste best warmed slightly in an oven or toaster oven. Rolls can also be frozen for later enjoyment.
OM NOM NOM!
Bready or Not Original: Food Processor Brioche Rolls
My no-fuss Food Processor Brioche Rolls recipe will dazzle your mind because they are SO EASY. Enriched doughs like this have a reputation (that is well-earned) to be time-consuming and aggravating. Not anymore.

The food processor is what makes this easy-peasey. It mixes the dough in no-time, and aerates the butter and eggs into the flour and develops that all-important gluten.
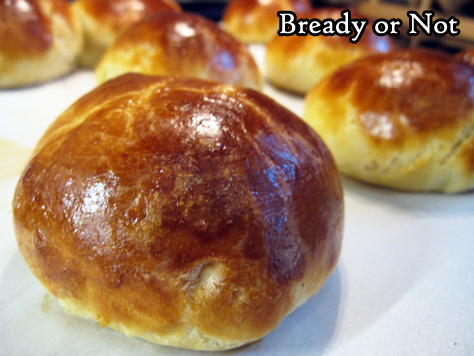
These rolls are good for any variety of uses, as they can be eaten with things sweet and savory. As the bread is nice and durable, we found they worked well for shredded pork sandwiches, with barbecue sauce and all.

Once these are baked-up, they are fantastic to freeze and thaw, too. They really are best eaten within a day–I suppose they still had to be fussy in at least one way!

Bready or Not Original: Food Processor Brioche Rolls
Equipment
- food processor
- food scale
Ingredients
1-lb batch
- 1/4 cup warm water no hotter than 130-degrees
- 2 1/4 teaspoon dry yeast 1 packet
- 1 3/4 cups all-purpose flour
- 3 Tablespoons white sugar
- 1/4 teaspoon salt
- 2 large eggs room temperature
- 6 Tablespoons unsalted butter melted
2-lb batch
- 1/2 cup warm water no hotter than 130-degrees
- 4 1/2 teaspoons dry yeast 2 packets
- 3 1/2 cups all-purpose flour
- 6 Tablespoons white sugar
- 1/2 teaspoon salt
- 4 large eggs room temperature
- 12 Tablespoons unsalted butter melted (1 1/2 sticks)
For egg wash
- 1 large egg room temperature
- 1 Tablespoon milk or half & half
Instructions
Follow these same directions, regardless of the batch size.
- Affix steel S-blade inside food processor.
- In a cup, stir together the dry yeast and water. Place the flour in the work bowl, followed by the yeast-water, sugar, and salt. Pulse a few times. Add the eggs and spin until they are mixed in, no more than 10 or 15 seconds.
- Start the processor on low and pour in the melted butter in a solid stream. Stop mixing after about 20 seconds. The dough will be very sticky and fluid.
- Apply nonstick spray or butter in a big mixing bowl. Pour in the dough. Cover with plastic wrap and let the dough rise at room temperature until it has tripled in size, no more than 3 hours. Keep an eye on it, because it can expand fast.
- Flour hands and punch down dough.
- Cover bowl with plastic wrap again, and stash the bowl in the fridge. Keep it there overnight, at minimum, or up to a day. It will rise a bit but nowhere near as much as the initial rise.
- To make rolls, prepare a baking sheet with parchment or nonstick spray.
- Prepare egg wash. Crack egg into a bowl. Beat in milk. In addition, add water to a small saucer and set it within reach.
- Grab small handfuls of dough. To get amounts even, use a kitchen scale to measure out 4-ounces worth. Working fast, pat into a ball. Dip fingers in water then stroke dough to smooth out rough spots. Set rounds on prepared sheet, spaced out. If the dough gets too sticky to work with, place in fridge briefly to chill again.
- Once rolls are formed, brush them with the egg wash. Let them rise for an hour, until nicely puffed.
- Preheat oven at 400-degrees.
- Gently brush on more egg wash. Place in oven and bake for 12 to 15 minutes, until browned and set. Doneness can be double-checked by jabbing a thermometer into a subtle spot along the bottom to ensure the middle is over 190-degrees.
- Rolls are best eaten within a day, but they keep very well frozen. Eat them warm or at room temperature.
