


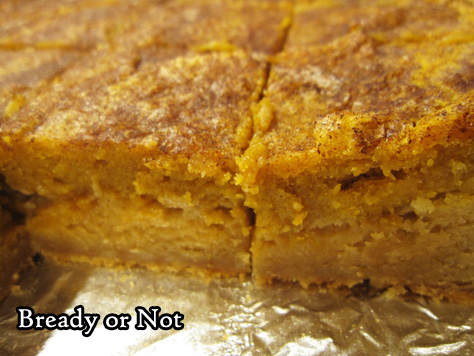
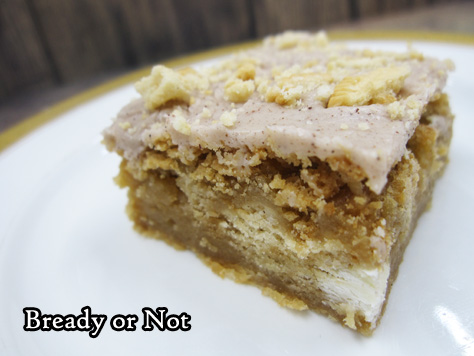
Bready or Not: Pumpkin Pie Snickerdoodle Bars
Happy Halloween! Today I bring you a major treat, no tricks. These Pumpkin Pie Snickerdoodle Bars will boggle your mind in the best kind of way.
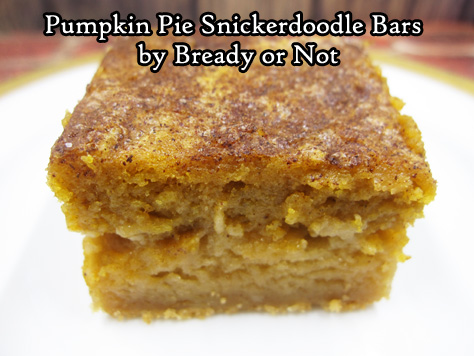
That’s because these bars really do, in fact, taste like a combination of Snickerdoodles and Pumpkin Pie. Crazy, right?
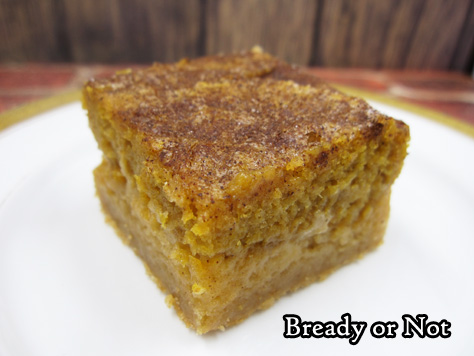
And since those two things are delicious, that means these bars are REALLY REALLY GOOD. Not just the flavors, but the combination of textures.

That’s because these are soft and dense, easy to eat in hand or with a fork. The ones in the middle might end up a little gooier, though. Not necessarily a bad thing.
The list of ingredients looks long but it actually comes together pretty fast. The ingredients are so alike, I didn’t even bother washing the bowl and beater, which saved a lot of time and effort.
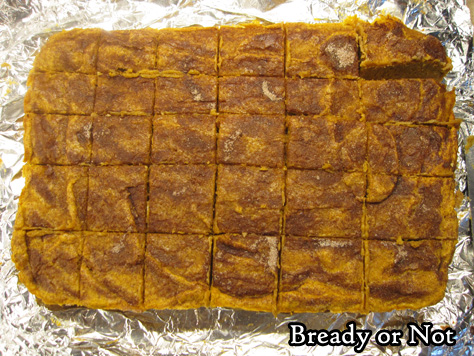
This makes a full 13×9 pan, so this is perfect for a potluck or family gathering. They might get softer after the two day point, but they will still be tasty.

Bready or Not: Pumpkin Pie Snickerdoodle Bars
Ingredients
Cookie Layer
- 1 cup unsalted butter 2 sticks, room temperature
- 2 cups brown sugar packed
- 2 eggs room temperature
- 1 Tablespoon vanilla extract
- 3 cups all-purpose flour
- 1 teaspoon baking powder
- 1/2 teaspoon salt
- 1/2 teaspoon cream of tartar
Pumpkin Pie Layer
- 1/2 cup unsalted butter 1 stick, room temperature
- 1 cup white sugar
- 2 eggs room temperature
- 1 teaspoon vanilla extract
- 1/2 teaspoon baking powder
- 1/2 teaspoon salt
- 1 teaspoon pumpkin pie spice heaping
- 1 cup all-purpose flour
- 15 ounce pumpkin puree
Topping
- 2 Tablespoons white sugar
- 1 teaspoon cinnamon
Instructions
- Preheat oven at 350-degrees. Line a 13x9 pan with foil and apply nonstick spray or butter.
- To make the cookie layer, cream together the butter and brown sugar. Once they are smooth, add the eggs and vanilla. Next, mix in the dry ingredients: flour, baking powder, salt, and cream of tartar. Spread the mixture evenly in the pan.
- Next up is the pumpkin pie layer. No need to wash the bowl. Cream together the butter and sugar followed by the eggs and vanilla. Add the baking powder, salt, pumpkin pie spice, and flour. Once they are just mixed, fold in the pumpkin puree. Spread the everything over the cookie layer.
- Spoon together the topping and add it evenly over the top of the dough.
- Bake for 38 to 41 minutes, until toothpick inserted in the center comes out clean (though it may still be softer when cut). Cool at room temperature at least an hour, then chill in fridge for several hours. Use the foil to lift the contents onto a cutting board to slice up.
- Keep stored chilled in a sealed container between waxed paper layers. Best consumed within 2 days; bars get mushier after that, but are still tasty.
- OM NOM NOM!
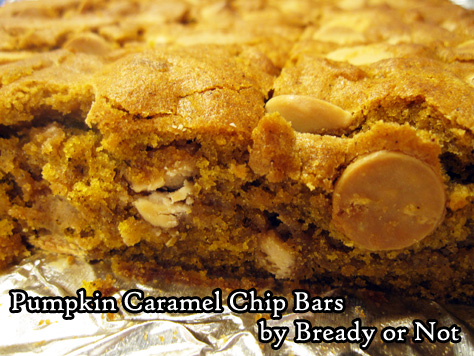
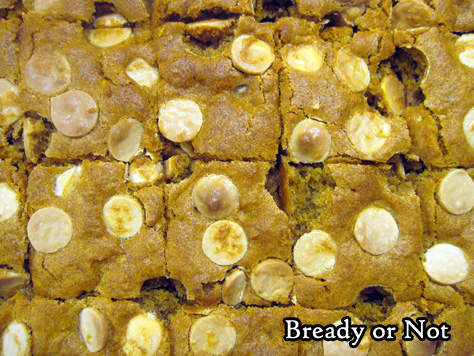
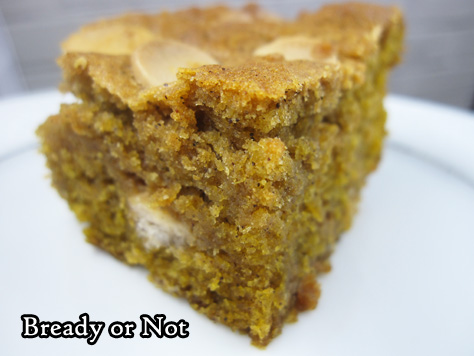
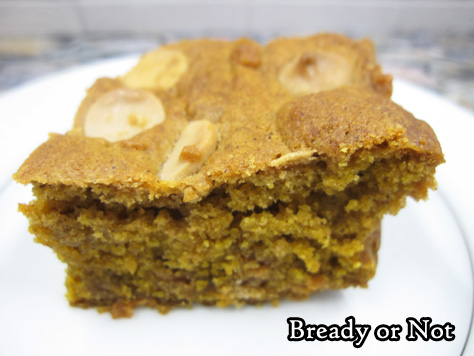
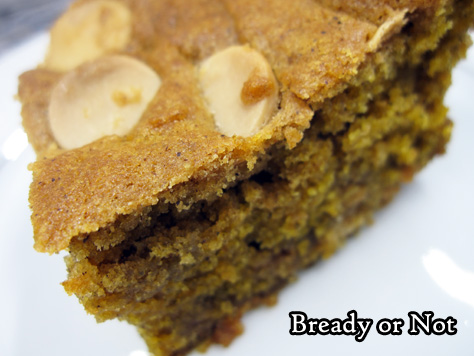
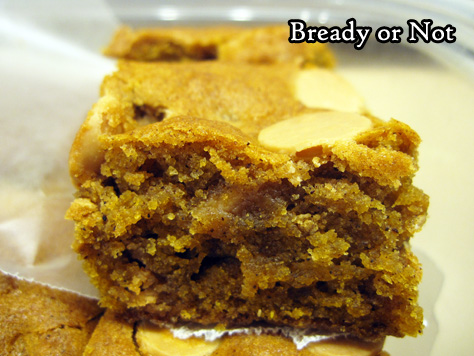
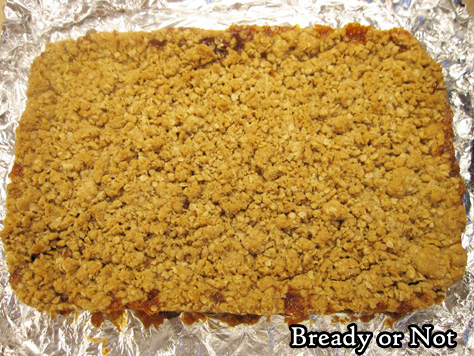
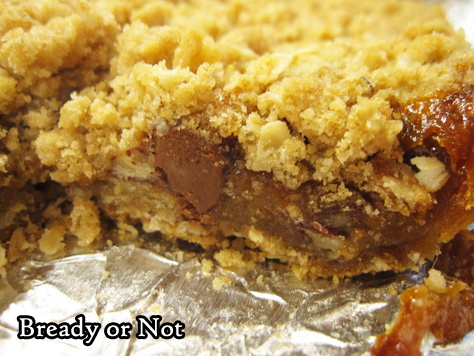
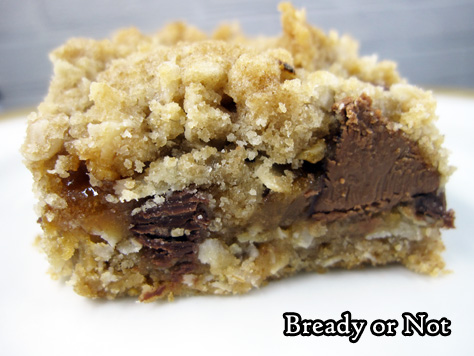
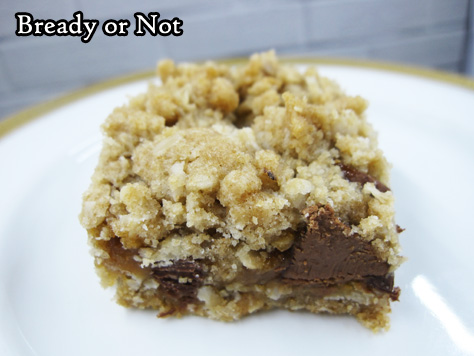
Bready or Not: Pumpkin Caramel Chip Bars
Caramel chips are a new and awesome thing in stores, and I couldn’t help but try pairing them with pumpkin in these bars. The result? YUM.
This is modified from a recipe I shared about a year ago for Pumpkin Chocolate Chip Bars.
I didn’t simply switch out the kinds of chips. I also decreased the spices. I wanted enough to add some flavor, but I didn’t want them to be spice cake-like as in the old version.
The use of bread flour creates bars that are especially thick and cakey. Unlike a standard frosted cake, these travel very well. The bars are nice and cohesive.
I like to place waxed paper between layers to prevent sticking and melting chips (because in Arizona, well, it’s still hot at this time of year).
Bready or Not: Pumpkin Caramel Chip Bars
Ingredients
- 1 cup all-purpose flour
- 1 cup bread flour
- 2 teaspoons cinnamon
- 1/2 teaspoon ginger
- 1/4 teaspoon allspice
- 1/4 teaspoon cloves
- 1 teaspoon baking soda
- 1 teaspoon salt
- 2 cups caramel chips divided
- 1 cup unsalted butter 2 sticks, softened
- 1/2 cup brown sugar packed
- 3/4 cup white sugar
- 1 large egg room temperature
- 2 teaspoons vanilla extract
- 1 cup pumpkin puree
Instructions
- Preheat oven to 350-degrees. Line a 13x9 pan with aluminum foil and apply nonstick spray or butter.
- In a medium bowl, combine the flours, cinnamon, ginger, allspice, cloves, baking soda, and salt. Stir in most of the caramel chips; coating them with flour will keep them from sinking as they bake. Set bowl aside.
- In a big mixing bowl, combine the butter and two sugars until light and fluffy, scraping down the sides of the bowl as needed. Add the egg, vanilla extract, and pumpkin puree. Once that's mixed, slowly blend in the dry ingredients until just combined.
- Pour the batter into the ready pan and smooth out. Sprinkle the remaining caramel chips over the top.
- Bake for 30 to 35 minutes, until it passes the toothpick test in the middle. Cool completely. Lift up by the foil and place on a cutting board to cut bars. Store in a sealed container at room temperature or chilled. Since pumpkin can be a little sticky, use parchment or wax paper between stacked layers of bars.
- OM NOM NOM!
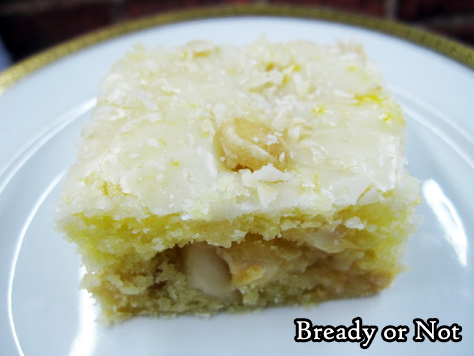
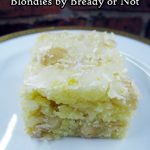
Bready or Not: Lemony Macadamia Nut Blondies
Welcome to MACADAMIA NUT MONTH! Why is this Macadamia Nut Month? Because next month on the 23rd, the final book in my Blood of Earth trilogy comes out! Macadamia nuts are a big product of Hawaii, and Hawaii is a major setting in Roar of Sky. Plus, macadamia nuts are awesome.

If you love these nuts, get ready to bliss out. This month includes recipes for:
White Chocolate Macadamia Nut Pie
White Chocolate Macadamia Nut Cookies
Lemony Macadamia Nut Bars (today)
Mini Fruit Cake Loaves to make now for the holidays (macadamia nuts optional)
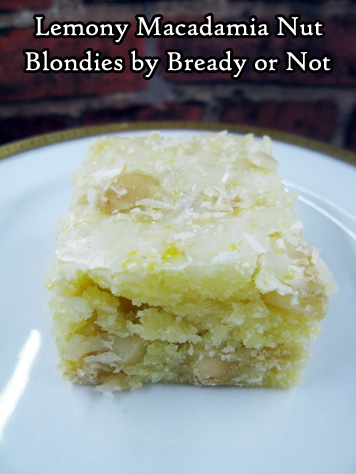
Sweet, tart, crunchy, fresh: these Lemony Macadamia Nut Blondies have it all going on.
My husband loves good lemon treats, and these met his whole-hearted approval–and his co-workers apparently went bonkers for them, too.

I’m honestly surprised there aren’t more goodies out there that combine lemon and macadamia nuts. It’s such an awesome combination.
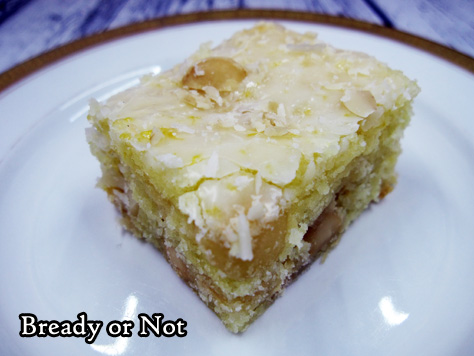
Here, the chewiness of the blondies is amped up by a very thin glaze that soaks into the bars while they are still hot. I was afraid the glaze might make them too sweet, but it turned out perfect.
If you have leftover macadamia nuts around, do remember to store them in the fridge! Their high fat content can cause them to spoil at room temperature, whereas they will keep for ages in the fridge.

Trust me, no one wants to eat rancid nuts.
Modified from Epicuricloud.
Come back next week for a recipe with optional macadamia nuts: mini fruit cake loaves, quite customizable with the dried fruit and nuts! And please preorder Roar of Sky!
Bready or Not: Lemony Macadamia Nut Blondies
Ingredients
Bars
- 1 cup unsalted butter 2 sticks, softened
- 1 1/2 cups white sugar
- 4 eggs room temperature
- 3 lemons zested, setting aside a pinch for the glaze
- 2 Tablespoons fresh lemon juice
- 1 1/2 teaspoons lemon extract
- 1 1/2 cups all-purpose flour
- 1/2 teaspoon salt
- 1 cup white chocolate chips
- 1/2 cup macadamia nuts
Glaze
- 1 cup confectioners' sugar
- 2 Tablespoons lemon juice
- lemon zest
- 1/4 cup macadamia nuts finely chopped
Instructions
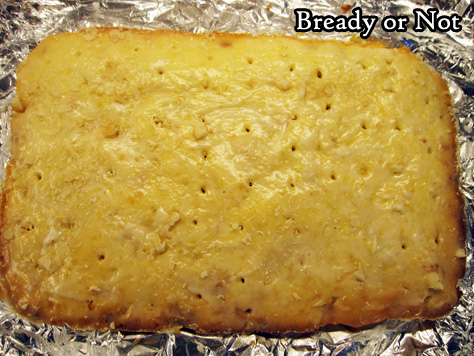
- Preheat oven to 350 degrees. Line a 13x9-inch pan with foil and apply nonstick spray.
- In a large bowl, cream together the butter and white sugar. Add eggs one at a time followed by the lemon zest, lemon juice, and lemon extract. Stir in the flour and salt. When those are just incorporated, add the white chocolate chips and macadamia nuts.
- Pour the batter into the ready pan. Bake for 25-35 minutes, until it passes the toothpick test in the middle.
- Immediately after that is done baking, make the glaze by stirring together the confectioners' sugar and reserved lemon juice and zest. Use a chopstick or similar tool to poke small holes across the top of the blondies. Pour the glaze over the top and use a spoon to distribute it evenly. Sprinkle the remaining nuts on top.
- Let pan cool completely. Use the foil to lift the contents onto a cutting board. Slice into bars. Store in a sealed container with wax paper or parchment between the layers.
- OM NOM NOM!
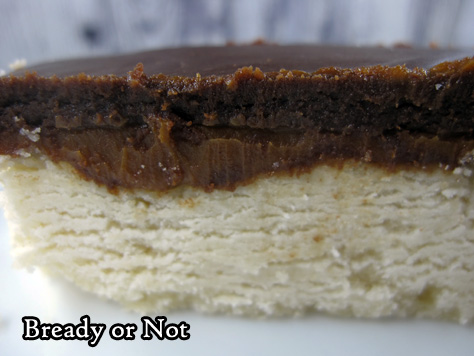
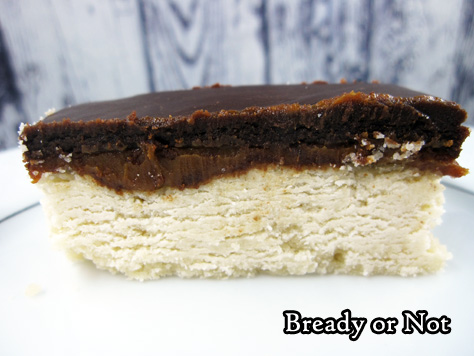
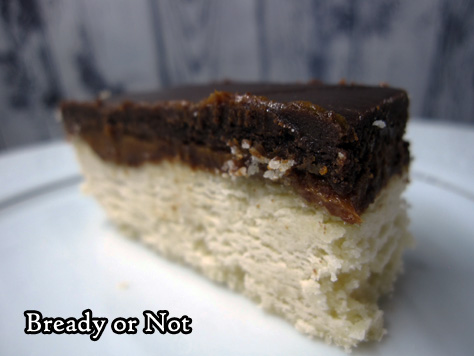
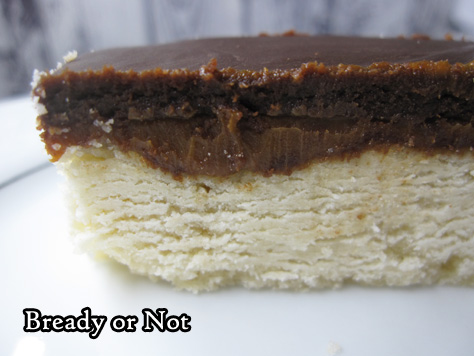
Bready or Not: Homemade Twix Bars
If you’re craving candy bars–a lot of candy bars–this recipe will result in a casserole dish of Twix-like yumminess.
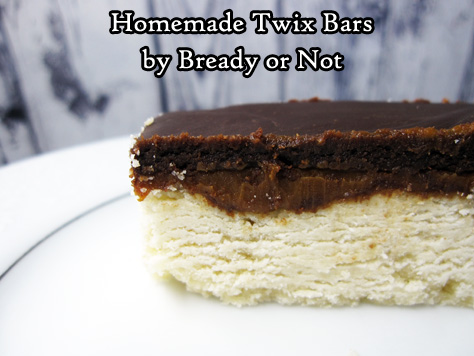
These are a bit softer than Twix, but the similarities are there. The crust is like cakey shortbread topped with caramel-sweet dulce de leche. Chocolate finishes off the top.

As the pictures show, there are some crumbs. Very delicious crumbs. I found the chocolate layer on top stayed soft, even after chilling.
This is the perfect recipe for feeding a large crowd. If you cut them into long rectangles, like Twix, you’ll have a lot!
But if you have leftovers, no worries–these keep well for days in the fridge, and you can also freeze them between waxed paper layers. Just thaw them in the fridge when your craving strikes again.
Modified from Twixy Shortbread Bars in Better Homes & Gardens.
Bready or Not: Homemade Twix Bars
Ingredients
Cookie base:
- 1 1/2 cups unsalted butter 3 sticks, softened
- 1/2 cup white sugar
- 1 1/2 teaspoons vanilla extract
- 3 cups all-purpose flour
Middle:
- 13.4 oz dulce de leche can
Chocolate top:
- 3/4 cup whipping cream
- 6 Tablespoons unsalted butter
- 3 Tablespoons light corn syrup
- 12 ounces semisweet chocolate chips 1 bag
- 3/4 teaspoon vanilla extract
Instructions
- Line a 13x9-inch pan with aluminum foil and apply nonstick spray.
- In a large bowl beat the 1 1/2 cups butter until soft and creamy. Add the sugar and vanilla. Beat in the flour. Press the dough into the prepared pan and set in fridge to chill for at least 30 minutes.
- Preheat oven at 350-degrees. Bake the pan with dough for 20 to 25 minutes, until set and turning light brown. Cool on rack.
- Spread contents of dulce de leche can evenly over the crust.
- In a saucepan on medium heat, warm up the whipping cream, 6 tablespoons of butter, and corn syrup until they are just boiling. Remove from heat. Add the chocolate and vanilla but don't stir! Let it sit for 5 minutes. Stir until nice and smooth. Cool another 10 minutes, then pour chocolate over the dulce de leche. Spread it evenly over the top. Cover and chill for an hour or two.
- Use the foil to lift contents of pan onto a large cutting board. Slice into bars.
- These homemade candy bars keep best in the fridge, and can also be frozen (and later thawed in fridge). If at room temperature for a prolonged period, the bottom crust may get soggy.
- OM NOM NOM!
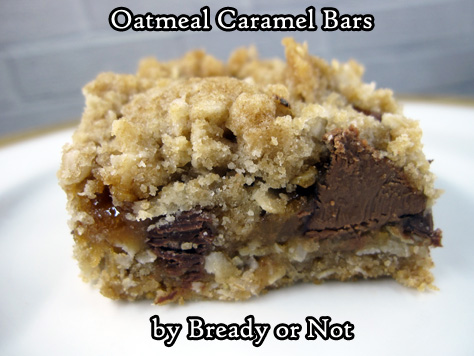
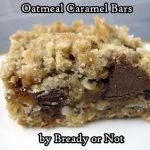
Bready or Not: Oatmeal Caramel Bars
I’d like to thank my past self for setting me up to re-discover this Oatmeal Caramel Bars recipe.
When I was home last Thanksgiving, my mom gave me a stack of her old recipes and food magazines to go through. A lot of the material dated to the 1970s and ’80s and went straight in the recycle pile.
Mixed in with everything else, though, I found some little food magazines I had bought back in 1999 as I looked toward getting married. One of them highlighted favorite recipes from the Pillsbury Bake-Off.
This recipe, originally titled Oatmeal Carmelitas, dated from the 1960s. I knew I had to make it.
The recipe essentially makes a big, fat candy bar. Oatmeal forms the crust, while the middle consists of chocolate chips and gooey caramel.
Yeah. This isn’t a health recipe, but wow, is it good. This was worth being published again in 1999–and again now, with some new tweaks.

Bready or Not: Oatmeal Caramel Bars
Ingredients
Crust:
- 2 cups all-purpose flour
- 2 cups quick oats
- 1 1/2 cups brown sugar packed
- 1 teaspoon baking soda
- 1/2 teaspoon salt
- 1 1/4 cups unsalted butter 2 1/2 sticks, room temperature
Filling:
- 14 ounce caramel jar
- 4 Tablespoons all-purpose flour
- 1 cup semi-sweet chocolate chips
- 1/2 cup pecans chopped
Instructions
- Preheat oven at 350-degrees. Line a 13x9 pan with aluminum foil and apply nonstick spray.
- In a large bowl, combine all crust ingredients until crumbly. Reserve half, about 3 cups, for the topping, and press the rest into the bottom of the pan. Bake for 10 minutes.
- Meanwhile, in a medium bowl, stir together the caramel and 4 Tablespoons of flour.
- When the crust is done baking, sprinkle chocolate chips and pecans over the top, then drizzle evenly with the caramel mixture. Add the reserved crumb mixture on top.
- Return to the oven for about 20 minutes, or until golden brown. Cool for an hour or so, then set in fridge to completely chill for several hours or overnight. To cut, use the foil to lift contents to a cutting board. Slice into bars.
- Store in sealed container in fridge with layers between pieces of parchment or wax paper. Bars will stay more cohesive if chilled; they are gooier at room temperature.
- OM NOM NOM!
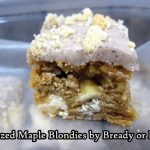
Bready or Not Original: Glazed Maple Blondies
This is a repost of an old favorite recipe: Glazed Maple Blondies.
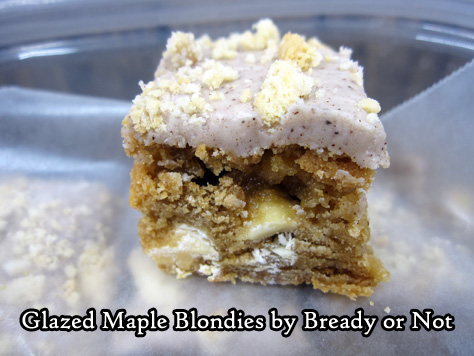
Last fall when I prepared my Sweet Maple Cookbook, I remade and rewrote my original recipe. This wasn’t just to check the wording in the recipe, but to double check a major modification: using Golden Oreos.
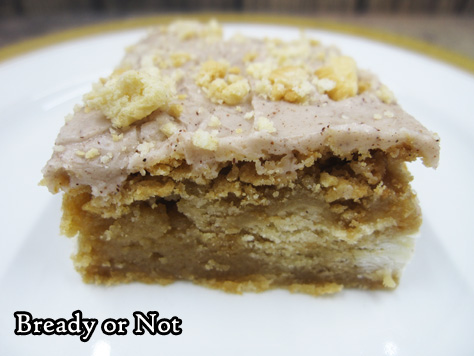
That’s because some of us, in blighted wastelands (aka Arizona), don’t have a wide variety of maple products available year-round. Maple cream sandwich cookies are a brief Christmastime dream. Golden Oreos, however, are available year-round just about everywhere.
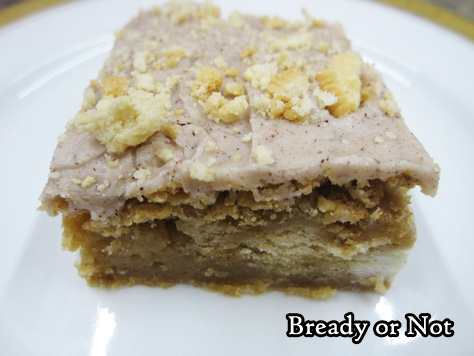
I found just the right balance of Golden Oreos and additional maple flavor to compensate for the lack of maple cookies. I tell you, my job is so strenuous at times.
My husband’s co-workers test and comment on most of my sweet recipes, and for them, this is an all-time favorite. Bake it up yourself, and see why!

Also, be sure to grab the Sweet Maple Cookbook over on Amazon! It includes this maple recipe and so much more.
Bready or Not Original: Glazed Maple Blondies
Ingredients
Blondies:
- 2 cups all-purpose flour
- 1 teaspoon baking powder
- 1/4 teaspoon baking soda
- 3/4 teaspoon salt
- 1 box maple cream cookies
- 10 Tablespoons butter melted
- 1 cup brown sugar packed
- 1/2 cup pure maple syrup
- 2 eggs room temperature
- 1 teaspoon vanilla extract
- 1 cup white chocolate chips
Glaze:
- 2 cups confectioners' sugar sifted
- 1 teaspoon cinnamon
- 2 Tablespoons butter melted
- 3/4 teaspoon maple flavor
- 2 Tablespoons + milk almond milk works
Instructions
Blondies:
- Line a 9x13 pan with aluminum foil and apply nonstick spray. Preheat oven to 350-degrees. Combine the dry ingredients in a bowl. Set aside. Coarsely chop the cookies. Reserve 1/4 cup of the finer crumbs.
- In a mixing bowl, blend the butter, brown sugar, and maple syrup. Add the eggs and vanilla. Pour in the flour mix until just combined, then stir in the white chocolate chips and cookie pieces.
- Spread batter in the pan. Bake for 20 minutes, or until a toothpick comes out clean. Let the blondie layer cool completely. Place in fridge to speed the process along, if necessary.
Glaze:
- Combine glaze ingredients in bowl. Add enough milk to make the icing spreadable, not runny. Immediately dollop over blondies and smooth out. Quickly sprinkle on the reserved crumbs. Use fingers to gently press in.
- Place pan in fridge to set for hour or two. Use the foil to lift the blondies onto a cutting board for easy slicing. Store refrigerated in a sealed container, between wax paper layers.
- OM NOM NOM!
