


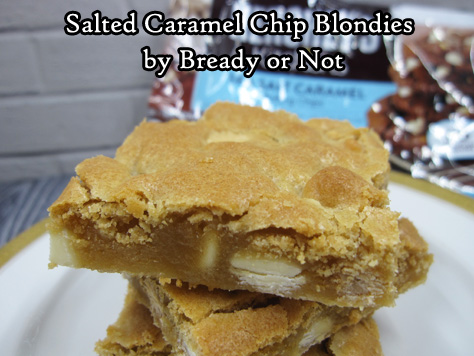
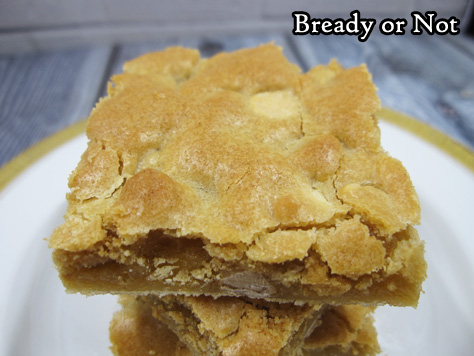
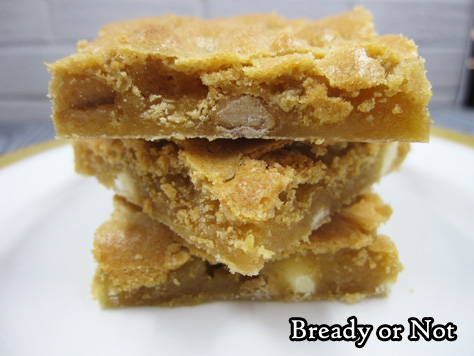
Bready or Not Original: Salted Caramel Chip Blondies
Salted Caramel Chips now exist. There is hope for our world yet.
“What makes these chips different than just using caramel chips?” Well, they have the texture of and keep their shape like regular chocolate chips. Caramel bits are more chaotic–they melt, they ooze, they can create a sticky mess.
More and more stores are carrying salted caramel chips around Arizona. Locally, I have found Ghirardelli (at Walmart), Nestle (at Walmart and several stores), and a Kroger-branded kind (at Fry’s Grocery Store).
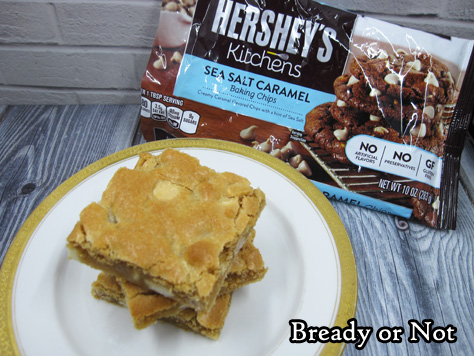
All three work and have a good flavor, but I liked the Kroger one the least. The color looks more artificial (yeah everything is about these is artificial but…) and the pieces are small and not quite as rich in flavor. Still, their price is good and they aren’t bad, by any means.
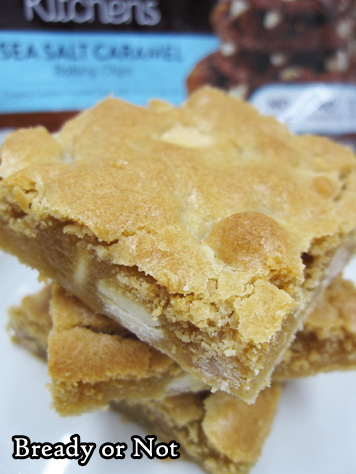
You’ll see these chips used in a couple recipes in the next while–I bought several bags to test out!
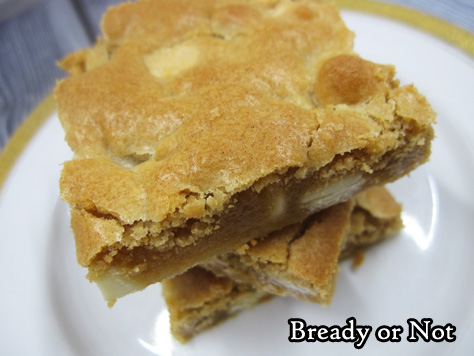
While I’ll definitely stick to using real caramel in things like pies, these salted caramel chips are now my go-to for cookies and bars.
I do suggest keeping the ratio of 1 cup chocolate chips with 1 cup of caramel chips in this recipe. The caramel chips ARE strong–they are like butterscotch in that way–and the white chocolate adds a different kind of sweetness to balance them out.
Bready or Not Original: Salted Caramel Chip Blondies
Ingredients
- 2 1/4 cups all-purpose flour
- 1 1/2 teaspoons baking powder
- 1/2 teaspoon salt
- 3/4 cup unsalted butter 1 1/2 sticks, room temperature
- 1 1/4 cups white sugar
- 1 1/4 cups brown sugar packed
- 2 teaspoons vanilla extract
- 3 large eggs room temperature
- 1 cup white chocolate chips
- 1 cup salted caramel chips
Instructions
- Preheat oven to 350-degrees. Line a 10x15 jelly roll pan with wide aluminum foil and apply nonstick spray or butter.
- In a small bowl, mix together the flour, baking powder, and salt. Set aside.
- In a mixing bowl, beat together the butter, both sugars, and vanilla to create a smooth batter. Beat in eggs, one at a time, followed by the flour mixture. Stir in the cup of white chocolate and cup of salted caramel chips. Spread batter evenly in pan.
- Bake until evenly golden brown and set in the middle, 24 to 27 minutes. Cool completely at room temperature or chill before cutting. Blondies keep for up to 3 days in a room temperature sealed container.
- OM NOM NOM!
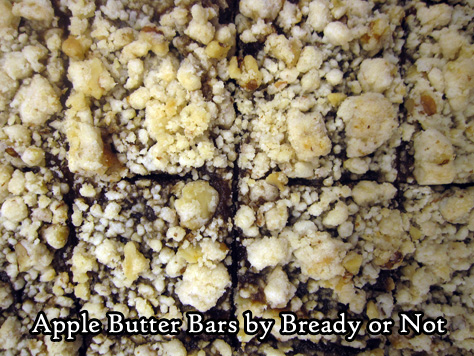
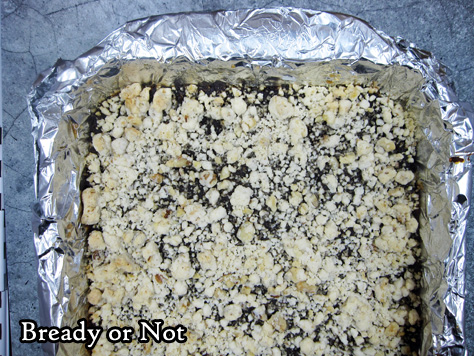
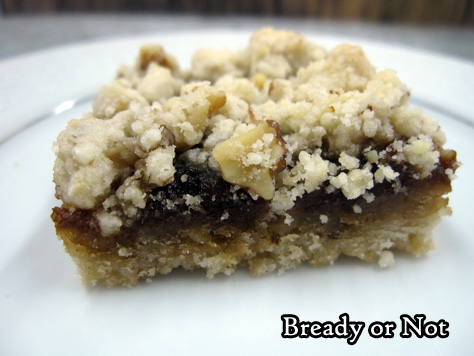
Bready or Not Original: Apple Butter Bars
Last month I shared a recipe for Apple Butter Oatmeal Bars. This time around, I’m sharing easy and straightforward Apple Butter Bars.
This is a totally original recipe out of necessity. I tried another recipe, and ended up with a crumbly mess. Therefore, I decided to adapt my Lemon Cheesecake Bar recipe.
That attempt turned out perfect. It’s fast to make, as you don’t have to bake in stages, and the end result was cohesive.
Do note that these are best chilled. They will get softer if kept at room temperature for a while.
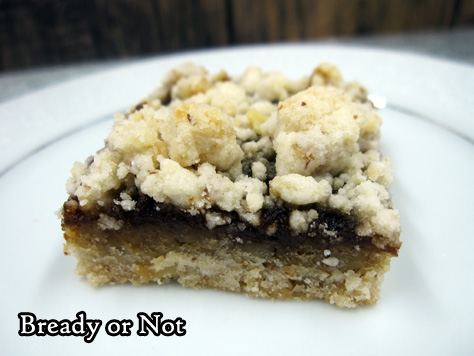
The taste is phenomenal. The crumb layers taste like vanilla shortbread, with a sporadic crunch from nuts. The thin layer of apple butter adds just the right about of spice and flavor.

This would be great with other fruit butters, too!
Bready or Not Original: Apple Butter Bars
Ingredients
- 2 cups all-purpose flour
- 1 cup walnuts chopped finely
- 1 cup confectioners' sugar
- 3/4 cup unsalted butter 1 1/2 sticks, softened
- 2 teaspoons vanilla extract
- 1 1/2 cups apple butter or other fruit butter
Instructions
- Preheat oven at 350-degrees. Line a 9x13 pan with aluminum foil and apply nonstick spray or butter.
- In a large bowl, blend together flour, walnuts, confectioners' sugar, butter, and vanilla, until it is crumbly. Reserve 1 1/2 cups of crumbs; press the rest into the ready pan.
- Bake for 18-20 minutes, until the edges are turning golden brown and crust is set.
- Pour apple butter over crust and smooth to edges. Crumble reserved flour mixture all over the top. Return the pan to the oven and bake for another 20 to 25 minutes.
- Cool to room temperature then chill in fridge. Use foil to lift out bars to slice. Store in sealed container in the fridge for maximum flavor and cohesiveness.
- OM NOM NOM!
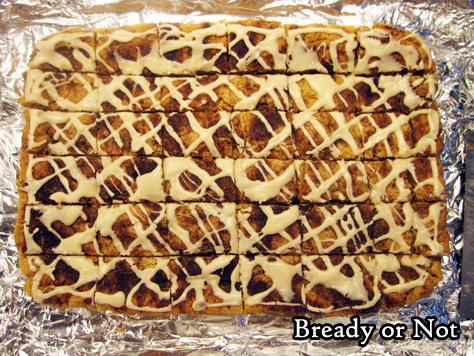
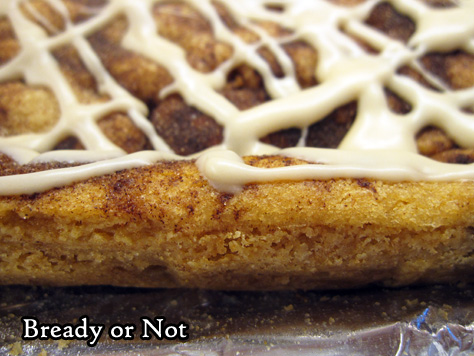
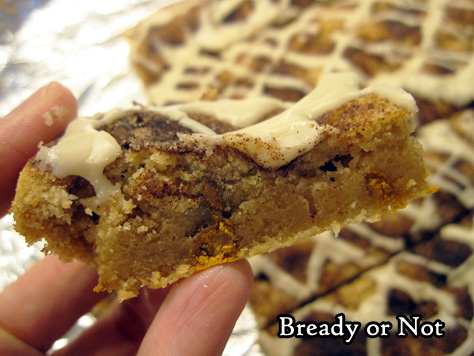
Bready or Not: Maple-Glazed Cinnamon Chip Bars
Most of the sweet treats I make go with my husband to his work. These Maple-Glazed Cinnamon Chip Bars left everyone there dazzled and amazed.
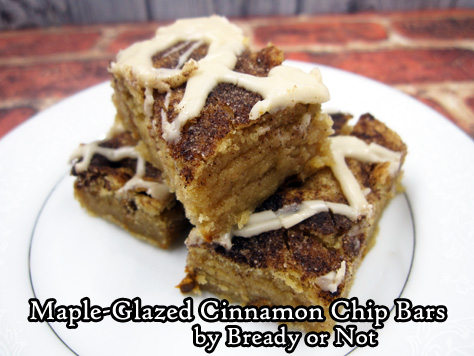
I confess, they turned out even better than I anticipated, too, though I knew from the start they combine many of my favorite things: soft and chewy blondie bars, cinnamon chips, more cinnamon and sugar on top, and a touch of maple glaze.
I actually debated whether or not the glaze was necessary. Would it be too sweet?
I soon found out that no, the glaze was not too sweet. It adds just a little extra oomph to complement the existing sweetness in the bars.
The bars travel keep and travel well, too. I kept them chilled in the fridge–I live near Phoenix, after all, my kitchen tends to be warm year-round–in sealed containers, with waxed paper between stacked layers. We found the bars were amazing after three days, but it’s kind of a miracle they lasted even that long.
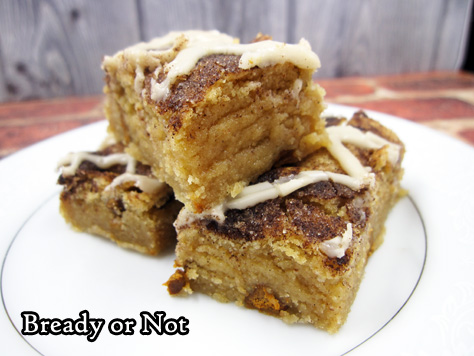
These things are GOOD. Really good. Even by Bready or Not standards.
Modified from Taste of Home 13×9 Holiday Special Issue, 2015.
Bready or Not: Maple-Glazed Cinnamon Chip Bars
Ingredients
Bars
- 1 cup unsalted butter 2 sticks, softened
- 2 cups brown sugar packed
- 2 large eggs
- 2 teaspoons vanilla extract
- 2 2/3 cups all-purpose flour
- 2 teaspoons baking powder
- 1 teaspoon salt
- 3/4 cup cinnamon chips
Topping
- 1 Tablespoon white sugar
- 1 teaspoon cinnamon
Glaze
- 1/2 cup confectioners' sugar
- 3 Tablespoons pure maple syrup
- 1/2 teaspoon vanilla extract
Instructions
- Preheat oven at 350-degrees. Line a 13x9 baking pan with aluminum foil and apply nonstick spray.
- In a large bowl, cream together butter and brown sugar, followed by the eggs and vanilla.
- In a separate bowl, sift together flour, baking powder, and salt. Gradually beat the dry ingredients into the butter mixture. Fold in the cinnamon chips.
- Spread batter in the pan. Combine the topping ingredients and sprinkle them all across the top of the batter.
- Bake for 20 to 25 minutes, until golden brown and the middle passes the toothpick test. Cool completely in pan on a wire rack.
- To make the glaze, combine all three ingredients in a small bowl until smooth in texture. Drizzle over top of bars and let set for fifteen minutes.
- Use foil to lift contents onto cutting board. Slice into bars. Store in an airtight container between layers of wax paper, either at room temperature or refrigerated.
- OM NOM NOM!
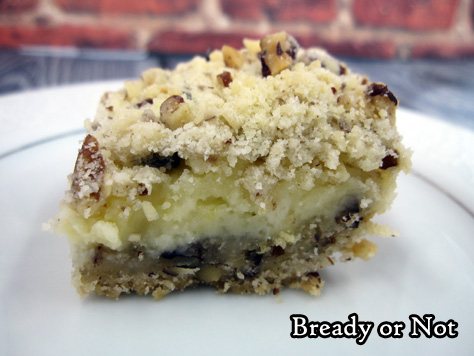
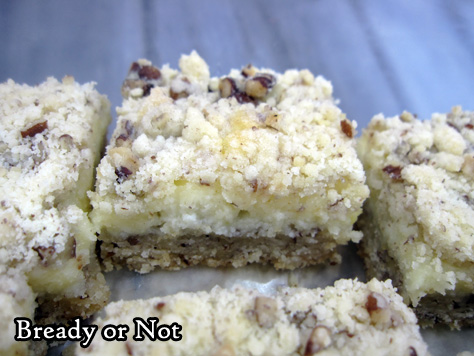
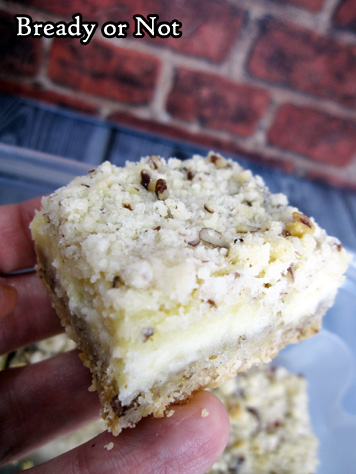
Bready or Not Original: Lemon Cheesecake Bars
Lemony. Fresh. Perfection. Those words are the best way to describe these incredible bars.
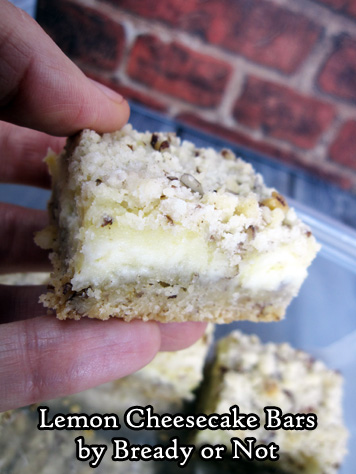
Not only are these delicious, but they are easy to make. A food processor is especially handy as you can chop up the nuts and then add in the rest of the crust ingredients, too.
To soften the cream cheese for the filling, leave it at room temperature for a bit, or do what I usually do: place the cheese on a plate and microwave for like 5 seconds. Then flip it over and zap again, if needed. It just needs to be soft enough to blend, not cooked.
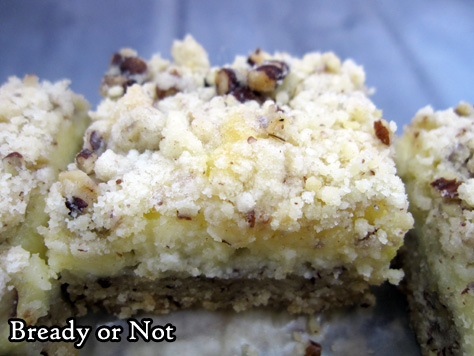
I confess, I sometimes get nervous when I do dessert bars with bottom crusts. Because sometimes, no matter how I compress them into the pan, they fall apart when the bars are cut apart. Not so here! They were surprisingly cohesive. (Here’s hoping you have the same experience.)
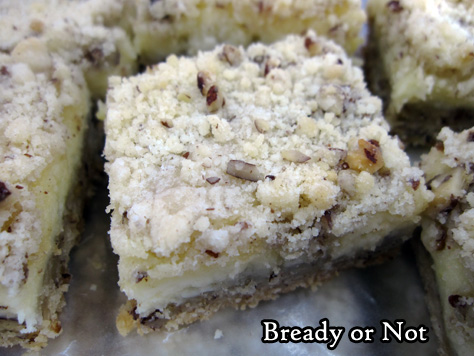
That cohesiveness makes these dangerously easy to eat. These bars have it all going on. Buttery crumb. Nutty crunches here and there. Vivid lemon flavor in the creamy filling.
I’d like to report how long these can last in the fridge, but I don’t know. I make these bars, and they are suddenly GONE. Poof.
Bready or Not Original: Lemon Cheesecake Bars
Ingredients
Crust
- 1 cup pecans
- 2 cups all-purpose flour
- 1 cup confectioners' sugar
- 3/4 cup unsalted butter 1 1/2 sticks , softened
Filling
- 2 cups confectioners' sugar
- 16 oz cream cheese 2 boxes, softened
- 2 lemons zested and juiced
- 1/3 cup fresh lemon juice
- 1 teaspoon lemon extract
- 2 eggs
Instructions
- Prepare a 9x13 pan with aluminum foil and nonstick spray. Preheat oven at 350-degrees.
- Use a food processor (or knife and cutting board) to chop up pecans to small pieces. Add flour, 1 cup confectioners' sugar, and butter to bowl, and blend with pecans until crumbly. Reserve 1 1/2 cups of the mix; press the rest into the prepared pan. Bake for 18 to 20 minutes, until it's just turning golden.
- As the crust bakes, combine all of the filling ingredients until fairly smooth.
- Pull the crust out of the oven. Pour filling over the top and smooth to the edges. Crumble the reserved crust across the top.
- Bake for another 30 to 35 minutes, until the edges are golden and the middle is set.
- Cool on a wire rack for 30 minutes to an hour, then place in the fridge to completely chill.
- Use the foil to lift the bars onto a cutting board for easy slicing. Store in a sealed container in the fridge.
- OM NOM NOM!
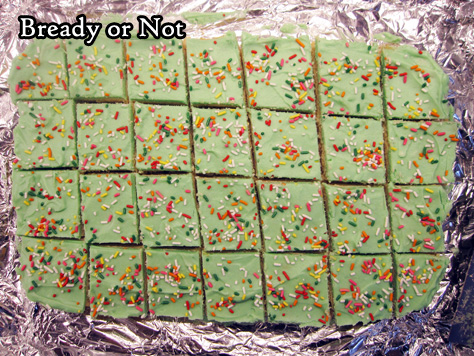
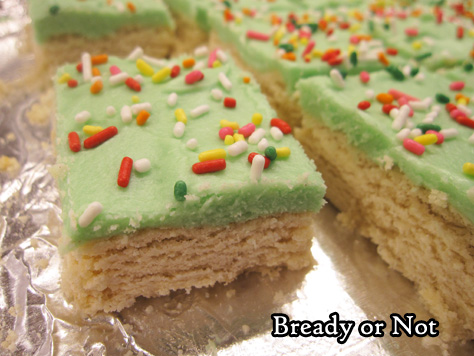
Bready or Not: Sugar Cookie Bars
Frosted sugar cookies are awesome, but let’s be honest–they are kind of a pain. Individual cookies that need to be frosted individually. It’s time-consuming and messy.
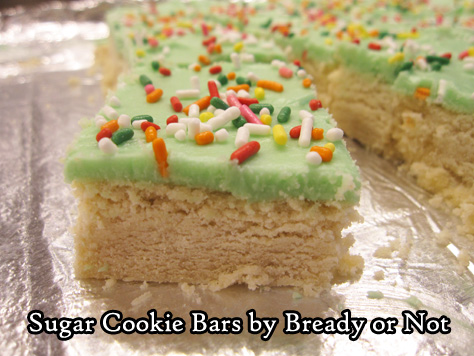
Simplify the process! Make sugar cookie bars. Bake up the whole pan in under 25 minutes. Let it cool. Frost. Slice. EAT.
The cookies are like shortbread in texture, buttery and firm. The frosting layer is just the right thickness and sweetness.
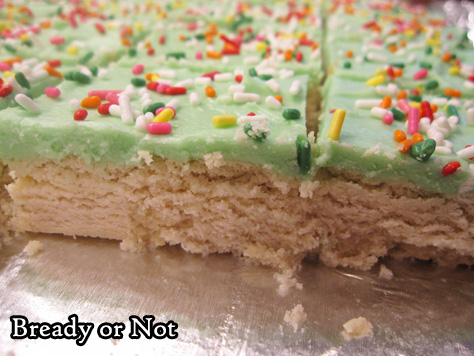
Color the frosting however you wish; I like to use Americolor dyes. And sprinkles. Sprinkles make everything better, right?
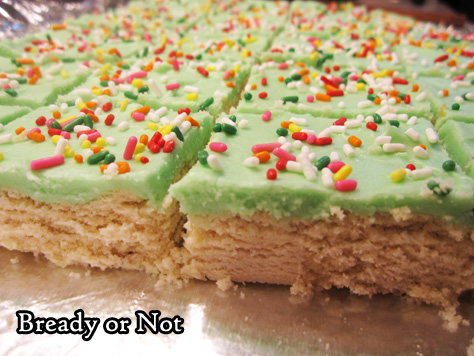
The end result is a basic and delicious frosted sugar cookie. They’re easy to pack for a party or potluck, too–stack them in a container with wax paper between the layers!
Modified from Lauren’s Latest.
Bready or Not: Sugar Cookie Bars
Ingredients
bars
- 1 cup unsalted butter 2 sticks , softened
- 1 cup white sugar
- 1 large egg
- 1 1/2 teaspoons vanilla extract
- 1 teaspoon almond extract
- 3 cups all-purpose flour
- 1 teaspoon baking powder
- 1/2 teaspoon salt
frosting
- 1/2 cup unsalted butter 1 stick, softened
- 2 cups confectioners' sugar
- 2 teaspoons vanilla extract
- 2 - 4 Tablespoons milk or half & half
- food dye
- sprinkles if desired
Instructions
- Preheat oven at 350-degrees. Line a 9x13 baking dish with aluminum foil and apply nonstick spray.
- In a large bowl, beat together the butter and white sugar until fluffy. Add the egg and both extracts, then the dry ingredients. Mix until just combined.
- Evenly compress the dough into the prepared pan. Bake for 20 to 25 minutes, until the edges are golden brown. Completely cool.
- To make the frosting, beat together the butter, confectioners' sugar, vanilla, two tablespoons milk, and a few drops of food dye. Add more milk to reach a spreadable consistency. Lift the uncut cookie bar out by the foil, then spread frosting on top. Add sprinkles. Slice bars. Store in a sealed container, stacked between wax paper layers.
- OM NOM NOM!
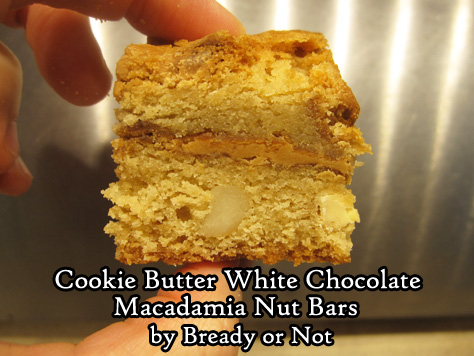
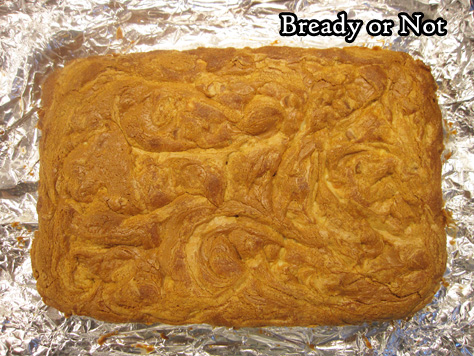
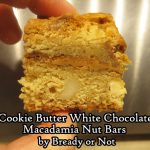
Bready or Not Original: Cookie Butter White Chocolate Macadamia Nut Bars
Cookie butter makes everything better. This is a maxim of life. It is proven true yet again with these Cookie Butter White Chocolate Macadamia Nut Bars.
Cookie butter is found by the peanut butter in most grocery stores in the US these days. The most popular brands are Biscoff and Speculoos, but Walmart, Kroger, and Sprouts even have their own jars now!
What does cookie butter taste like? Well… rich, buttery cookie dough rendered into peanut butter-like form. That’s the only way to describe it.
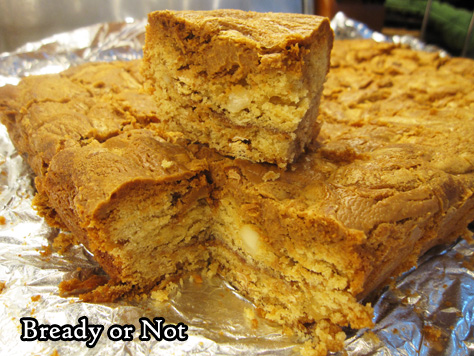
In this recipe, the cookie butter flavor amps up the inherent baked-good yumminess of these bars. Add white chocolate and macadamias along with that? Oh yeah.
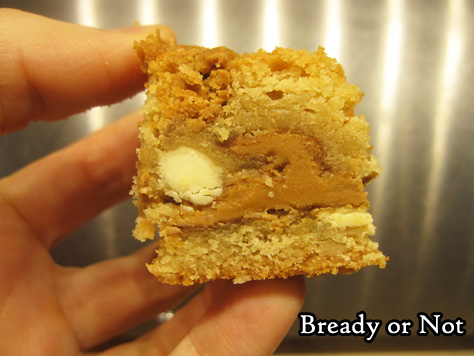
You end up with a ribbon of cookie butter through the middle and swirls across the top. These effectively acts like a thin frosting, as these otherwise aren’t heavy duty on sweetness.
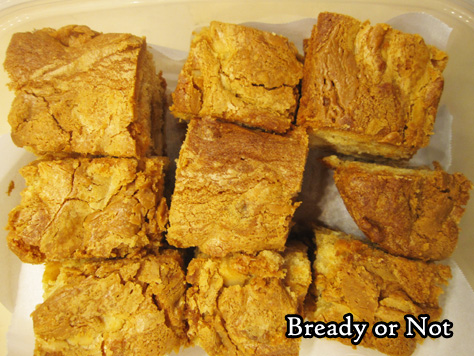
The bars rise a lot as they bake and end up quite cakey. They hold together well, so you can cut them small, if you want.

I want to mention macadamia nuts again. They are lovely in this recipe, adding a sporadic crunch and buttery flavor that goes oh-so-well with everything else.
Bready or Not Original: Cookie Butter White Chocolate Macadamia Nut Bars
Ingredients
- 1 1/2 cups unsalted butter 3 sticks, softened
- 1/2 cup white sugar
- 2 cups brown sugar packed
- 4 large eggs room temperature
- 1 Tb vanilla extract
- 4 cups all-purpose flour
- 1 teaspoon salt
- 2 teaspoons baking powder
- 1 cup white chocolate chips
- 1 cup macadamia nuts chopped
- 2/3 cup + 1/2 cup creamy cookie butter spread divided
Instructions
- Preheat oven to 350-degrees. Line a 9x13 pan with aluminum foil and apply nonstick spray.
- In a large bowl, cream butter until light and fluffy. Add in both sugars, followed by the eggs one by one, then the vanilla.
- In a separate bowl, sift together the flour, salt, and baking powder. Gradually mix into the wet ingredients until just incorporated.
- Spread half of the dough in the bottom of the pan. Mixture will be thick. Use an uneven spatula to spread 2/3 cup cookie butter in an even layer over the dough.
- Top with remaining dough and spread to edges. Dollop the 1/2 cup of cookie butter here and there over the top, then use a butter knife to swirl it into the dough.
- Bake for 40 to 45 minutes, until the top is golden brown and the middle passes the toothpick test. Dough will rise a great deal.
- Cool completely in pan. Use the foil to lift up bars for easy cutting. Store sliced pieces in a sealed container at room temperature for as long as a week.
- OM OM NOM!
