


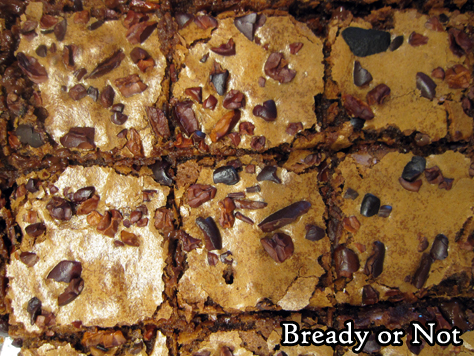
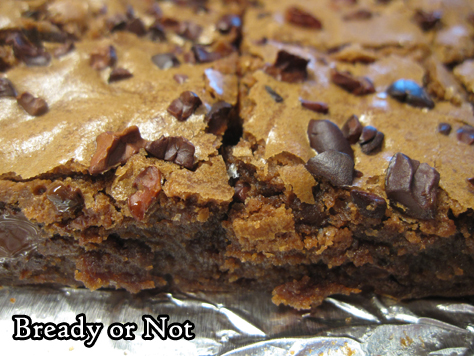
Bready or Not Original: Cocoa Nib Brownies
Cocoa nibs add chocolate flavor and a crunch to baked goods, and they are fantastic atop these Cocoa Nib Brownies!

Cocoa nibs are strongly flavored like dark chocolate. You don’t need a lot of them to add a boost to these brownies.
The original version of this recipe involved melting the chocolate and butter on the stovetop. Ain’t nobody got time for that. I ended up reworking the entire recipe.
I’m all about using the microwave whenever I can. Fast to heat up, convenient to stick the bowl in the dishwasher afterward!

Of course, you can go back to the stove top method if you want. Either way, you get a delicious, chewy brownie packed with chocolate flavor plus a crunch.
Bready or Not Original: Cocoa Nib Brownies
Equipment
- 9×13 dish
- big microwave-safe bowl
- uneven spatula
Ingredients
- 1 cup unsalted butter 2 sticks
- 10 ounces bittersweet chocolate chips
- 1 3/4 cups white sugar
- 4 large eggs room temperature
- 1 1/2 teaspoons vanilla extract
- 1 1/4 cups all-purpose flour
- 1/4 teaspoon kosher salt
- 1/4 cup cocoa nibs plus 1 Tb
Instructions
- Preheat oven at 350-degrees. Line a 9×13 pan with foil and apply nonstick spray or butter.
- In a big microwave-safe bowl, in short bursts melt together the butter and 1 1/4 cups of the bittersweet chocolate chips, stirring well between each pass, until everything is melted together and smooth.
- Whisk sugar into the chocolate. It’s okay if it still looks somewhat grainy. Beat in the eggs and vanilla, following up with the flour and salt. Once no streaks of white remain, fold in the last 3/4 cups of chocolate chips.
- Pour batter into the pan and use an uneven spatula to spread it to corners. Sprinkle the cocoa nibs evenly all over the stop.
- Bake for 25 to 28 minutes, until a toothpick stuck in the center comes out clean. Set out to cool completely. Use the foil to lift the contents onto a cutting board, and slice into pieces. Store in a sealed container at room temperature for up to 3 days.
OM NOM NOM!
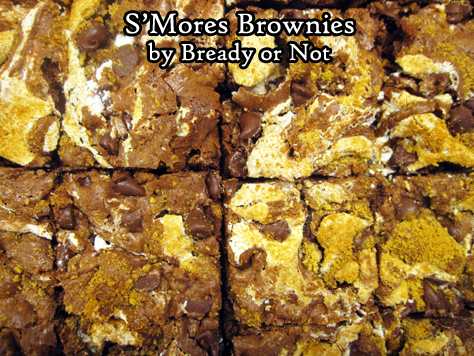
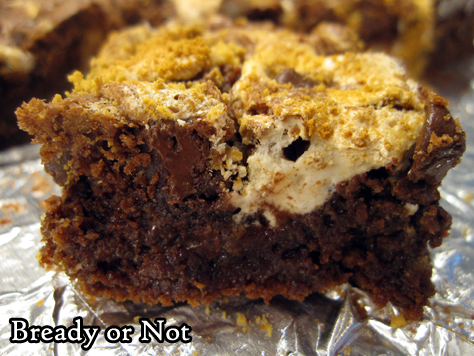
Bready or Not Original: S’Mores Brownies
Create luscious S’Mores in brownie-bar form with my original recipe for S’Mores Brownies!
I had a jar of marshmallow fluff I wanted to use. I deliberated what to use it for and hit upon S’Mores Brownies, but to my surprise, I didn’t find an existing recipe that used jarred fluff. Time to make my own recipe!
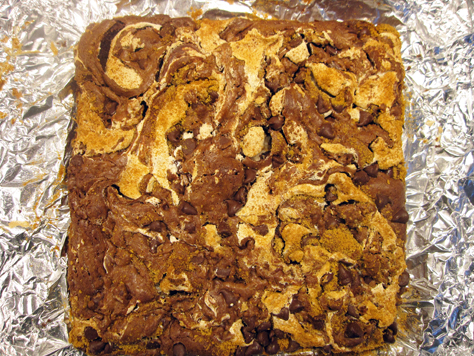
Using regular marshmallows to bake is delicious and all, but you also end up with caramelized, hollow sections. I wanted marshmallows to stay soft and gooey alongside the chocolate crumb. By golly, my idea worked!
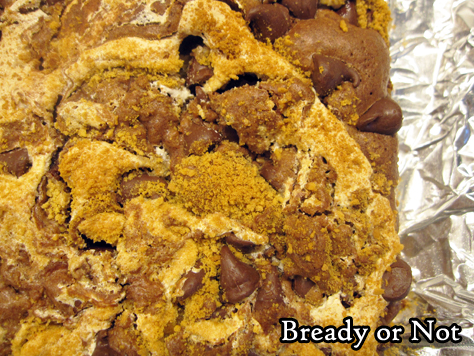
This is definitely a brownie for people who love chocolate. I loaded it with chocolate chips, inside and out. The graham cracker crumb and marshmallow complement it in a beautiful way.
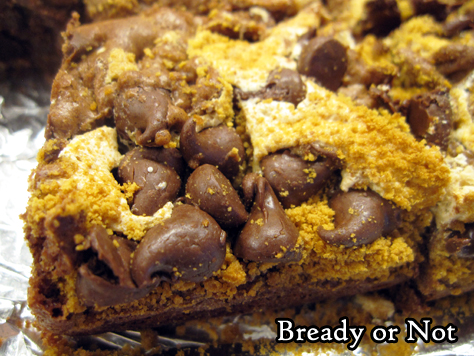
This will look messy as a batter. Marshmallow fluff is not the easiest stuff to work with. It’s lumpy and sticky. The good news is, as the pan bakes, the contents will even out. The resulting marble effect make it look as delicious as it tastes.
Store these brownies in a sealed container for days–and they can be frozen for longer, too.
Bready or Not Original: S'Mores Brownies
Ingredients
- 1/4 cup unsalted butter half cube
- 2 cups semisweet chocolate chips divided
- 1/2 cup white sugar
- 2 eggs room temperature
- 2/3 cup all-purpose flour
- 1/2 teaspoon baking powder
- 1/4 teaspoon salt
- 7 ounces marshmallow fluff one jar
- 1/2 cup graham cracker crumbs
Instructions
- Preheat oven at 350-degrees. Line an 8x8 or 9x9 pan with heavy foil and apply butter or nonstick spray.
- In a microwave safe bowl, heat the butter and 1 cup of chocolate chips in brief bursts until fully melted and smooth; watch it carefully and stir well between each burst. Stir in the white sugar, followed by eggs, flour, baking powder, and salt.
- Pour half the chocolate batter into the ready pan and spread into an even layer. Add small dollops of the marshmallow fluff across the top; it will be gloppy and sticky, so don't worry about getting it even.
- Sprinkle graham cracker crumbs over the fluff and batter. Drop dollops of the rest of the chocolate batter on top along with the remaining 1 cup chocolate chips. Even out a bit, then use a butter knife or narrow spatula to swirl the layers together for a marbled effect. It may be mountainous in some areas but it will even out as it bakes.
- Bake until the top is crinkled and edges are pulling away from the sides of the pan, about 25 to 30 minutes. Let cool at room temperature for an hour, then stash in the fridge for another few hours to completely cool.
- Use the foil to lift the contents onto a cutting board to slice into bars. Store in a sealed container in fridge, waxed paper between stacked layers to prevent sticking. Keeps for up to three days, or freeze for later enjoyment.
OM NOM NOM!
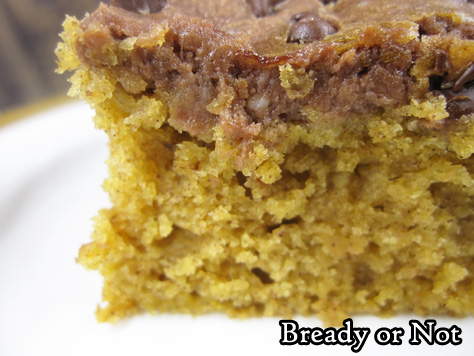
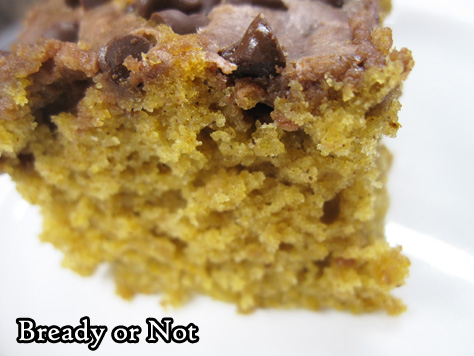
Bready or Not: Chocolate-Swirled Pumpkin Bars
Chocolate-Swirled Pumpkin Bars. Because I will never feature enough iterations of this perfect pairing.
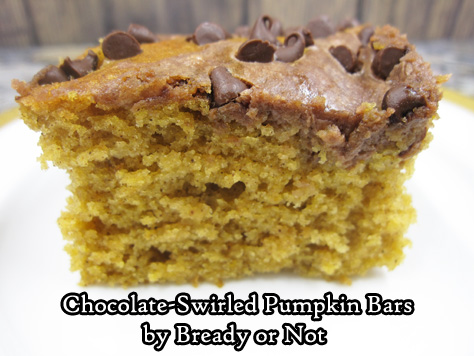
Yeah, every year I do a new take (or a couple) on this lovely Voltron-saving-the-galaxy team-up between pumpkin and chocolate. You know why? Because it’s AWESOME. Like Voltron. With a lot less death and destruction.
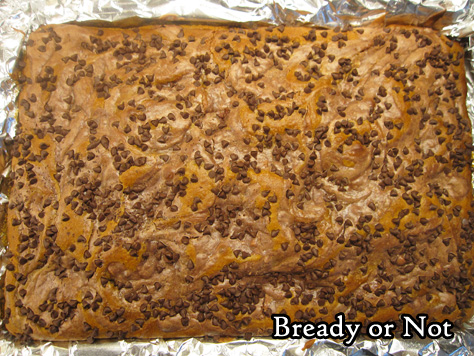
This recipe gets extra oomph from cream cheese, but by no means do these taste like cheesecake bars. Here, the cream cheese adds umami richness rather than straight-out cream cheese flavor.

I was amazed by how thick these bars ended up. Really, these are more akin to cake than standard blondies or brownies.
Bake these up and brighten someone’s day. You don’t need to summon up Voltron to save a person’s world. Sometimes, baked goods can do the trick.
Need more pumpkin X chocolate OTP? Check out past posts on Bready or Not!
Pumpkin Chocolate Chip Bars
Pumpkin Nutella Swirl Muffins
Triple Chocolate Pumpkin Bundt Cake
Chocolate Chip Pumpkin Shortbread
Pumpkin Chocolate Chip Bread (2 loaves)
Bready or Not: Chocolate-Swirled Pumpkin Bars
Equipment
- 15x10-x1 jelly roll pan
Ingredients
Pumpkin base layer
- 2 cups all-purpose flour
- 1 1/2 cups white sugar
- 2 teaspoons baking powder
- 2 teaspoons ground cinnamon
- 1 teaspoon baking soda
- 1/2 teaspoon salt
- 1/4 teaspoon ground cloves
- 4 eggs
- 15 ounces pumpkin puree
- 1 cup vegetable oil
Chocolate swirl
- 8 ounces cream cheese softened
- 1/3 cup white sugar
- 1 egg
- 1 Tablespoon milk
- 1/2 cup semi-sweet chocolate chips
Topping
- 1/2 cup semi-sweet chocolate chips
Instructions
Prepare the base layer
- Preheat oven at 350-degrees. Line a jelly roll pan (15x10x1) with aluminum foil, making sure the edges are covered. Add nonstick spray or grease.
- In a large bowl, stir together the flour, sugar, baking powder, cinnamon, baking soda, salt, and cloves. Add the four eggs, the pumpkin, and oil. Pour into the prepared pan.
Start the chocolate swirl
- Microwave 1/2 cup of chocolate chips, zapping in short increments and stirring well between each pass, until it is melted. Set aside.
- In a mixing bowl, beat the cream cheese with the sugar; it's okay if it's still a little lumpy. Follow up with the one egg, milk, and melted chocolate. Dollop the chocolate mixture atop the pumpkin batter. Use a narrow spatula or butter knife to swirl layers together in a marbled effect. Sprinkle the remaining chocolate chips on top.
- Bake 25 to 30 minutes, until it looks puffed and the middle passes the toothpick test. Cool on a rack for at least an hour, then chill in fridge before cutting. This will make it easier to cut.
- Use foil to lift onto a cutting board. Slice into bars then store chilled in a sealed container with waxed paper between stacked layers.
OM NOM NOM!
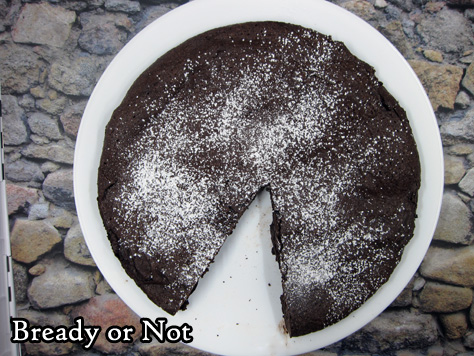
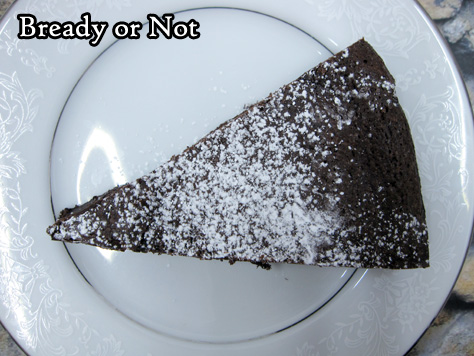
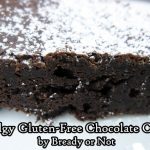
Bready or Not: Fudgy Chocolate Gluten-Free Cake
This incredible Fudgy Chocolate Cake is like a great big grown-up brownie.
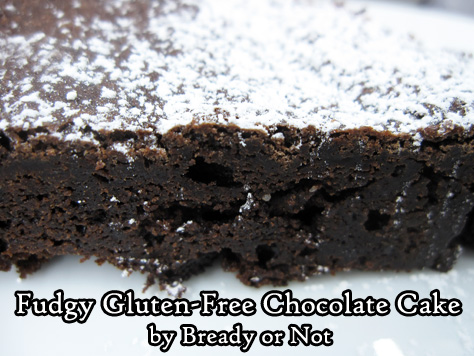
While this can’t be said to be healthy, it IS gluten free, so makes for a wonderful treat for people with that dietary restriction.
It also keeps very well. I sliced it up and kept pieces stored in the fridge for over a week. They never dried out or lost flavor.
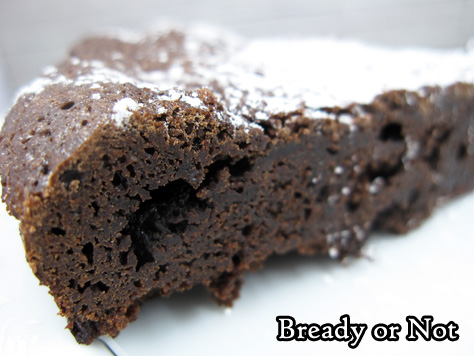
Even better, this cake can be frozen to last longer. Freeze slices on waxed paper and keep stored in a plastic container or freezer bag. Defrost in fridge when you want to indulge!

This cake is delicious by itself, but you could easily dress it up with fresh strawberries, cherries, or raspberries, and/or a scoop of vanilla ice cream–all of which are gluten-free as well, of course.
Modified from Allrecipes Magazine February/March 2015.
Bready or Not: Fudgy Chocolate Gluten-Free Cake
Ingredients
- 1/2 cup cocoa powder sifted, plus more to dust pan
- 4 ounces semisweet chocolate chips
- 1/2 cup unsalted butter
- 3/4 cup white sugar
- 3 eggs beaten
- 1 teaspoon vanilla extract
- confectioners' sugar for top, optional
Instructions
- Preheat oven at 300-degrees. Cut parchment to fit in the bottom of an 8-inch cake pan. Grease pan. Set parchment inside. Grease again. Dust paper and sides of pan with cocoa.
- In a large microwave-safe bowl, heat chocolate and butter in short bursts, stirring well between each pass, until smooth. Stir in cocoa powder followed by sugar, eggs, and vanilla. Pour into prepared pan.
- Bake about 40 minutes, until cake begins to pull away from the sides of the pan; a toothpick inserted in the center should come out just slightly wet. Cool in pan for 20 minutes, then invert onto a rack. Remove the parchment, then invert again onto a plate to cool for at least an hour before cutting. Sprinkle with confectioners' sugar, if desired.
- Keep cake covered by plastic wrap in fridge; keeps well as long as a week. Cake can be sliced and frozen for later enjoyment.
- OM NOM NOM!
Bready or Not: Chocolate Peanut Butter Bars [cake mix]
These Chocolate Peanut Butter Bars are so good that people won’t even guess that it uses cake mix.
![Bready or Not: Chocolate Peanut Butter Bars [cake mix]](https://www.bethcato.com/blog/wp-content/uploads/2019/05/Double-Choc-PB-Bars6_sm.jpg)
I, personally, don’t see any shame in using cake mix. It’s a convenient base ingredient to doctor up.
![Bready or Not: Chocolate Peanut Butter Bars [cake mix]](https://www.bethcato.com/blog/wp-content/uploads/2019/05/Double-Choc-PB-Bars10_sm.jpg)
Chocolate and peanut butter is such a classic pairing. You can use any number of chocolate cake mixes for this (it was tested with a 15.25 ounce box), but I recommend devil’s food cake. It has a nice depth to it.
![Bready or Not: Chocolate Peanut Butter Bars [cake mix]](https://www.bethcato.com/blog/wp-content/uploads/2019/05/Double-Choc-PB-Bars8_sm.jpg)
If you’re in America, you might find a premade bag of peanut butter and chocolate chips at stores like Walmart. If you can’t find that, just use separate bags of those kinds of chips and measure out a cup of each.
![Bready or Not: Chocolate Peanut Butter Bars [cake mix]](https://www.bethcato.com/blog/wp-content/uploads/2019/05/Double-Choc-PB-Bars14_sm.jpg)
At my husband’s work, some of his co-workers considered this among their all-time favorite recipes. That is high praise indeed.
![Bready or Not: Chocolate Peanut Butter Bars [cake mix]](https://www.bethcato.com/blog/wp-content/uploads/2019/05/Double-Choc-PB-Bars4_sm.jpg)
![Bready or Not: Chocolate Peanut Butter Bars [cake mix]](https://www.bethcato.com/blog/wp-content/uploads/2019/05/Double-Choc-PB-Bars6_sm-150x150.jpg)
Bready or Not: Chocolate Peanut Butter Bars [cake mix]
Ingredients
- 1 box chocolate cake mix 15.25 oz
- 3/4 cup unsalted butter melted
- 1/2 cup milk
- 1 cup creamy peanut butter
- 1 bag peanut butter and chocolate chips or 1 cup of each kind of chips
- 1/2 cup chopped peanuts
Instructions
- Preheat oven at 350-degrees. Line a 9x13 pan with foil and apply nonstick spray.
- In a big bowl, combine the cake mix, melted butter, and milk. Spread half of batter on bottom of the pan. Bake for 15 minutes.
- Place peanut butter in a microwave safe bowl and warm to be spreadable. Pour over the baked bottom crust and spread to edges. Sprinkle the peanut butter and chocolate chips on top, followed by dollops of the reserved cake batter. Finish with the chopped peanuts.
- Bake for another 20 minutes, until the visible portions of the peanut butter layer look set. Cool completely, refrigerating if desired.
- Use foil to lift onto cutting board to slice into bars. Store in a sealed container at room temperature.
- OM NOM NOM!
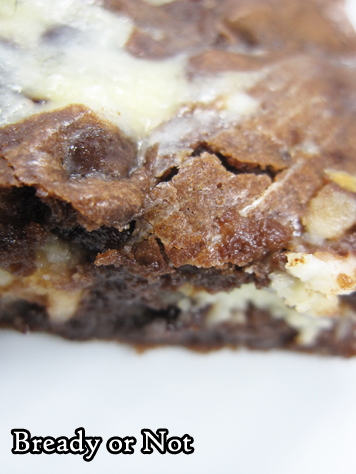
Bready or Not: Cheesecake Brownies
Cheesecake Brownies. Beautiful to behold. Delicious to eat.
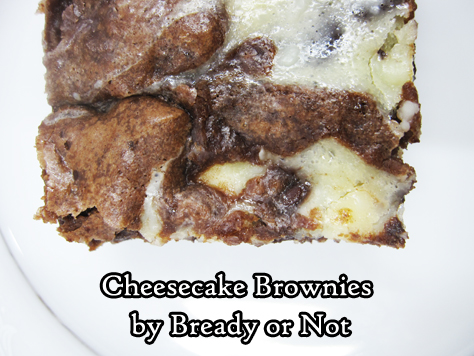
I’m not a cheesecake person. But the pairing of chocolate and cheesecake? That makes it work.
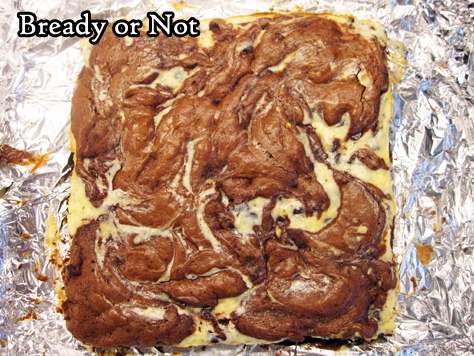
This recipe is all about that balance of different kinds of sweetness. The addition of semisweet chocolate chips complements both and adds a different texture, too.
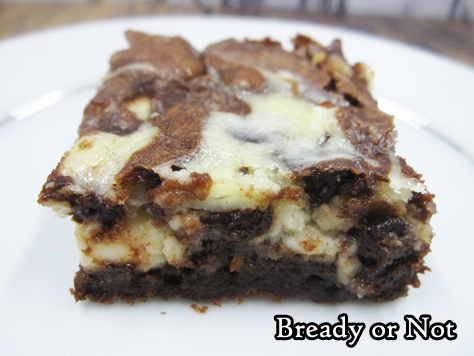
I have to say, I love the swirl effect on the top of these brownies. There’s something especially pleasing about food that looks as amazing as it tastes.
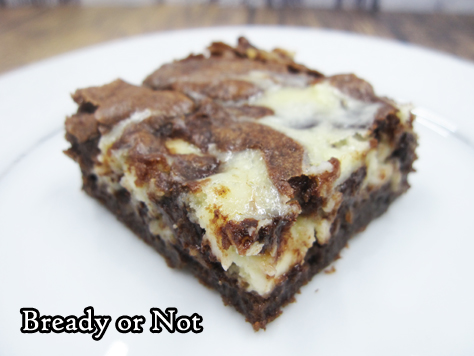
If you want a similar, stronger (and more expensive) pairing, my Swirled Goat Cheese Brownies will also interest you.
Modified from All Recipes Magazines, November 2017.

Bready or Not: Cheesecake Brownies
Ingredients
- 8 oz cream cheese softened
- 3/4 cup white sugar divided
- 3 eggs
- 2 cups semisweet chocolate chips divided
- 1/4 cup unsalted butter
- 2/3 cup all-purpose flour
- 1/2 teaspoon baking powder
- 1/4 teaspoon salt
Instructions
- Preheat oven at 350-degrees. Line an 8x8 or 9x9 pan with heavy foil and apply butter or nonstick spray.
- Beat together cream cheese, 1/4 cup sugar, and 1 egg until fairly smooth; some small chunks are fine. Stir in 1 cup chocolate chips.
- In a microwave safe bowl, heat the butter and remaining 1 cup chocolate chips in brief bursts until fully melted and smooth; watch it carefully and stir well between each burst. Stir in the remaining 1/2 cup sugar, followed by the 2 eggs, flour, baking powder, and salt.
- Pour half the chocolate batter into the ready pan and spread into an even layer. Gently spread the cream cheese batter on top. Drop dollops of the rest of the chocolate batter on top. Use a butter knife or narrow spatula to swirl the layers together for a marbled effect.
- Bake until the top is crinkled and edges are pulling away from the sides of the pan, about 25 to 30 minutes. Let cool at room temperature for an hour, then stash in the fridge for another few hours to completely cool.
- Use the foil to lift the contents onto a cutting board to slice into bars. Store in a sealed container in fridge, waxed paper between stacked layers to prevent stocking, for up to three days, or freeze for later enjoyment.
- OM NOM NOM!
