


Bready or Not Classic: Oatmeal Cream Pies
I prepared two classic recipes to repost while I was on vacation this summer. That isn’t happening now. Therefore, I’m sharing them earlier with the hope that my fellow #stressbakers can enjoy them. Eat well and stay safe out there!
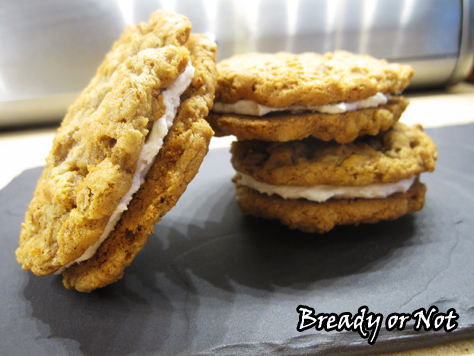
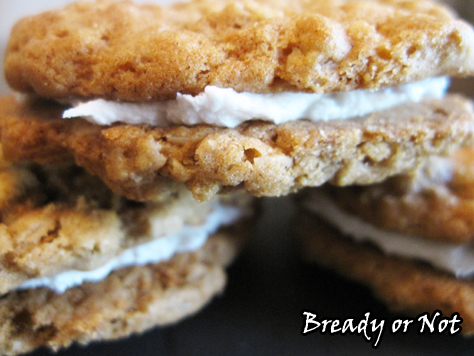
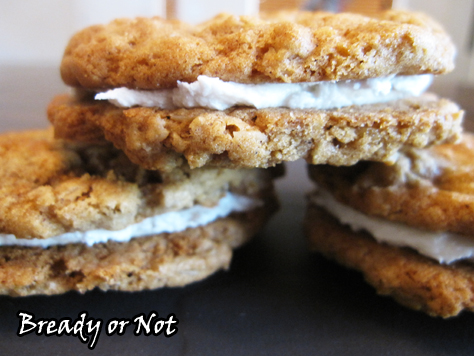
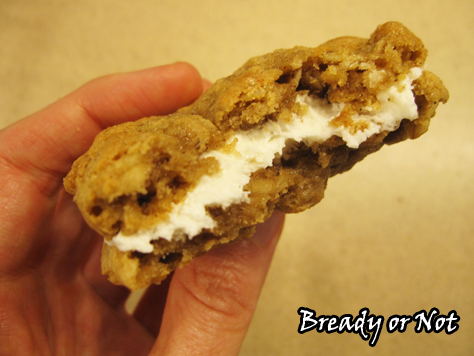
Today I present something seriously delicious: Oatmeal Cream Pies, aka Sandwich Cookies.
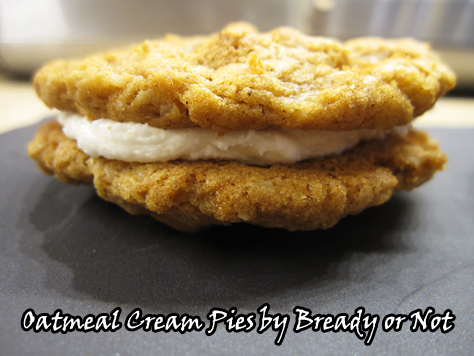
These things are about the size of a sandwich, too, and about as filling because of the chewy oatmeal cookies. You have two tablespoons worth of dough with a teaspoon of marshmallow cream between them. So yeah.
I don’t think I’d make smaller cookies, though, for sheer reasons of space and time. The recipe makes over four dozen cookies, which makes for over two dozen sandwich cookies. This is a recipe to make for a lot of hungry adults or kids!
If you love commercial-made cream pies like the ones from Little Debbie, these homemade ones will blow your mind. They have that same taste and texture, but with some extra chewy freshness.
I highly advise that you use tablespoon and teaspoon scoops for this recipe, too. It helps a lot if the cookies are of uniform size and that the amount of filling is equally distributed.
Modified from Taste of Home.
Bready or Not: Oatmeal Cream Pies
Ingredients
Cookies:
- 1 1/2 cups shortening
- 2 2/3 cups brown sugar packed
- 4 large eggs
- 2 teaspoons vanilla extract
- 2 1/4 cups all-purpose flour
- 2 teaspoons ground cinnamon
- 1 1/2 teaspoons baking soda
- 1 teaspoon salt
- 1/2 teaspoon ground nutmeg
- 4 cups old-fashioned rolled oats
Filling:
- 3/4 cup shortening
- 3 cups confectioners' sugar sifted
- 7 oz marshmallow creme 1 jar
- 1 - 3 Tablespoons milk or half & half
Instructions
- Preheat the oven at 350-degrees. In a large bowl, cream together the shortening and brown sugar until they are light and fluffy. Beat in eggs, one at a time, followed by the vanilla extract.
- In another bowl, combine the flour, cinnamon, baking soda, salt and nutmeg; gradually add this dry mix to the creamed mix. Stir in oats. If you're using a stand mixer, you'll probably need to stir the last of the oats in by hand. This is a lot of dough!
- Use a tablespoon scoop to dole out the dough onto a cookie sheet, keeping two inches between each spoonful. These will spread.
- Bake for 10 to 12 minutes; they brown very fast, so keep an eye on them at the end. Remove them when they are turning golden brown. Let sit on cookie sheet for 10 minutes before transitioning them to a rack to cool.
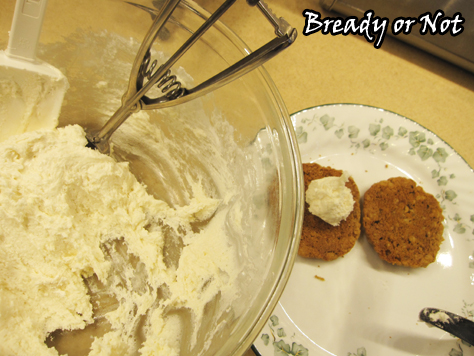
- To make the filling, start by sifting the confectioners' sugar into a large bowl. Add the shortening and marshmallow crème. Add a tablespoon of milk and gradually add more as needed to get it to spreadable consistency. Use a heaping teaspoon to dollop filling onto the base of a cookie. Spread it with a knife, top with another cookie, and press together to get cream to the edges.
- End result: about 30 large sandwich cookies.
- OM NOM NOM!
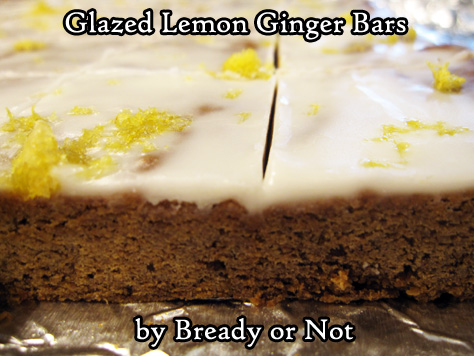
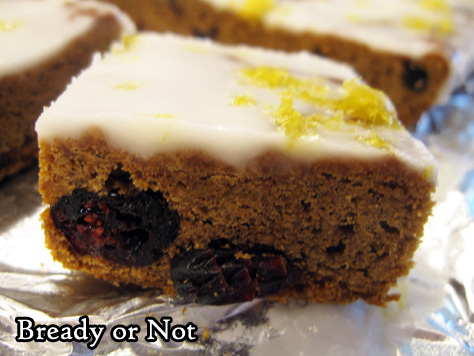
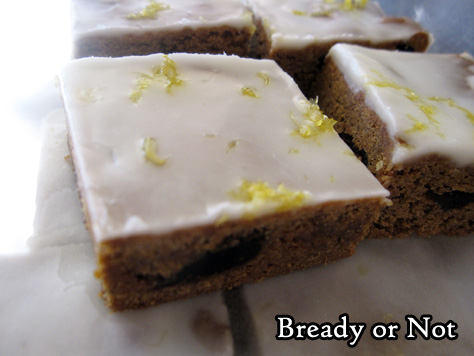
Bready or Not Original: Glazed Lemon Ginger Bars
These Glazed Lemon Ginger Bars are zippy and fresh, perfect to serve at the holidays and year-round!
I firmly believe good food should be enjoyed whenever. I suppose some people would try to classify these as a Christmassy thing because they are a kind of gingerbread bar. To that, I say NOPE.
I’m rebellious. It’s April. Ginger is an awesome spice. It should be confined to no season. Be free, ginger!
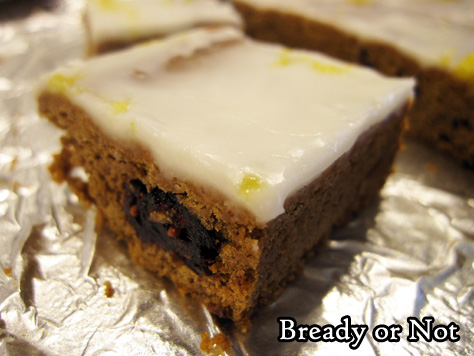
These bars aren’t all about the ginger, though. The spices here are nuanced and delicious, and the lemon plays a pretty big part in the crisp glaze.

Try to make these things at least a day ahead of when they will be served, too, as they taste even BETTER after sitting in the fridge. I say that, but they are pretty awesome while fresh, too.
This is the second entry in my April of lemon recipes. Here’s what else you can look forward to this month!
Lemon Sour Cream Bundt Cake
Glazed Lemon Ginger Bars [you are here]
Cranberry Lemon Biscotti
Cream Cheese Stuffed Lemon Bundt Cake
Lemon Frangipane

Bready or Not Original: Glazed Lemon Ginger Bars
Equipment
- 13x9 pan
Ingredients
Bars
- 10 Tablespoons unsalted butter softened
- 3/4 cup brown sugar packed
- 1/2 cup molasses
- 1 large egg
- 2 cups all-purpose flour
- 2 teaspoons ground ginger
- 1/2 teaspoon baking soda
- 1/2 teaspoon baking powder
- 1/2 teaspoon ground cinnamon
- 1/4 teaspoon salt
- 1/2 cup dried cranberries
Glaze
- 1 Tablespoon unsalted butter melted
- 1 cup confectioners' sugar plus more as needed
- 5 teaspoons lemon juice
- 3/4 teaspoon vanilla extract
- 1/2 teaspoon lemon zest finely grated
Instructions
- Preheat oven at 350-degrees. Line a 13x9 pan with aluminum foil and apply nonstick spray or butter.
- In a large bowl, cream together butter and brown sugar until light and fluffy. Add molasses and egg.
- In a separate bowl, mix together the dry ingredients: flour, ginger, baking soda, baking powder, cinnamon, and salt.
- Gradually mix dry ingredients into the wet, until just combined. Fold in the dried cranberries.
- Pour batter into prepared pan and even out. Bake for 20 to 25 minutes, until middle passes toothpick test. Cool completely.
- To make the glaze, in a small bowl melt the butter. Add the confectioners' sugar, lemon juice, and vanilla extract. Stir to create a thick, spreadable consistency, adding more sugar if needed to thicken or more lemon juice or water to thin. Spread atop bars. Sprinkle zest over the top. Let glaze set before cutting.
- Store bars sliced, with waxed paper between layers, in sealed container in fridge. Note that these bars taste even better after chilling for a day! They keep well for several days, too.
OM NOM NOM!
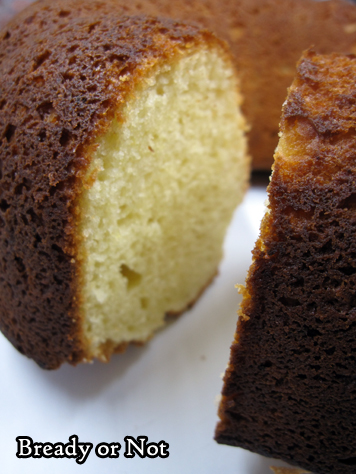
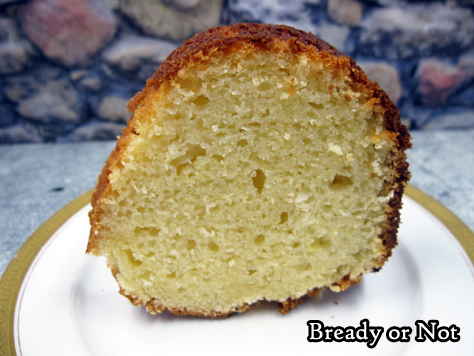
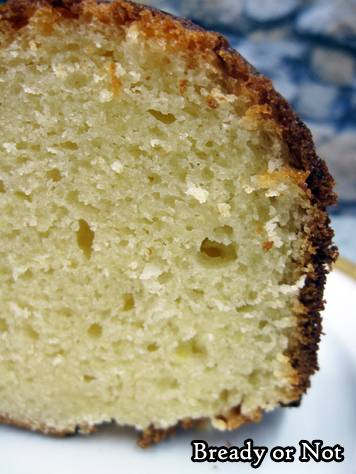
Bready or Not Original: Lemon Sour Cream Bundt Cake
No foolin’. This Lemon Sour Cream Bundt Cake is simple and delicious.
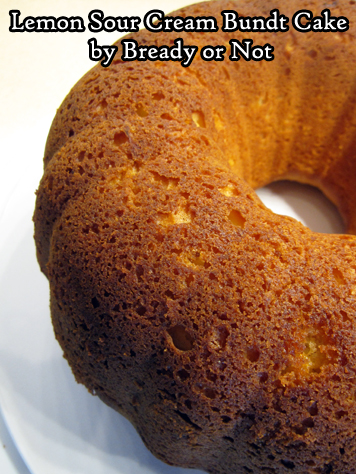
This isn’t a hardcore sweet dessert. I found it similar to a mild lemony shortcake, something good on its own and over-the-top amazing with the addition of fresh fruit and whipped cream.
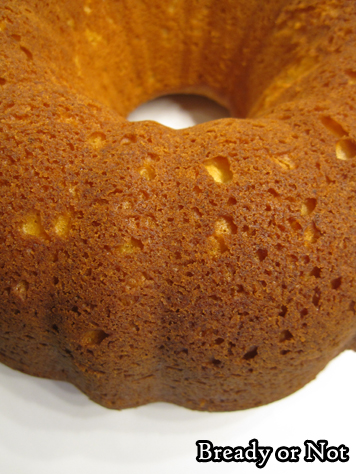
I didn’t even bother with a glaze. Doesn’t need it. That makes this an especially friendly recipe to slice and freeze for later enjoyment.
I know some people worry about the taste of sour cream in cakes. Don’t. Sour cream (or substitute with vanilla or plain Greek yogurt) adds moisture, creating a soft, tender crumb.
This recipe kicks off an entire month of lemon recipes! Look forward to these delectable treats in the coming weeks:
Glazed Lemon Ginger Bars
Cranberry Lemon Biscotti
Cream Cheese Stuffed Lemon Bundt Cake
Lemon Frangipane

Bready or Not Original: Lemon Sour Cream Bundt Cake
Equipment
- large bundt cake pan
Ingredients
- 3 cups all-purpose flour
- 2 teaspoons baking powder
- 1/2 teaspoons baking soda
- 1/4 teaspoons salt
- 1 cup unsalted butter 2 sticks softened
- 1 1/2 cups white sugar
- 1/2 cup lemon juice
- 4 eggs
- 1 cup sour cream 8 ounces
Instructions
- Preheat oven at 350-degrees. Grease a bundt pan and set aside.
- In a medium bowl, combine the flour, baking powder, baking soda, and salt together.
- In a large bowl, cream together the butter and sugar. Add the lemon juice, then mix in the eggs one at a time. Stir in half the flour mix. Add the sour cream, then follow up with the rest of the dry ingredients. Pour into prepared pan.
- Bake for 55 to 60 minutes, until it passes the toothpick test. Cool for twenty minutes in the pan, then invert onto a wire rack to completely cool.
- Store covered at room temperature.
OM NOM NOM!
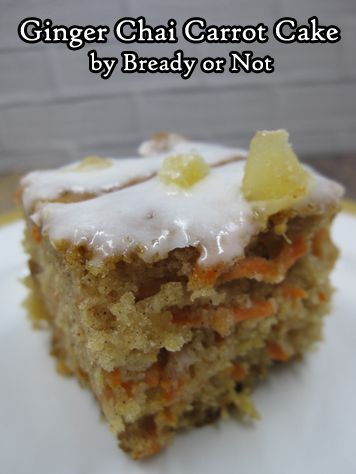
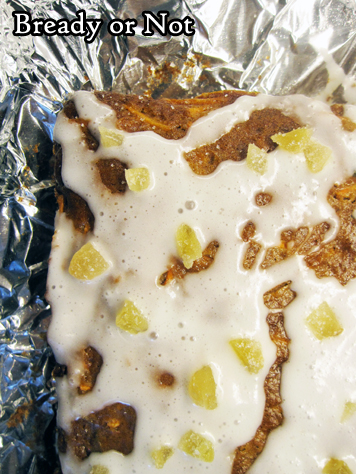
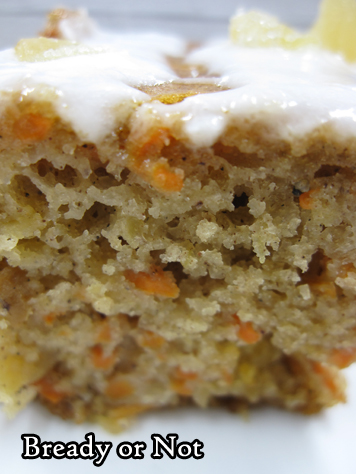
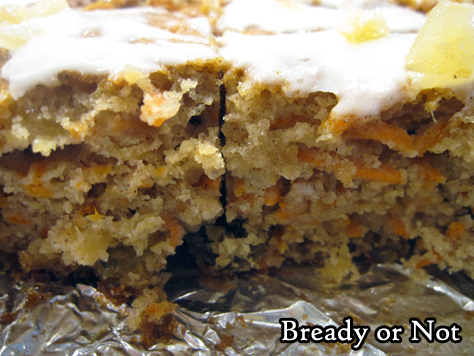
Bready or Not: Ginger Chai Carrot Cake
Trust me, this Ginger Chai Carrot Cake is amazing. This is the only carrot cake I have ever liked.
That’s right, I made the cake even though I was pretty ambivalent about carrot cakes overall. The combination of ingredients just appealed to me somehow. I actually went out and made the cake a week after reading the original recipe in Bake from Scratch Magazine.
Some modifications I made straight up: I used a square pan rather than a round and tall cake pan, which meant the bake time was a little higher, too. I also upped the cinnamon because, well, cinnamon. I was worried about buying enough grated carrot so I measured and weighed that; this is why I made sure to put the “7 ounces” info in the ingredients.
The recipe looks long because of the spices it includes, but it’s actually a very easy recipe to make. To save some time on baking day, mix the dry ingredients the day before! That’s what I did.
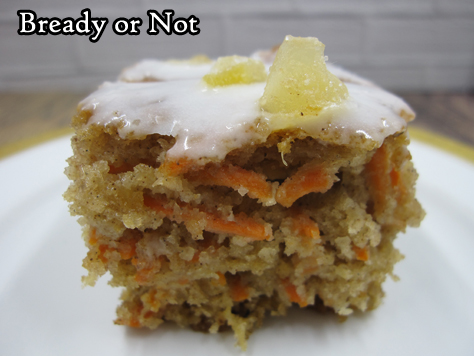
This cake is incredibly moist. It’s sweet and spicy, embodied with cozy heat courtesy of the candied ginger. Everything melds beautifully.
If you love carrot cake, make this cake. If you hate carrot cake, give this one a try. It just might convert you!
Bready or Not: Ginger Chai Carrot Cake
Equipment
- 9x9 square pan
Ingredients
Cake
- 1 1/2 cups all-purpose flour
- 3/4 cup brown sugar packed
- 1 1/2 teaspoons baking powder
- 1 teaspoon baking soda
- 1 teaspoon ground cardamom
- 1 teaspoon ground cinnamon
- 1/4 teaspoon kosher salt
- 1/4 teaspoon ground ginger
- 1/8 teaspoon ground cloves
- 1/8 teaspoon ground pepper
- 1/3 cup canola oil
- 1/3 cup buttermilk or soured milk (see note), room temperature
- 1 teaspoon vanilla extract
- 2 large eggs room temperature
- 9 ounces crushed pineapple drained
- 2 cups grated carrots about 7 ounces
- 1/2 cup golden raisins
- 1/3 cup candied ginger finely chopped
Glaze
- 1 cup confectioners' sugar
- 3 Tablespoons heavy whipping cream or half & half
- candied ginger finely chopped
Instructions
- Preheat oven at 350-degrees. Line pan with heavy foil to fully covers bottom and sides; apply butter or nonstick spray.
- In a large bowl, stir together flour, brown sugar, baking powder, baking soda, cardamom, cinnamon, salt, ground ginger, cloves, and pepper.
- Into the middle of the dry ingredients, pour in the oil, buttermilk, vanilla, and eggs. Mix in the pineapple, shredded carrot, raisins, and candied ginger. Pour batter into prepared pan.
- Bake for 30 to 35 minutes, until a wooden toothpick inserted in the middle comes out clean. Let cool in pan for about 15 minutes, then use foil to lift it onto a rack. Continue to cool to room temperature, or place in fridge to completely chill.
- Once cake is cool, combine the confectioners' sugar and cream to form a glaze. Drizzle over cake. Sprinkle extra candied ginger over the top. Slice and enjoy!
OM NOM NOM!
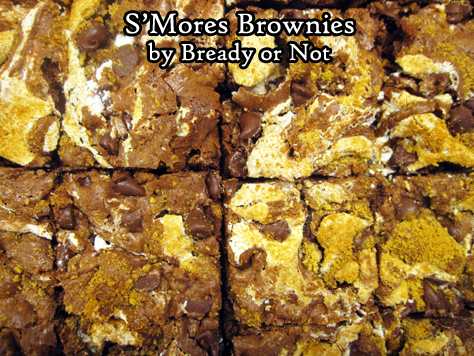
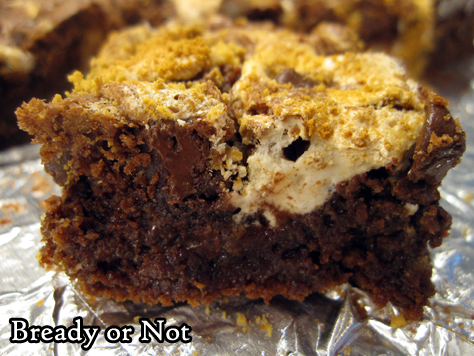
Bready or Not Original: S’Mores Brownies
Create luscious S’Mores in brownie-bar form with my original recipe for S’Mores Brownies!
I had a jar of marshmallow fluff I wanted to use. I deliberated what to use it for and hit upon S’Mores Brownies, but to my surprise, I didn’t find an existing recipe that used jarred fluff. Time to make my own recipe!
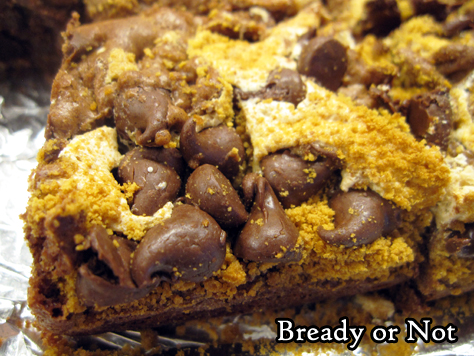
Using regular marshmallows to bake is delicious and all, but you also end up with caramelized, hollow sections. I wanted marshmallows to stay soft and gooey alongside the chocolate crumb. By golly, my idea worked!
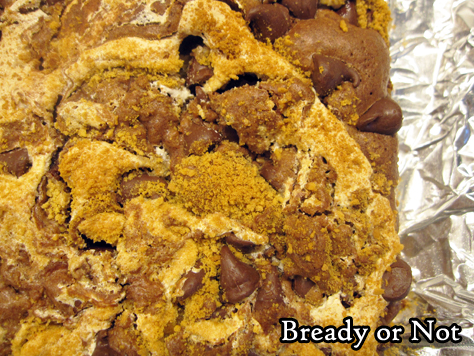
This is definitely a brownie for people who love chocolate. I loaded it with chocolate chips, inside and out. The graham cracker crumb and marshmallow complement it in a beautiful way.
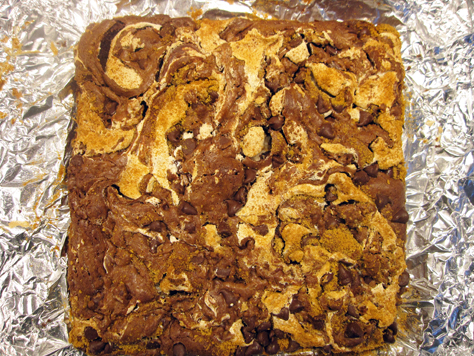
This will look messy as a batter. Marshmallow fluff is not the easiest stuff to work with. It’s lumpy and sticky. The good news is, as the pan bakes, the contents will even out. The resulting marble effect make it look as delicious as it tastes.
Store these brownies in a sealed container for days–and they can be frozen for longer, too.
Bready or Not Original: S'Mores Brownies
Ingredients
- 1/4 cup unsalted butter half cube
- 2 cups semisweet chocolate chips divided
- 1/2 cup white sugar
- 2 eggs room temperature
- 2/3 cup all-purpose flour
- 1/2 teaspoon baking powder
- 1/4 teaspoon salt
- 7 ounces marshmallow fluff one jar
- 1/2 cup graham cracker crumbs
Instructions
- Preheat oven at 350-degrees. Line an 8x8 or 9x9 pan with heavy foil and apply butter or nonstick spray.
- In a microwave safe bowl, heat the butter and 1 cup of chocolate chips in brief bursts until fully melted and smooth; watch it carefully and stir well between each burst. Stir in the white sugar, followed by eggs, flour, baking powder, and salt.
- Pour half the chocolate batter into the ready pan and spread into an even layer. Add small dollops of the marshmallow fluff across the top; it will be gloppy and sticky, so don't worry about getting it even.
- Sprinkle graham cracker crumbs over the fluff and batter. Drop dollops of the rest of the chocolate batter on top along with the remaining 1 cup chocolate chips. Even out a bit, then use a butter knife or narrow spatula to swirl the layers together for a marbled effect. It may be mountainous in some areas but it will even out as it bakes.
- Bake until the top is crinkled and edges are pulling away from the sides of the pan, about 25 to 30 minutes. Let cool at room temperature for an hour, then stash in the fridge for another few hours to completely cool.
- Use the foil to lift the contents onto a cutting board to slice into bars. Store in a sealed container in fridge, waxed paper between stacked layers to prevent sticking. Keeps for up to three days, or freeze for later enjoyment.
OM NOM NOM!
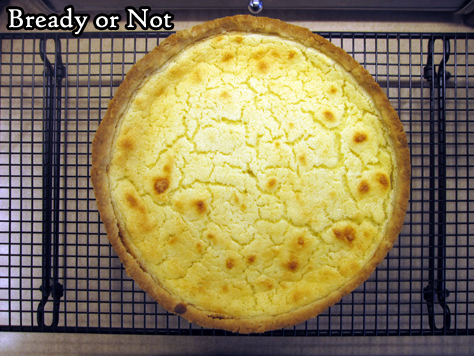
Bready or Not: Irish Lemon Pudding Tart
St. Patrick’s Day nears. Let’s celebrate with a scrumptious Irish Lemon Pudding Tart!
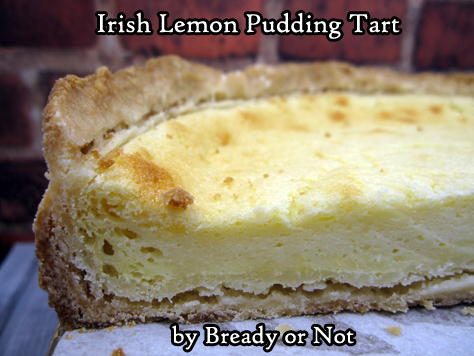
Mind you, this is “pudding” in more of a British/Irish sense, meaning a dessert. Don’t expect this to have the texture of American Jell-O pudding.
No, this is delightfully fluffy because egg whites are beaten stiff and folded in right at the end, adding loft light texture.
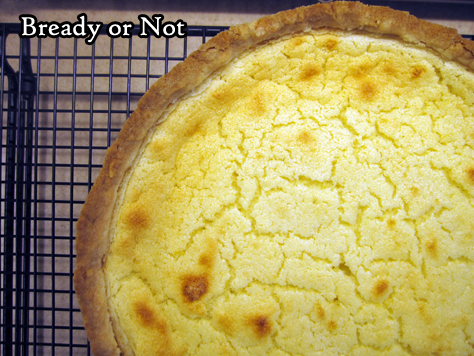
Make no mistake: this tart takes work. It dirties a lot of bowls.
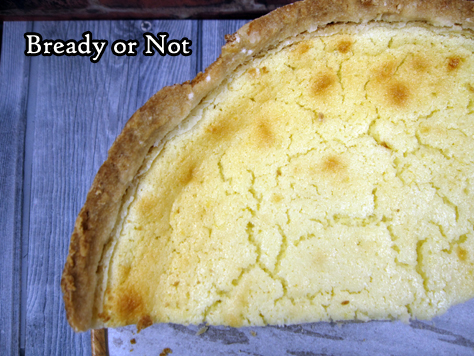
But wow, does it taste like something special. I certainly can’t find anything like this in stores around the southwest US.
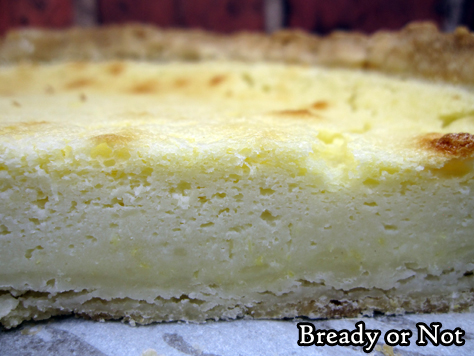
Even better, this tart keeps very well in the fridge for at least a week. Just keep it covered by foil.
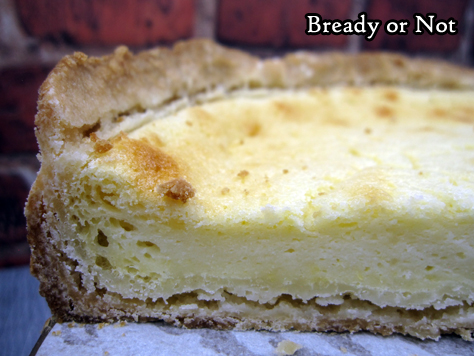
This isn’t a super-sweet dessert. The fresh lemon flavor is at the forefront. Really, this is a perfect spring or summer dessert. Or breakfast. Or snack.

Bready or Not: Irish Lemon Pudding Tart
Equipment
- 9-inch springform pan
- parchment paper
Ingredients
Crust:
- 1/2 cup unsalted butter 1 stick
- 1 1/4 cups all-purpose flour
- 3 Tablespoons white sugar
- 1/4 teaspoon salt
Pudding:
- 2 eggs whites and yolks, divided
- 2 Tablespoons unsalted butter softened
- 1/4 cup white sugar
- 2 large lemons zested and juiced
- 1/2 cup all-purpose flour
- 1 1/4 cups milk or substitute 1 cup half & half plus 1/4 cup water
- 1 teaspoon lemon extract
Instructions
Make the crust:
- Cut parchment paper to fit inside springform pan. Apply nonstick spray; place parchment circle inside, then spray again to coat the entire inside of pan.
- Melt butter in microwave or on stovetop.
- In a large bowl, stir together flour, sugar, and salt. Pour in the butter. Use hands to knead ingredients together until they can form a ball. Flatten out handfuls and place in prepared pan, forming an even layer across the bottom and up about 2/3 of the height of the pan walls. Cover with plastic wrap and chill about 30 minutes.
- Preheat oven at 350-degrees.
- Take pan out of fridge. Use a fork to prick bottom and sides of crust all over. Bake for 10 minutes, then set aside to prepare filling.
Make the pudding:
- Place the egg whites in a bowl that can accommodate a hand mixer. Set aside.
- In a large bowl, beat together butter and sugar. Add egg yolks and beat until fluffy. Add lemon zest, juice, and lemon extract. Beat until smooth; add flour, and mix until just blended. Pour in milk and incorporate. Batter will look thin with bubbles at the edges of the bowl.
- Return to the egg white bowl. Use a hand mixer to beat until stiff peaks form.
- Fold whites until batter without losing too much volume. It's okay if there are still some lumps. Pour batter into crust.
- Bake for 35 to 40 minutes, until middle is set and passes toothpick test. Let cool completely.
- Unlock sides of springform pan. Store on base disc of pan, or move to another dish, if desired. Keep draped by foil in fridge for up to a week. Serve cold or slightly warmed.
