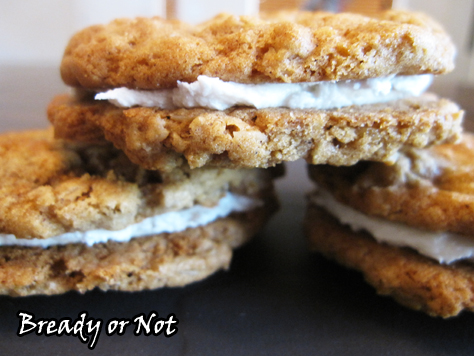
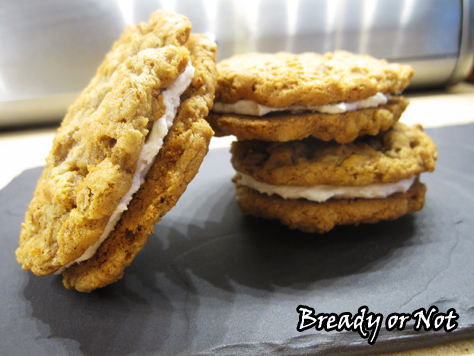
Bready or Not: Oatmeal Cream Pies
Today I present something seriously delicious: Oatmeal Cream Pies, aka Sandwich Cookies.
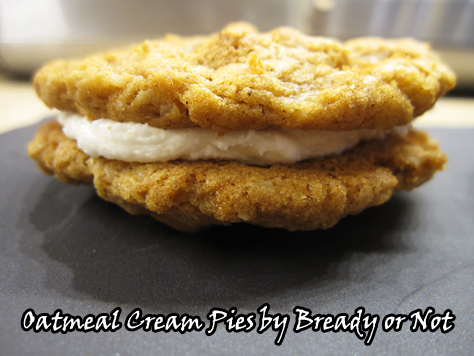
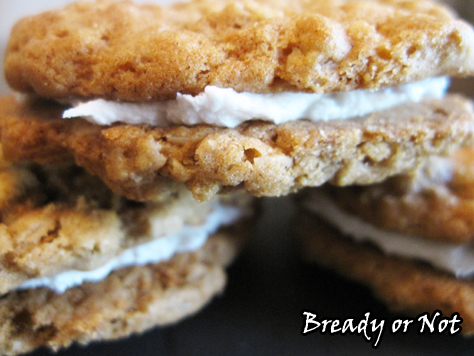
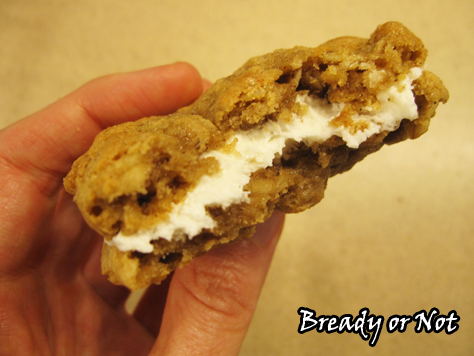
These things are about the size of a sandwich, too, and about as filling because of the chewy oatmeal cookies. You have two tablespoons worth of dough with a teaspoon of marshmallow cream between them. So yeah.
I don’t think I’d make smaller cookies, though, for sheer reasons of space and time. The recipe makes over four dozen cookies, which makes for over two dozen sandwich cookies. This is a recipe to make for a lot of hungry adults or kids!
If you love commercial-made cream pies like the ones from Little Debbie, these homemade ones will blow your mind. They have that same taste and texture, but with some extra chewy freshness.
I highly advise that you use tablespoon and teaspoon scoops for this recipe, too. It helps a lot if the cookies are of uniform size and that the amount of filling is equally distributed.
Modified from Taste of Home.
Bready or Not: Oatmeal Cream Pies
Ingredients
Cookies:
- 1 1/2 cups shortening
- 2 2/3 cups brown sugar packed
- 4 large eggs
- 2 teaspoons vanilla extract
- 2 1/4 cups all-purpose flour
- 2 teaspoons ground cinnamon
- 1 1/2 teaspoons baking soda
- 1 teaspoon salt
- 1/2 teaspoon ground nutmeg
- 4 cups old-fashioned rolled oats
Filling:
- 3/4 cup shortening
- 3 cups confectioners' sugar sifted
- 7 oz marshmallow creme 1 jar
- 1 - 3 Tablespoons milk or half & half
Instructions
- Preheat the oven at 350-degrees. In a large bowl, cream together the shortening and brown sugar until they are light and fluffy. Beat in eggs, one at a time, followed by the vanilla extract.
- In another bowl, combine the flour, cinnamon, baking soda, salt and nutmeg; gradually add this dry mix to the creamed mix. Stir in oats. If you're using a stand mixer, you'll probably need to stir the last of the oats in by hand. This is a lot of dough!
- Use a tablespoon scoop to dole out the dough onto a cookie sheet, keeping two inches between each spoonful. These will spread.
- Bake for 10 to 12 minutes; they brown very fast, so keep an eye on them at the end. Remove them when they are turning golden brown. Let sit on cookie sheet for 10 minutes before transitioning them to a rack to cool.
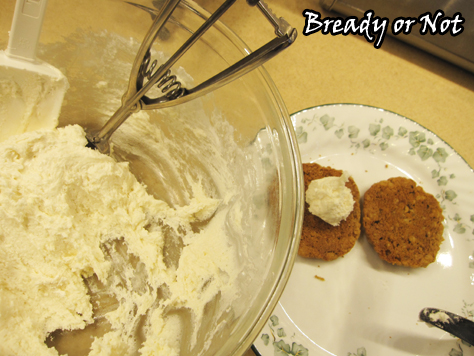
- To make the filling, start by sifting the confectioners' sugar into a large bowl. Add the shortening and marshmallow crème. Add a tablespoon of milk and gradually add more as needed to get it to spreadable consistency. Use a heaping teaspoon to dollop filling onto the base of a cookie. Spread it with a knife, top with another cookie, and press together to get cream to the edges.
- End result: about 30 large sandwich cookies.
- OM NOM NOM!
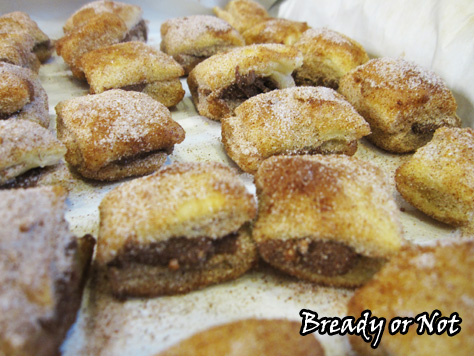
Bready or Not: Stuffed Churro Nuggets
With Cinco de Mayo two days away, let’s revisit a classic Holy Taco Church recipe: Stuffed Churro Nuggets.
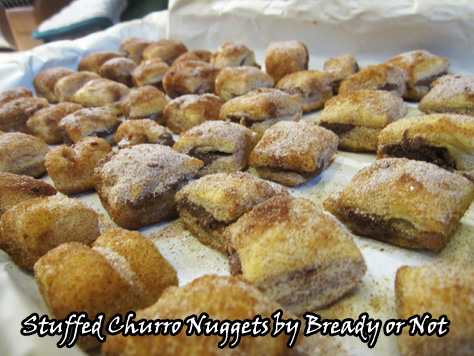
This recipe is EASY. It uses store-bought puff pastry. (I mean, you can use a homemade version, but even the great Mary Berry of the Great British Bake Off says she prefers the store kind.) I haven’t tried it with gluten-free puff pastry, but I know that it exists; if anyone uses that with this recipe, let me know how it turns out!

You can choose whatever filling you want. I like to make this and fill half with Nutella and half with Dulce de Leche, but you could try this with any kind of thick, spreadable delicious stuff.
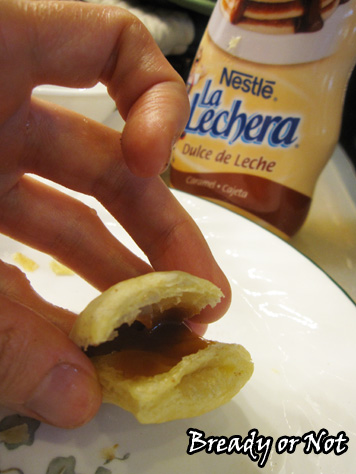
Maybe try peanut or other nut butters? Or maple butter? (OOOOOOOOH.) But trust me, you can’t go wrong with Nutella and Dulce de Leche (and if you can find the squeeze bottle Dulce de Leche, it’s especially convenient).
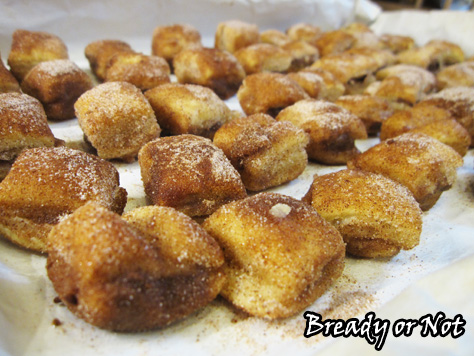
These nuggets are best eaten the same day, but if you take this to any sizable gathering, that won’t be a problem. These are a perfectly-sized hors d’oeuvres, and I doubt that anyone will have just one!

Bready or Not: Stuffed Churro Nuggets
Ingredients
Nuggets
- 1/2 package puff pastry 1 bag out of a 2 pack box
- 1/4 cup unsalted butter 1/2 stick
- 1/2 cup white sugar
- 1 Tablespoon cinnamon
Choose your stuffing! One of these or something else
- Nutella
- Dulce de leche squeeze bottle, can, etc
Note that if your filling is stiff, you can make it more spreadable with a zap in the microwave. Make sure you do so in a microwave-safe container.
Instructions
- Let puff pastry come to room temperature. Preheat oven at 425-degrees.
- Get out a large cookie sheet and line it with parchment paper. Unfold puff pastry onto the surface and use a pizza cutter to quickly cut the dough into 1-inch cubes.
- Bake for 10 to 15 minutes, until the squares are puffed and golden.
- Set out whatever will be used to stuff the nuggets. Mix together the sugar and cinnamon in a bowl. In another bowl, melt the butter.
- Remove the puff pastry from the oven. Pop open each cube by removing the top completely or opening it as if on a hinge--it's surprisingly easy, with those flaky layers--and add a dab of filling. Close the pastry, then roll it in butter and then in cinnamon-sugar.
- Churro Nuggets are best eaten the same day. Store them in a sealed container, with parchment or waxed paper between layers.
- OM NOM NOM!
Goodreads Book Giveaway

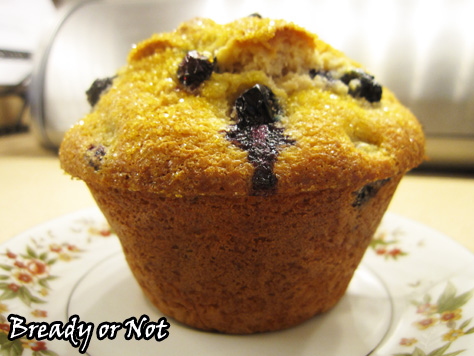
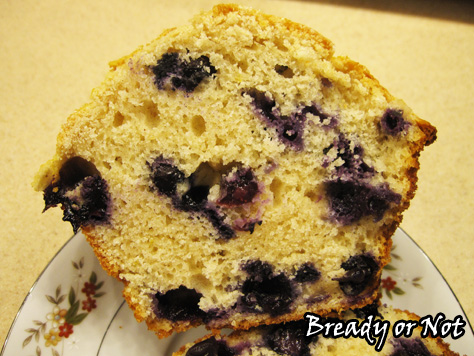
Bready or Not: Jumbo XXL Lemon-Blueberry Muffins
You could made normal, piddly muffins. Or you can make ENORMOUS HONKIN’ MUFFINS like the kind you get in bakeries. These Jumbo XXL Lemon-Blueberry Muffins taste pretty darn good and will fill your belly, too.

These muffins pans are surprisingly cheap. Amazon has a couple different kinds. Search for “jumbo muffin pan” or “Texas muffin pan.” (Because everything is bigger in Texas).
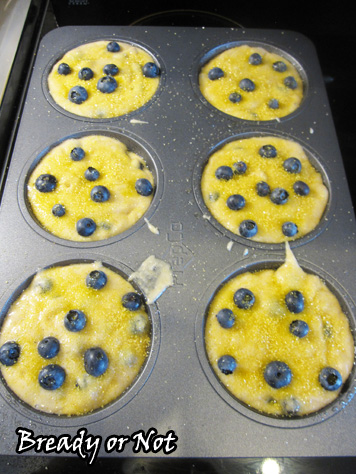
Confession: one reason I like these muffins is because they are pretty. I add a couple blueberries on top to make sure they don’t all sink, and I add some turbinado sugar to make them glisten.
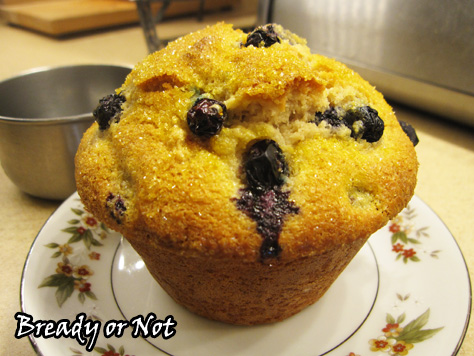
Then there’s the size. Look at the pictures here and you’ll see that silver cup for size contrast. That’s 1 cup. Yeah.
If that’s too much muffin for you to eat, you can easily cut one in half. Or you can do what I do and freeze most of the batch. Wrap’em up in a few layers of plastic wrap and they’ll keep well in the freezer for a few weeks.
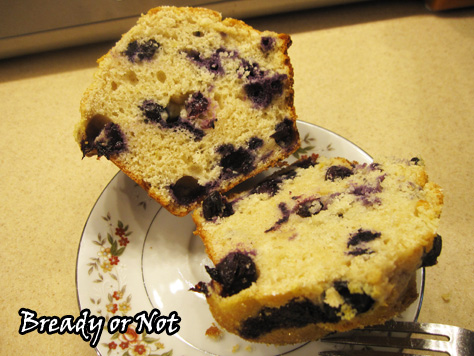
That’s a perfect way to make these cakey lemon-blueberry bombs last a little longer!
Modified from Sally’s Baking Addiction. Shared another version of this recipe in 2013 on my LiveJournal.

Bready or Not: Jumbo XXL Lemon-Blueberry Muffins
Ingredients
- 3 cups all-purpose flour
- 4 teaspoons baking powder
- 1 teaspoon salt
- 1 teaspoon ground cinnamon
- 2 eggs room temperature
- 1 lemon zested and juiced
- 1 cup white sugar
- 1 cup milk or almond milk or half & half
- 1/2 cup canola oil
- 1/2 teaspoon vanilla extract
- 6 ounces fresh blueberries washed and patted dry
- sparkling sugar optional, or turbinado sugar for the top
Instructions
- Preheat oven at 425-degrees. Use nonstick spray or butter on the muffin pan.
- In a medium bowl, mix together the flour, baking powder, salt, lemon zest, and cinnamon. Set aside.
- In a large bowl, whisk together the eggs and sugar. Mix in the milk, oil, lemon juice, and vanilla extract. Mixture will be pale and yellow.
- Gradually stir the dry ingredients into the wet ingredients, making sure to scrape the bowl, but don't overmix. The batter will be thick and somewhat lumpy.
- Carefully fold in the blueberries, reserving some to place on top of the muffins.
- Pour the batter into the greased muffin tins, filling just about to the top. Add the reserved blueberries and some turbinado or sparkling sugar, if desired.
- Bake at 425-degrees for 5 minutes, then reduce oven temperature to 375. Continue to bake for about 25 minutes. The tops should be lightly golden, and the muffins should pass the toothpick test. Allow them to cool for 10 minutes in pan, then remove to begin eating or to allow them to cool completely on a rack. (If you leave the muffins in the pan too long, they will steam and get soggy.)
- Muffins are best eaten within a day or two, but they can also be frozen for later enjoyment. Eat at room temperature or zap in the microwave to warm up.
- OM NOM NOM!
Bready or Not: Chewy Honey Snickerdoodles
This is a Bready or Not Original recipe. And it will blow your mind.
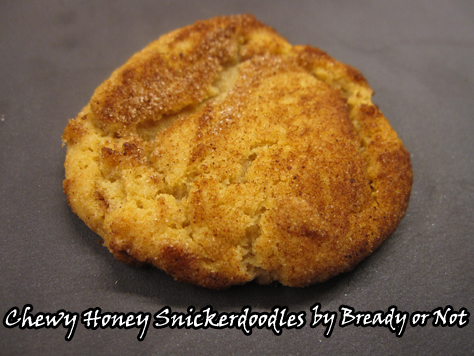
As WorldCon in Kansas City neared, I asked on Facebook if people had cookie requests. Several people asked for Snickerdoodles. Problem: My traditional Snickerdoodle recipe only stays optimal for a few days.
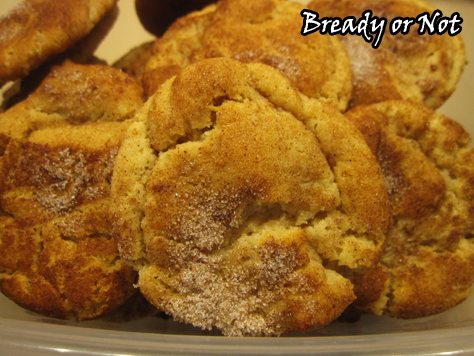
Therefore, I needed to create a new Snickerdoodle recipe, one that would travel well and hold up to summer heat. I looked at my other go-to convention cookie recipe for Chewy Honey Maple Cookies. I Snickerdoodlified it.
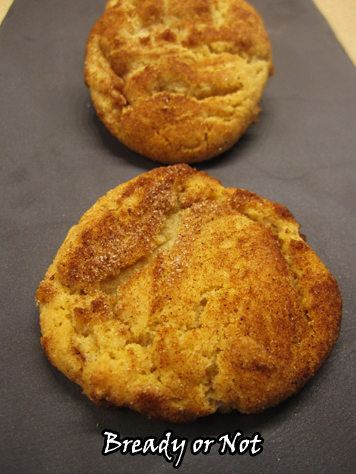
The end result: a new kind of Snickerdoodle with a sweet kiss of honey, and the durability to travel without falling apart AND the miraculous knack for staying fresh ‘n tasty for over a week.
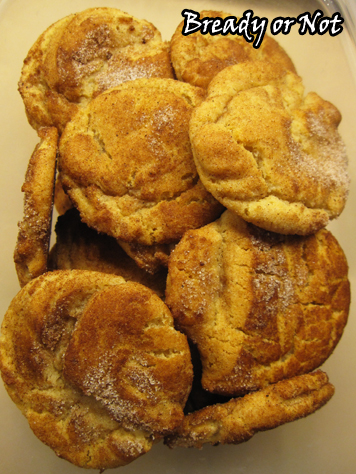
These cookies were well loved during the con. Several people said they were the best Snickerdoodles they’d ever had.
Here’s the recipe, so that you may replicate their joy.

Bready or Not: Chewy Honey Snickerdoodles
Ingredients
For dough:
- 3/4 cup unsalted butter 1 1/2 sticks, softened
- 1/2 cup light brown sugar packed
- 1/2 cup white sugar
- 2 Tb honey
- 1 large egg room temperature
- 2 teaspoons vanilla extract
- 1 cup bread flour
- 1 cup all-purpose flour
- 1 1/2 teaspoons cream of tartar
- 2 teaspoons cornstarch
- 1 teaspoon baking soda
- 1/2 teaspoon salt
For rolling:
- 3 tablespoons white sugar
- 3 teaspoons ground cinnamon
Instructions
- In a large bowl, beat the butter until smooth. Add the sugar and honey and beat until creamy and fluffy, about 3 minutes. Scrape down the sides of the bowl and then mix in the egg and vanilla extract.
- In a separate bowl, combine the dry ingredients: bread flour, all-purpose flour, cream of tartar, cornstarch, baking soda, and salt. Sift together.
- Slowly stir together the wet and dry ingredients until just combined. Wrap the dough in plastic wrap and stash in the fridge for several hours or days.
- When you're ready to bake, preheat the oven to 350-degrees. Use greased stoneware, parchment paper, or silpat mats. Prepare sugar and cinnamon mix, and roll dough balls to coat.
- The cookie dough, even straight from the fridge, has a soft Play-Doh-like consistency, so it will spread when it bakes; keep this in mind when you space the cookie dough balls.
- Teaspoon-sized cookies need to bake 9 to 12 minutes; Tablespoon-sized take 11 to 13 minutes. Let set on cookie sheets for 10 to 15 minutes before moving to a rack to cool completely.
- Cookies will keep in a sealed container, between waxed paper or parchment layers, for over a week and a half. They are excellent for travel or shipping.
- OM NOM NOM!

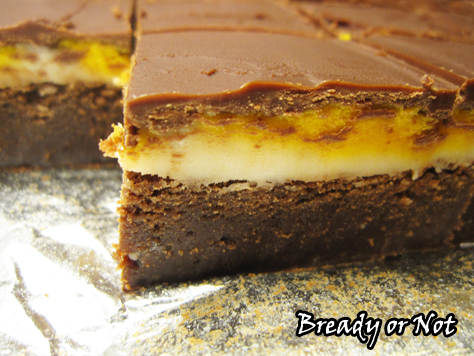
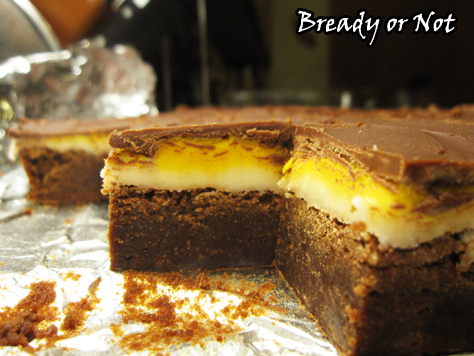
Bready or Not: Cadbury Egg Brownies
Three years ago, I shared my recipe for Cadbury Egg Brownies. Today we revisit that glorious recipe–and double it.

Because it obviously didn’t deliver enough sweetness the first time around, right?
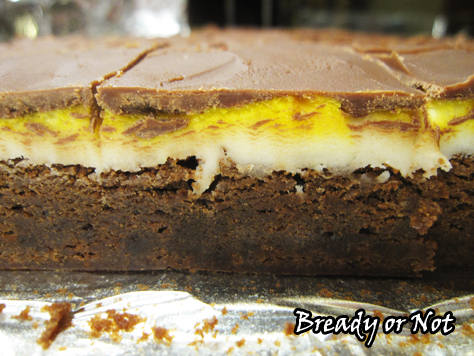
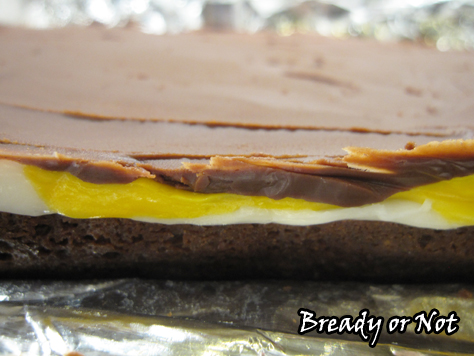
Here’s the thing about these brownies: they taste like Cadbury Eggs, but BETTER. That’s because they aren’t as cloying sweet. The brownie layer balances things out in a magical way.
This is a time-consuming recipe because of the layers and the refrigeration time involved, but it’s not hard. The first stage is the only one that requires baking.
I will forever be amazed at how the cream filling layer turns out, too. It’s eerily like the non-runny portion of the Cadbury Egg filling. But you make it yourself. It boggles the mind.
Even better, these brownies will keep as long as a week if sealed and kept in the fridge. Trust me, there is NOTHING healthy about these. You want to make these to share with a crowd!
I’ve modified this a good bit, but I must give credit to the original recipe from Love and Oil. They shared something amazing.
Bready or Not: Cadbury Egg Brownies
Equipment
- 9x13 pan
- aluminum foil or parchment paper
- uneven spatula
- microwave safe bowl or double boiler
Ingredients
For Brownies:
- 1 1/3 cup all-purpose flour
- 1/4 cup cocoa powder sifted
- 1 teaspoon salt
- 1 teaspoon espresso powder optional
- 12 ounces milk chocolate chopped
- 1 cup unsalted butter (2 sticks) cut into cubes
- 1/2 cup white sugar
- 1 cup light brown sugar packed
- 4 large eggs room temperature, lightly beaten
- 2 teaspoons vanilla extract
For Cream Filling:
- 1/2 cup light corn syrup
- 4 tablespoons unsalted butter (half stick) room temperature
- 1 teaspoon vanilla extract
- 1/4 teaspoon salt
- 3 cups confectioners' sugar sifted
- yellow food coloring gel
For Glaze:
- 8 ounces milk chocolate chopped
- 4 Tablespoons unsalted butter half stick, cut into cubes
Instructions
Brownie stage
- Preheat oven to 350-degrees. Line the bottom and sides of a 9x13-inch pan with aluminum foil or parchment paper, making sure to overlap the sides to create handles. Cover with nonstick spray.
- Sift together flour, cocoa, and salt (and espresso powder, if using) in a small bowl and set aside.
- Melt chocolate and butter together in a double boiler or in slow increments in microwave. Stir until smooth. Whisk in sugars and stir until dissolved and mixture has cooled slightly, then add eggs and vanilla extract until just combined.
- Fold together the chocolate and flour mixes until just incorporated. Pour into prepared pan.
- Bake for 25 to 30 minutes or until toothpick inserted into the middle comes out clean. Transfer pan to a wire rack and allow to cool completely.
Cream filling stage
- Beat together corn syrup, butter, vanilla, and salt on medium-high speed until smooth. Add powdered sugar, a little bit at a time, mixing until creamy.
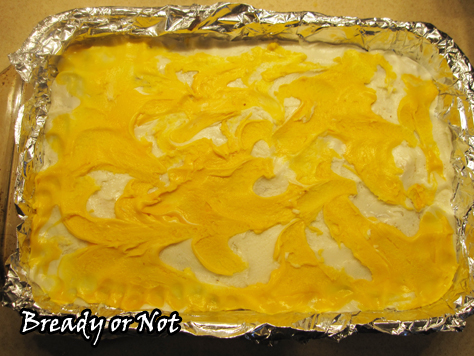
- Dump 3/4 of the cream mixture on top of cooled brownies and spread into an even layer. Add a drop of yellow food coloring gel to remaining cream mixture and stir until evenly colored. Drop dollops of yellow cream on top of white layer, and then swirl gently with a spatula. Refrigerate for at least 2 hours or until set.
Glaze stage
- Slowly melt the chocolate and butter together in a double boiler or microwave bowl. Stir until smooth. Pour over cream filling, carefully spreading into a thin, even layer.
- Chill in the fridge long enough for the chocolate to not quite harden, 15-20 minutes, OR let it chill for several hours and then let set at room temperature for about 15 minutes. The chocolate needs to be soft enough to cut through without cracking, but not soft enough to smear with each cut.
- Use the foil/paper to lift the entire block out of the pan and onto a cutting board. Using a large sharp knife, cut into 2-inch squares. Keep in sealed container in fridge; brownies will keep upward of a week.
OM NOM NOM!
Read More
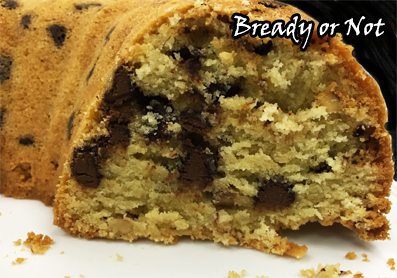
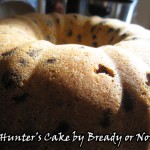
Bready or Not: Hunter’s Cake
It’s April. We’re overdue for a cake recipe, yes? How about some Hunter’s Cake?
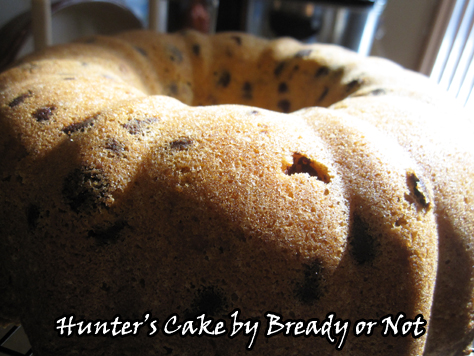
This is a cake that’s designed for some fantasy-style questing. The crumb is tender to eat but dense, so it doesn’t crumble much.
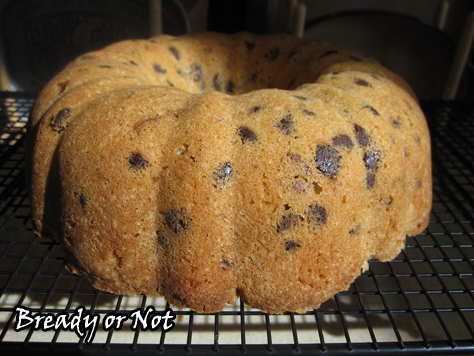
There’s no frosting, no fussiness. Wrap up slices of this cake to go in a lunch box, a picnic basket, a backpack, or Hobbit’s leather pouch.
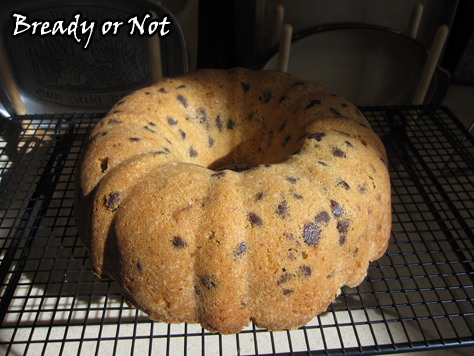
Use whatever kind of chocolate you want. I used milk chocolate, because that’s what I tend to keep around. Whatever kind you use, be sure to coat the chocolate chips in flour before you add them to the batter. That will prevent them from sinking.
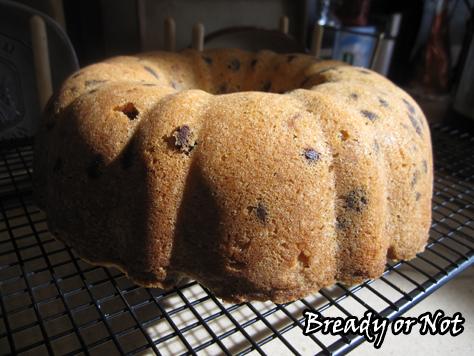
This cake is perfect to eat right out of hand. No fork required.
Modified from Rescued Recipes by Jan D’Atri in the Arizona Republic.
Bready or Not: Hunter's Cake
Ingredients
- 1 cup shortening
- 2 cups white sugar
- 2 teaspoons vanilla extract
- 1/4 teaspoon salt
- 6 eggs room temperature
- 2 cups all-purpose flour
- 8 ounces chocolate chips any kind
- 1 cup walnuts chopped
Instructions
- Preheat oven at 325-degrees. Grease and flour a Bundt pan, tube pan, or angel food cake pan.
- In a large bowl, beat together the shortening, sugar, vanilla, and salt. Add eggs one at a time until smooth, followed by most of the flour.
- In a small bowl, stir together the chocolate chips and remaining flour; this is important, as it will keep the chips from sinking in the batter as it bakes.
- Stir the floured chocolate and walnuts into the batter. Spoon the batter into the prepared pan.
- Bake for 55 minutes and use the toothpick test to check for doneness; bake longer if necessary. The top of the cake will be golden brown and will likely develop cracks.
- Let cool in pan for about 15 minutes, then invert onto a rack to completely cool. Store covered at room temperature. Cake is great to slice and pack for adventures!
- OM NOM NOM!