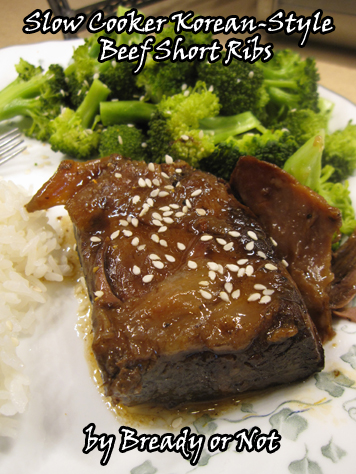
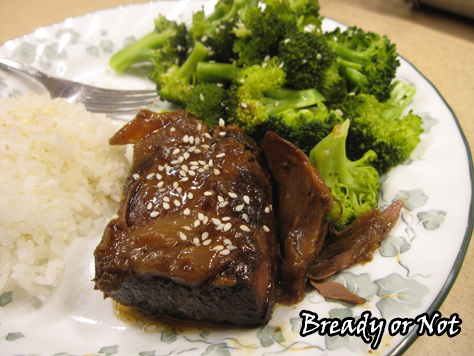
Bready or Not: Slow Cooker Korean-Style Beef Short Ribs
I’m presenting to you the recipe for one of the best dishes I’ve ever made in a crock pot: Korean-style beef short ribs.
I have made this many times over now. I’ve even tried it using cheaper cuts like chuck roast and rump roast. Those worked out okay (though the meat really dries out before its soak in the juice at the end), but they are nowhere as delicious as the short rib version.
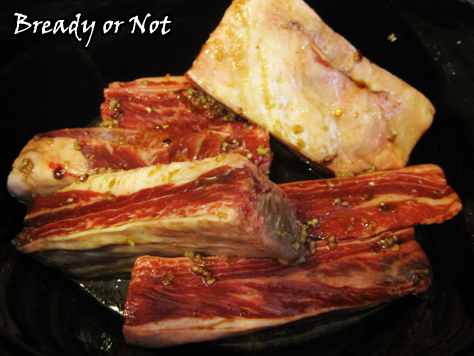
It turns out amazing whether you use boneless or bone-in ribs–a mix is a great way to go, too! Don’t trim the fat. You want all that flavor. The end result is a sauce that tastes like you added red wine, but you didn’t. It’s like MAGIC.
Seriously, these ribs taste like something from a great Asian restaurant. Pair it with some broccoli and a good spoonful of the sauce, and YUM.
Whenever I see beef short ribs go on sale, I do a little dance of joy because it means I get to make this recipe again.
Modified from Heather’s Bytes.

Bready or Not: Slow Cooker Korean-Style Short Ribs
Ingredients
- 1/2 cup low-sodium soy sauce
- 1/3 cup light brown sugar packed
- 2 Tb sesame oil
- 2 Tb rice vinegar
- 1/2 teaspoon ground ginger
- 4 cloves minced garlic
- 1/2 tsp red pepper flakes
- 5 lbs beef short ribs boneless, bone-in, or a mix
- 1-2 Tb cornstarch
- sesame seeds optional
Instructions
- In a small bowl, mix together soy sauce, brown sugar, oil, vinegar, ginger, garlic and red pepper. Place the ribs in a 5 or 6-quart slow cooker; pour the sauce over them. Cover and cook on HIGH for 4 hours or on LOW for 9 hours. Depending on how the ribs are stacked in the cooker, you may want to quickly stir them at some point halfway through.
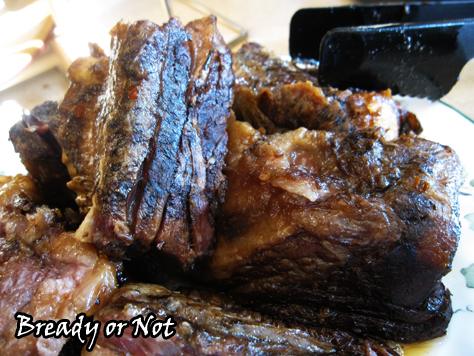
- Use a slotted spoon to remove the ribs from the cooker. Place a tablespoon of corn starch in a small bowl and add some juice from the cooker. Whisk them together to create a slurry without lumps, and add back into the crock pot. Stir. If the juice doesn't start to thicken, repeat the process with some more corn starch.
- Either keep the ribs intact, or pull meat into chunks and discard the bones and fat. Place meat in cooker again on WARM setting for 10 minutes or so to soak in flavors. Serve. Great with rice, broccoli, and perhaps a sprinkling of sesame seeds!
- OM NOM NOM!

Read More
Pi Day! Celebrate with Bready or Not
It’s March 14th and that means it’s PI DAY (3.14). Therefore, it’s only right to celebrate by making and eating some pie, right? I have a whole subcategory of pie recipes in Bready or Not, but let’s highlight some favorites.
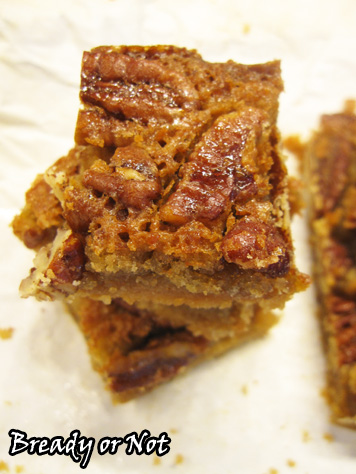
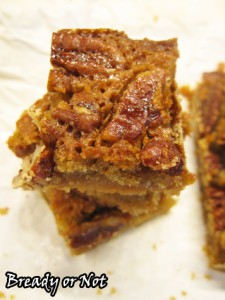 Maple Pecan Pie Bars
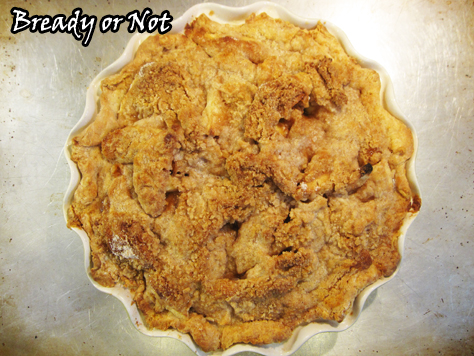
 Maple Apple Pie
 Snickerdoodle Pie

 Peppermint Brownie Pie

 No-Bake Cookies and Cream Chocolate Pie

 No-Bake Triple Layer Lemon Pudding Pie

Om nom nom! #SFWAPro
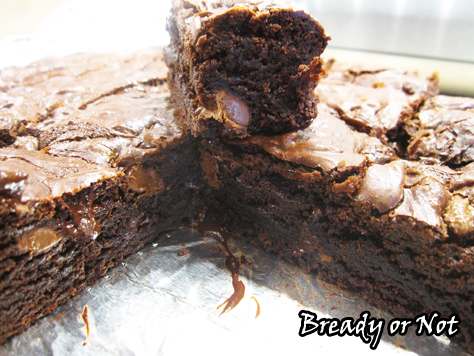
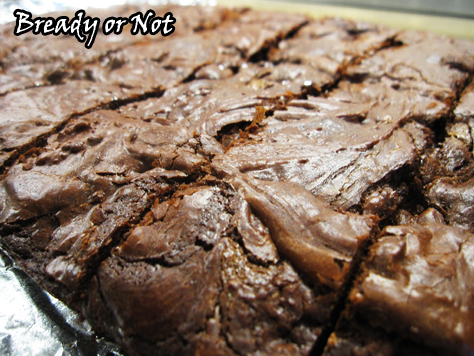
Read MoreBready or Not: Chili Spice Chocolate Brownies
This recipe, originally posted at the Holy Taco Church, adds a kick to regular ol’ brownies.

If you’ve browsed the candy aisles of late, you noticed that gourmet chocolate bars are all the rage. Take advantage of this when it comes to baked goods. Flavored chocolate adds an extra level of nuance to brownies and cookies.
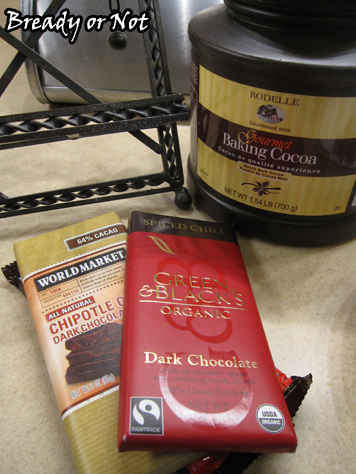
For these Chili Spice Chocolate Brownies, I chopped up a combo of Green & Black Spiced Chili Chocolate and World Market’s Dark Chocolate Chipotle, but any type of amped-up chocolate will work here.

Note that I can’t handle really hot stuff–hello, burning skin and inability to breathe and feeling like a taun-taun kicked me in the intestines–but these brownies aren’t spicy in THAT way. There’s an occasional zing of chili here and there, but the main flavor is of the cinnamon and the milder chocolate.
Modified from Cinnamon-Spiced Chocolate Brownies at King Arthur Flour.

Bready or Not: Chili Spice Chocolate Brownies
Ingredients
- 1 cup unsalted butter two sticks, melted
- 2 1/4 cups white sugar
- 1 1/4 cups baking cocoa or Dutch-process cocoa, sifted
- 1 teaspoon salt
- 1 teaspoon baking powder
- 1 teaspoon espresso powder
- 1 tablespoon ground cinnamon
- 1 tablespoon vanilla extract
- 4 large eggs room temperature
- 1 1/2 cups all-purpose flour
- 2 bars spiced chocolate bars 3 ounces, such as chipotle or chili, chopped
- 6 ounces milk chocolate chips or semi-sweet
[toggle the chocolates to be more or less spicy based on your tastes, but equal 12 ounces total]
Instructions
- Preheat the oven to 350-degrees. Line a 9x13 pan with parchment paper or aluminum foil and grease the surface.
- In a medium-sized saucepan set over low heat, melt the butter, then add the sugar. Stir to combine. Heat the mixture briefly, just until it's hot throughout; it'll become shiny as you stir it. Set on a cool burner or trivet.
- Stir in the cocoa, salt, baking powder, espresso powder, cinnamon, and vanilla.
- Whisk in the eggs, stirring until smooth. Add the flour, again stirring until smooth. Fold in the chopped spicy chocolate and mild chocolate.
- Spoon the batter into the pan, spreading it to the edges. It will be extremely thick and lava-like.
- Bake the brownies for 34 to 36 minutes, until a cake tester inserted into the center comes out clean. The brownies should feel set on the edges, and just barely set in the center.
- Remove from the oven. Allow to cool completely in the pan before cutting.
- OM NOM NOM!
Read More
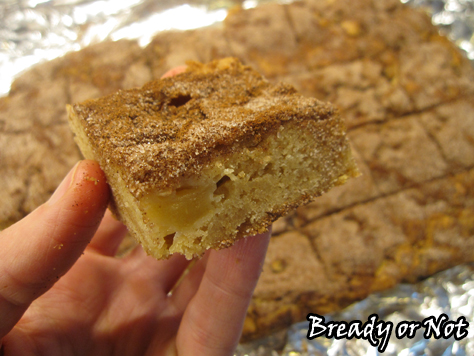
A Bready or Not Original: Apple Snickerdoodle Bars
I have shared many takes on snickerdoodles and many versions of apple cake and pie. This time, I combine apple cake and snickerdoodles to make something especially awesome.

These Apple Snickerdoodle Bars are incredibly straightforward to make. The most time-consuming thing is peeling and dicing the apples. The batter comes together fast, the apples mix right in, and you top the whole thing with a cinnamon-sugar layer.

In under thirty minutes of baking, BOOM. You have created a masterpiece.

Seriously, if you love apples and snickerdoodles, a piece of this will be like heaven. It is dense and tender, not crumbly at all. The topping crisps up in an amazing way.

I store these cut-up between wax paper layers in the fridge. They also freeze well.
If you’re bonkers for these bars, freezing them might help with the matter of restraint.

A Bready or Not Original: Apple Snickerdoodle Bars
Ingredients
Bars
- 2 cups baking apples 2 medium apples, peeled & diced
- 2 cups all-purpose flour
- 1 tsp salt
- 2 teaspoons baking powder
- 1 tsp cream of tartar
- 1/2 cup butter 1 stick, melted
- 2 cups brown sugar packed
- 2 eggs room temperature
- 2 teaspoons vanilla extract
Topping
- 1/4 cup white sugar
- 3 teaspoons cinnamon
Instructions
- Line a 13x9 pan with aluminum foil or parchment paper. Apply nonstick spray or butter. Preheat oven at 350-degrees.
- Peel and dice the apples; stir in some flour to lightly coat to prevent browning as you prepare the batter.
- In a medium bowl, combine the flour, salt, baking powder, and cream of tartar. Set aside.
- In a large bowl, mix the melted butter and brown sugar. Add the eggs and vanilla. Slowly stir in the dry ingredients. Once that is just combined (it will be very thick), add the diced apples.
- Dollop the batter into the prepared pan and spread it out evenly. In another small bowl, combine the white sugar and cinnamon. Use a spoon to cover the top of the batter with the cinnamon-sugar.
- Bake for 28 to 32 minutes, until the top is set and the middle passes the toothpick test. Let cool at room temperature and then chill in the fridge. Use the parchment or foil to lift the bars out for easy cutting on a board. Store bars in a sealed container in the fridge.
- OM NOM NOM!
Bready or Not: Yeasted Waffles
If you’re in need of a quick-fix breakfast, whip up a batch of these yeasted waffles! Chill the batter for at least 4 hours and you can start using it; the batter can stay in the fridge up to 3 days.

I was really impressed with how this batter kept, too. I noticed no difference in the taste for day to day, and I kept it chilled for the 3 day max stated in the original Eating Well recipe.

That said, these do taste different than normal waffles. There’s yeast in there! I found them to have a slightly sourdough flavor, which was not off-putting in the slightest.
Like any homemade waffles, the cooked waffles also keep very well frozen between layers of waxed paper. You stick the frozen waffles straight into the toaster like you would the store-bought version.

No matter how quickly these waffles are cooked up, they make for a convenient and delicious breakfast!
Modified from the original from the March/April 2016 Eating Well Magazine.

Bready or Not: Yeasted Waffles
Ingredients
- 2 3/4 cups almond milk or other milk
- 6 Tablespoons butter cut into pieces
- 3 cups all-purpose flour or whole wheat flour, or mix
- 1 1/2 Tablespoons white sugar
- 2 1/4 teaspoons active yeast 1 packet
- 3/4 teaspoons salt
- 3 large eggs lightly beaten
- 1 1/2 teaspoons vanilla extract
Instructions
- In a small saucepan, heat milk and butter over medium until the butter is melted. Set aside to let cool until it's just warm, about 15 minutes.
- In a large bowl, whisk together the flour, sugar, yeast, and salt. Add in the milk mixture followed by the eggs and vanilla extract. Stir together until just combined.
- Refrigerate the batter for at least 4 hours, or up to 3 days.
- Preheat waffle iron. Gently stir the batter to reconstitute. Use about scant 1/2 cup of batter for each waffle; the waffles will expand as they cook, and the iron might overflow on the first attempts you get a feel for the right amount to pour in.
- Return any unused batter to the fridge for later enjoyment. Cooked waffles can also be frozen.
- OM NOM NOM!

Read More
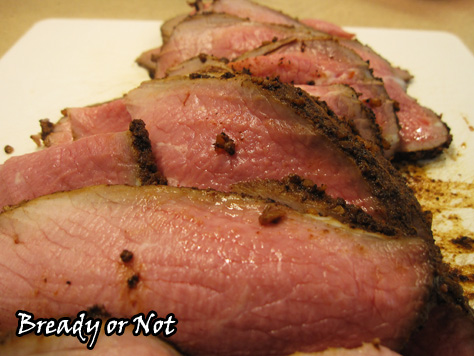
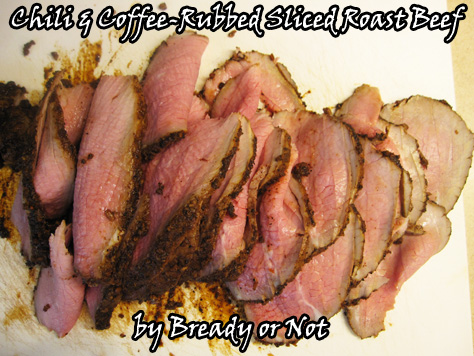
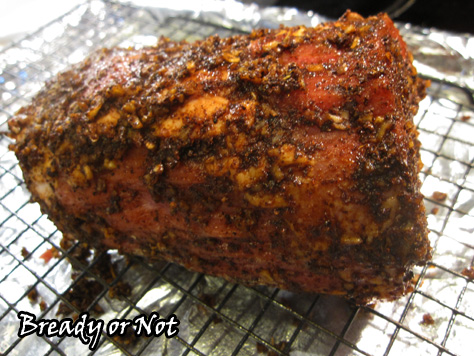
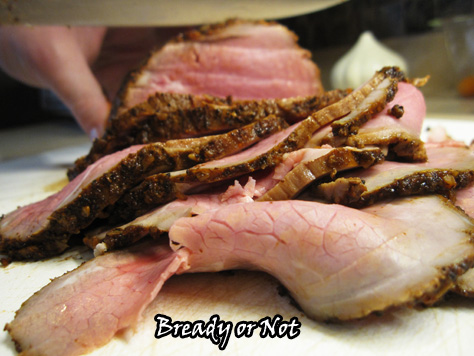
Bready or Not: Chili and Coffee-Rubbed Sliced Roast Beef
For this day after Valentine’s Day, we’re not talking chocolate or sweets. Instead, let’s go straight for a big chunk of meat: using a chili and coffee rub to make sliced roast beef!
I was pretty intimidated the first time I tried a basic recipe for this dish. It didn’t help that it made way too much rub, which I tried to use up anyway, which meant the roast started smoldering like a log when it started cooking. Whoops.
Despite the hassles, my husband loved the end result, so I resolved to re-do the recipe and get it right. I think my husband’s feedback on each iteration was just a big hint to keep making these roasts.
He likes these served up as sliders. On a piece of aluminum foil, I use my dinner rolls, add a piece or two of meat, a dollop of coarse mustard, and a sprinkling of shredded cheese. I close the rolls and pour some melted butter on top, wrap the sliders in the foil, then bake until the cheese is melted. Perfection.
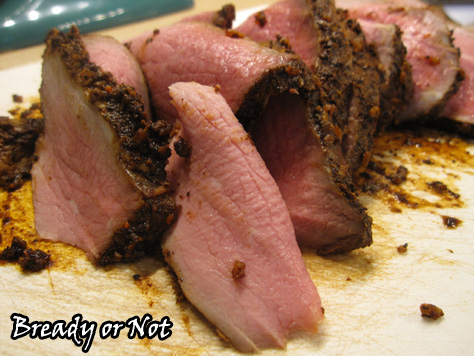
I think this roast beef has spoiled us. This recipe gives you the freshest meat possible, and if you catch eye of round roasts on sale, whoa is this a bargain!

Bready or Not: Chili and Coffee-Rubbed Sliced Roast Beef
Ingredients
- 1 Tablespoon dried onion
- 1 orange zested and juiced
- 2 Tablespoons fresh orange juice
- 1 1/2 Tablespoons coffee finely ground
- 1 1/2 Tablespoons chili powder
- 1 1/2 teaspoons kosher salt
- 4 garlic cloves minced
- 2 - 2 1/2 pound eye of round roast
Instructions
- Move your middle oven rack down a slot to be near the bottom and preheat oven to 475-degrees. Use a small roasting pan, or prepare a rimmed cookie sheet with aluminum foil and place a rack on top of it. Apply nonstick spray.
- Combine the first seven ingredients in a small bowl. If the rub is too thick, add a touch more orange juice or water. Spread the mixture all over the roast.
- Bake meat for 12 minutes, then turn it over and bake for another 12 minutes. It may start smoking because of the thick seasoning on the meat; if so, turn on the vent and keep an eye on things.
- Without opening the oven, reduce heat to 300-degrees. Roast for another 30 minutes, or until a thermometer registers 120-degrees in the center.
- Let the meat rest at room temperature for 30 minutes. Don't remove the crusted seasonings.
- Wrap the roast in parchment paper and then encase in plastic wrap. Refrigerate it for 8 hours or overnight.
- Serve the meat by cutting it into thin slices. Serve in hot or cold sandwiches, wraps, on crackers, or eat straight out of hand.
- OM NOM NOM!