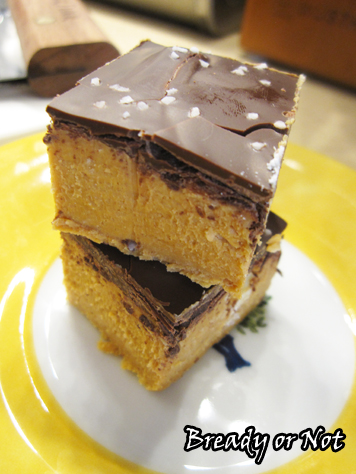
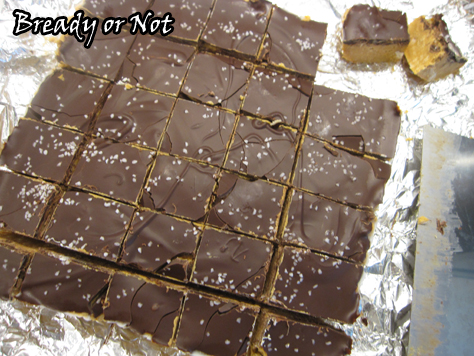
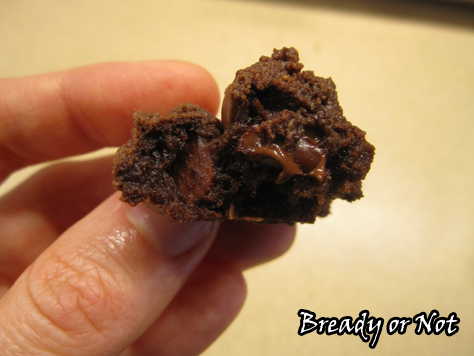
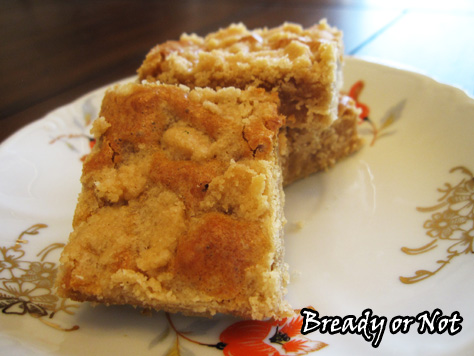
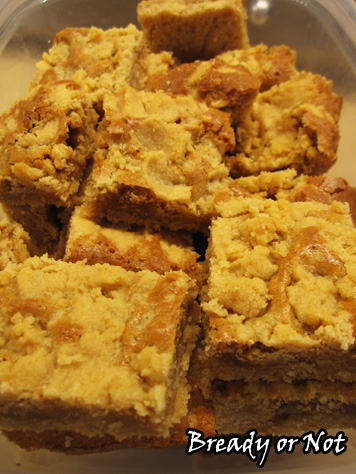
Bready or Not: Salted Dulce de Leche Fudge
Life might really suck. But don’t worry. Salted Dulce de Leche Fudge loves you.
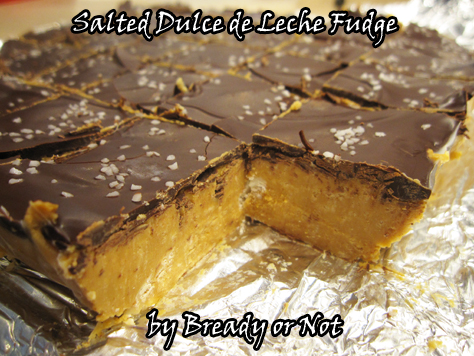
This fudge exists in Zen. It simply is. It does not think. It is here. A thing that you may partake of, a thing that makes stress fade away as dulce de leche-smooth chocolate melts on your tongue.
Its creation is fairly peaceful, too. This fudge is super easy. It comes together in just a few minutes if you use your microwave.

You can find cans of dulce de leche by the sweetened condensed milk in the grocery store, or on the Hispanic foods aisle. You can also caramelize a can of sweetened condensed milk to make it yourself.
I used bittersweet chocolate for the top layer. I’m not a bitter or dark chocolate sort, but it really works well here with the mild sweetness of the fudge. And the salt—the salt is essential. Coarse salt is nice because it keeps in crystals on the top—I really recommend pretzel salt, if you have it around.
However you tweak the recipe, know that the end result will love you, and you will love it, and all will be right in the world for about twenty-two seconds. Until you eat more fudge.
Modified from Easy Salted Caramel Fudge at Something Swanky, with my version originally posted at the Holy Taco Church.

Bready or Not: Salted Dulce de Leche Fudge
Ingredients
- 13 - 14 ounce Dulce de Leche can
- 3 cups white chocolate chips or white candy melts
- 1 cup milk chocolate chips or bittersweet or dark chocolate chips
- 1 - 2 pinches coarse salt pretzel salt or kosher
Instructions
- Line an 8x8 or 9x9 baking dish with foil or parchment. Apply non-stick cooking spray. Measure out the two kinds of chocolate, separately, and open the can.
- Over low heat in the microwave or on the stovetop, melt the white chocolate. Once it is smooth and completely melted, mix in the dulce de leche and a pinch of salt. Stir until the color is consistent. It will be very thick.
- Glop it into the prepared baking dish and smooth out the top with a rubber or offset spatula.
- Melt the darker chocolate morsels in the microwave; 30 seconds, stir, then another 20-30 seconds should do it. Pour the melted chocolate over the fudge. Even it out with your trusty spatula. Sprinkle salt over the top.
- Let it cool completely on the counter or in the fridge for 3-4 hours, until it's set. The chocolate top will likely crackle some as you cut it, but that's okay. It makes tasty crumbs. Cut into small squares.
- Leftovers will keep sealed in fridge for upwards of a week.
- OM NOM NOM!
Read More
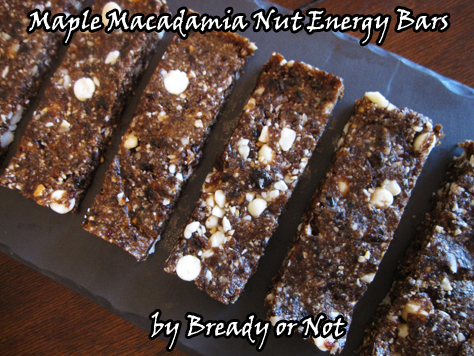
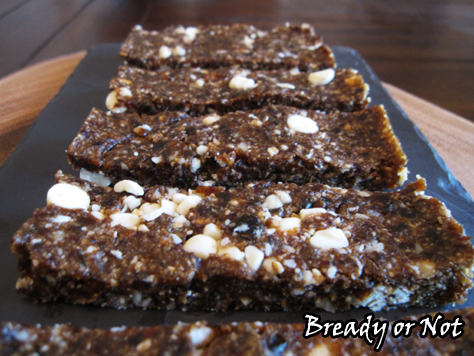
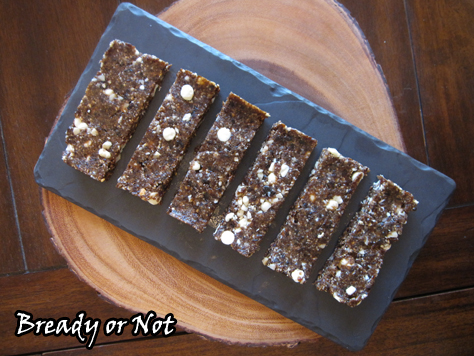
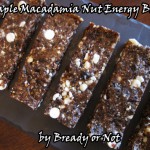
Bonus Bready or Not: No-Bake Maple Macadamia Nut Energy Bars (Gluten Free)
Maple Macadamia Nut Energy Bars. I have my new favorite quick-fix breakfast.
When I think of summer snacks, I think 1) no oven on to heat up my house, 2) quick to make amid writing deadlines and my son’s therapies, and 3) DELICIOUS. To me, maple is delicious, and that kind of awesomeness should not be confined to a single season.
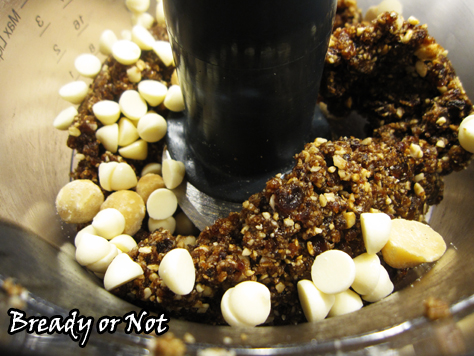
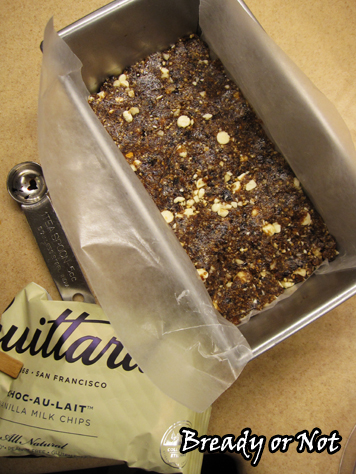
These bars blend up in a few minutes in a food processor or high-powered blender. Mash them in a lined loaf pan, let them chill, slice, eat. Try not to eat them all in one sitting. After all, these are packed with vitamins and healthy stuff–and no gluten!
The primary flavors are maple and macadamia infused with white chocolate, with the coconut mild in the background. These are dense in texture. I have made many variations of energy bars/truffles using dates like this, but I have never added almond flour before. Wow. It doesn’t add a strong almond flavor, but it does fill in those nooks and crannies. Everything melds together.
I don’t understand why more people aren’t creating recipes with maple, macadamia nuts, and white chocolate. If someone needs to start the trend, well, I volunteer as tribute.
Some other energy bars/truffles featured on Bready or Not:
– Blueberry Muffin Breakfast Truffles
– Chocolate-Coffee Truffles
– Chocolate Chip Cookie Dough Breakfast Bites
– Maple Energy Bars/Bites
Bonus Bready or Not: No-Bake Maple Macadamia Nut Energy Bars (Gluten Free)
Ingredients
- 1/3 cup almond flour or meal
- 6 medjool dates chopped, about 1/2 cup
- 2 Tablespoons shredded coconut
- 1 Tablespoon pure maple syrup
- 1 teaspoon maple flavor
- 1/4 cup cashews
- 1/4 cup macadamia nuts divided
- 2 Tablespoons white chocolate chips or vanilla chips
Instructions
- Prepare a loaf pan by lining the long sides with either waxed paper or parchment paper, with the paper sticking up on either side like a sling.
- In a food processor, add the almond flour, chopped dates, coconut, maple syrup, cashews, and most of the macadamia nuts. Set aside the reserved macadamias and white chocolate.
- Run the food processor until everything inside is ground down. The mix should stick together if you pinch it between your fingers; if it's not cohesive, drizzle in a tiny amount of water and pulse again.
- Add the remaining macadamia nuts and white chocolate chips. Pulse a few times to chop them up a little and distribute them.
- Pour into the loaf pan. Use a spatula to compress everything. Chill in fridge for at least an hour.
- Use the sling to lift up the macadamia mix. Slice into bars. Store in a sealed container in fridge.
- OM NOM NOM!
Read More
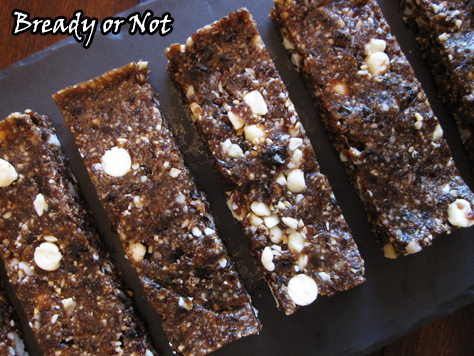
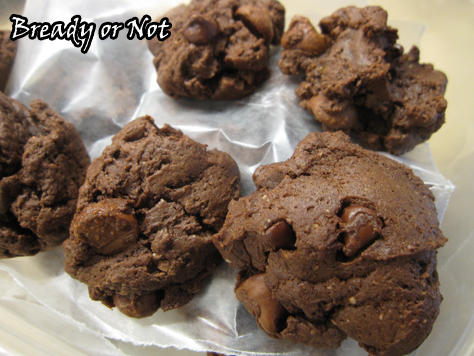
Bready or Not: Double Chocolate Cheesecake Cookies
It’s been like a month since I posted a hardcore chocolate recipe on here. Chocoholics have NEEDS. Therefore, here are Double Chocolate Cheesecake Cookies.

Choice adjectives: Dense. Chocolaty. Rich. Luscious. Pillowy.
Seriously, these are thick in the best kind of way. Pair these cookies with a tall glass of milk or some hot coffee.
Cream cheese is magical when it’s mixed into cake batter or cookie dough. Some past examples include Chocolate Cream Cheese Pound cake and Philly Snickerdoodles.
Modified from How Sweet Eats.

Bready or Not: Double Chocolate Cheesecake Cookies
Ingredients
- 1 2/3 cups all-purpose flour
- 1/2 cup cocoa powder sifted
- 1/2 teaspoon baking soda
- 1/4 teaspoon salt
- 1/2 cup unsalted butter 1 cube, softened
- 1 cup brown sugar packed
- 1/4 cup white sugar
- 8 ounces cream cheese 1 block, softened
- 1 large egg
- 2 teaspoons vanilla extract
- 1 cup milk chocolate chips or semi-sweet chocolate chips
Instructions
- In a small bowl, whisk together flour, cocoa, baking soda, and salt.
- In a large bowl, beat together the butter and sugars until fluffy, about 3 to 5 minutes. Add in the cream cheese until combined; it's okay if there are still small clumps. Follow with egg and vanilla extract.
- Slowly mix in the dry ingredients. As soon as everything is incorporated, stir in the chocolate chips.
- Wrap dough in plastic wrap and chill for a few hours or several days.
- Preheat oven at 350-degrees. Using a tablespoon scoop, dole dough onto a baking sheet. Bake for 10 to 12 minutes. Let sit on sheet a few minutes to set before transitioning to a rack to completely cool.
- OM NOM NOM!
Read More
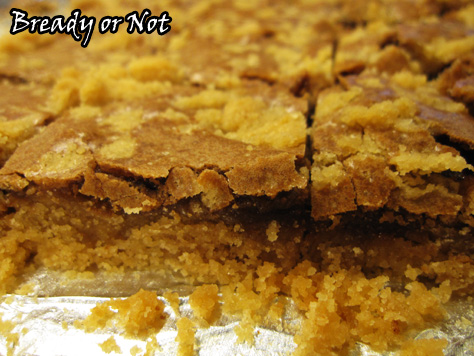
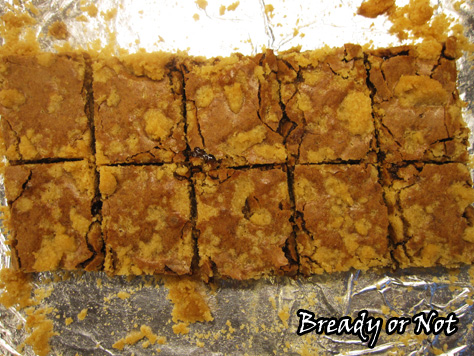
Bready or Not: Biscoff-Nutella Ecstasy Bars
Last week I shared Peanut Butter Ecstasy Bars. This week I switch out the peanut butter for a version that tastes even better.
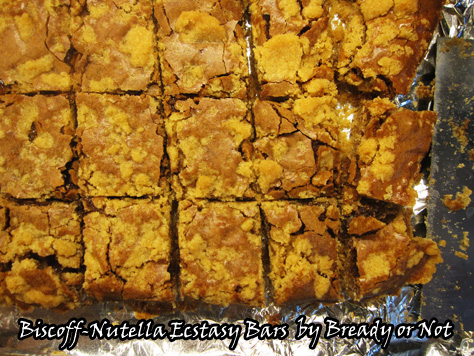
The top and bottom layers use cookie butter (Biscoff, Speculoos, whichever!) while the middle layer uses just a touch of Nutella. That combination is luscious. Cookie dough and chocolate. Guh.
I mentioned before that the peanut butter version can be crumbly, especially the edge pieces. Well, this new variation is even messier. Karmic balance for the extra deliciousness, right? The middle pieces were a touch gooey, even as the edge pieces pretty much shattered as they were cut.
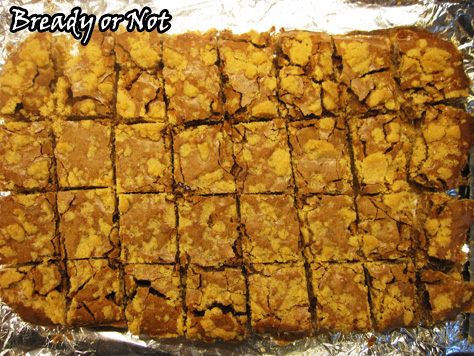
That’s not a bad thing here, though. These pieces are delicious. Lap them up. Save them to top ice cream or yogurt. Just please, don’t let them go to waste.
Mind you, they’ll also go to your waist, but that’s a totally separate dilemma.
Bready or Not: Biscoff-Nutella Ecstasy Bars
Ingredients
Crust:
- 1/2 cup unsalted butter room temperature
- 1/2 cup Creamy Biscoff spread or other cookie butter brand
- 1 1/2 cups white sugar
- 1 teaspoon vanilla extract
- 1 1/2 cups all-purpose flour
Filling:
- 2 eggs room temperature
- 2 Tablespoons Nutella or similar chocolate spread
- 1/2 cup white sugar
- 1/2 cup brown sugar packed
Instructions
- Preheat oven to 375-degrees. Line a 9x13 pan with aluminum foil and apply nonstick spray.
- In a large bowl, mix butter, cookie butter, and sugar. Add the vanilla. Slowly mix in the flour. Set aside about 1 cup of the dough, and firmly press the rest into the prepared pan.
- Using the same bowl, make the filling. Beat together the eggs, Nutella, and two sugars. Spread this over the unbaked crust. Sprinkle the reserved dough over the top.
- Bake for 20 to 25 minutes, until the dough it set and golden. Cool completely in pan. Slice into bars. The bars may be crumbly, especially the edge pieces, but every bit is delicious. Keeps for at least 3 days in a sealed container.
- OM NOM NOM!
Read More
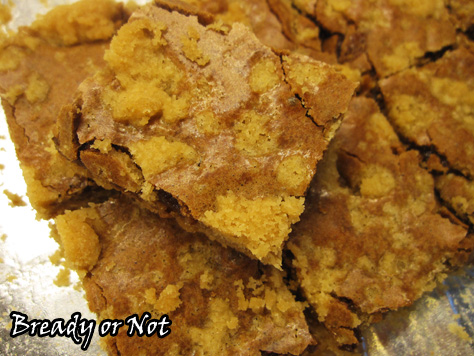
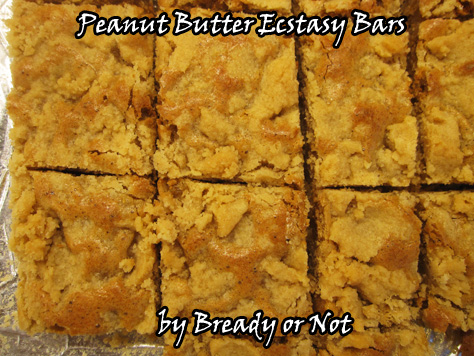
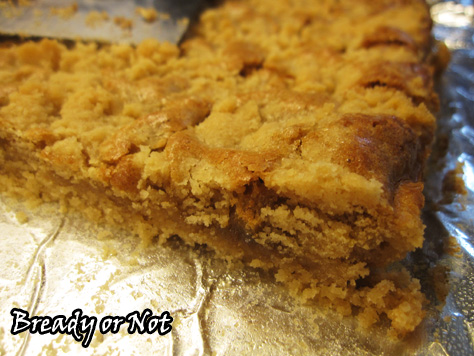
Bready or Not: Peanut Butter Ecstasy Bars
If you like peanut butter, these are for you. I found the original recipe on the back of a C&H Brown Sugar box.
I tweaked it some (MORE VANILLA!) and clarified the instructions. It’s an incredibly simple recipe. Basic ingredients that whip together fast and bake up fast, too.
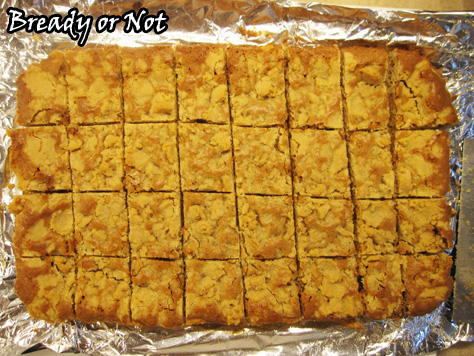
The end result is like a peanut butter sugar cookie in bar form. It’s like getting punched in the face by the peanut butter fairy! They even look pretty because of the mottled layers.
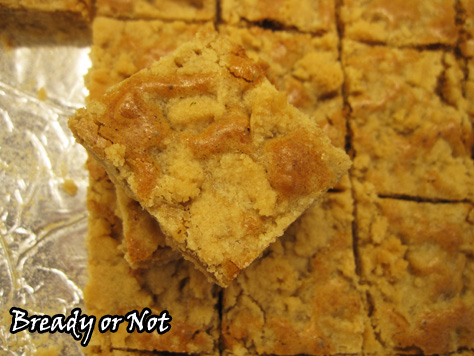
One caveat: these aren’t the neatest cookies, and probably not the best for travel. They are crumbly, especially the edge pieces. Seriously, though, you will want to save and eat those crumbs. They are that good.
As I made these, I couldn’t help but think of more modifications. Therefore, stay tuned for next week when I post the Biscoff and Nutella version of these bars. OH YEAH.
In the meantime, try these and experience peanut butter bliss.

Bready or Not: Peanut Butter Ecstasy Bars
Ingredients
Crust:
- 1/2 cup unsalted butter 1 stick, room temperature
- 1/2 cup peanut butter smooth or chunky
- 1 1/2 cups white sugar
- 1 teaspoon vanilla extract
- 1 1/2 cups all-purpose flour
Filling:
- 2 eggs room temperature
- 2 Tablespoons peanut butter smooth or chunky
- 1/2 cup white sugar
- 1/2 cup brown sugar packed
Instructions
- Preheat oven to 375-degrees. Line a 9x13 pan with aluminum foil and apply nonstick spray.
- In a large bowl, mix butter, peanut butter, and sugar. Add the vanilla. Slowly mix in the flour. Set aside about 1 cup of the dough, and firmly press the rest into the prepared pan.
- Using the same bowl, make the filling. Beat together the eggs, peanut butter, and two sugars. Spread this over the unbaked crust. Sprinkle the reserved dough over the top.
- Bake for 20 to 25 minutes, until the dough it set and golden. Cool completely in pan. Slice into bars. The bars may be crumbly, especially the edge pieces, but every bit is delicious. Keeps for at least 3 days in a sealed container.
- OM NOM NOM!
Read More
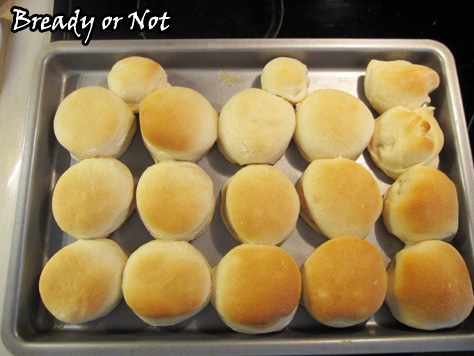
Bready or Not: Soft Dinner Rolls
Back when I first started Bready or Not in 2011, one of my first recipes was for Soft Dinner Rolls. I’m featuring it again today because it’s still a family favorite, and one I make regularly.
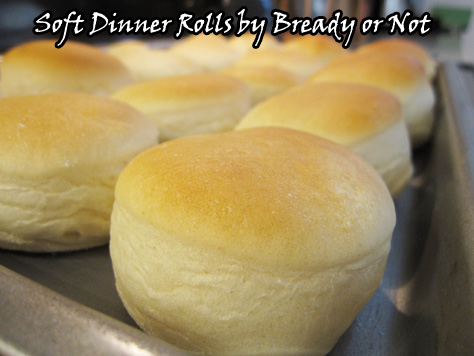
I used to be very intimidated by working with yeast. Would the dough rise? How would I know when it was ready? I used box mixes for a while and built up my confidence to handle the stuff from-scratch.
These soft rolls have never failed me. Other doughs are persnickety; this dough is not. The result is soft, and it bakes up into soft, luscious rolls.
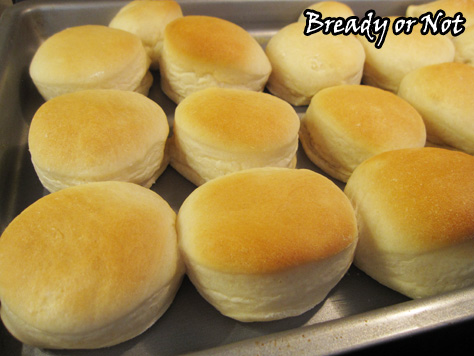
These are the rolls I make every year for Thanksgiving and Christmas. I can make them weeks in advance. They thaw fast. They keep for as long as six days in a sealed bag. Most importantly, they reheat and taste as fresh as ever (and can even be reheated another time, too).
If you’re shy about yeast rolls, give these a try! If you’ve already mastered yeast bread, add these to your repertoire–they are worth making again and again.
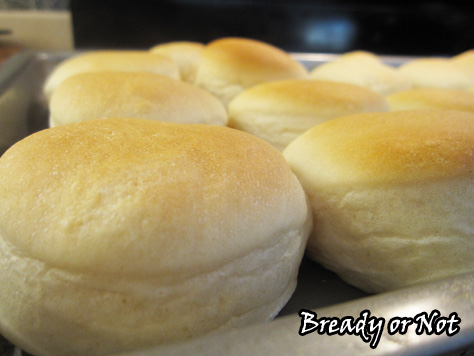
On the subject of yeast, the only kind I use is SAF Instant Yeast. I store it in a sealed plastic tub in the freezer; the yeast granules don’t freeze, but the cold preserves the yeast.


Bready or Not: Soft Dinner Rolls
Ingredients
- 1 cup warm water 110 degrees (temperature especially important if mixing by hand)
- 1/4 cup vegetable oil
- 2 Tablespoons white sugar
- 3 cups bread flour
- 1 teaspoon kosher salt
- 2 1/4 teaspoons instant yeast or 1 packet bread machine yeast
Instructions
If making by hand
- Mix all ingredients together and knead until soft. Place the dough in a bowl and lightly cover with plastic wrap. Let dough rise 45 minutes to 1 hour; knead down again. Let rise another 45 minutes to 1 hour.
If making in a bread machine
- Add ingredients in the order specified. That often means the liquids first. Set the machine on dough cycle and start; this should run for about 2 hours.
- Prepare a cookie sheet or jelly roll pan by greasing lightly with butter. When the dough is done, lightly flour a mat or flat surface. Gently flatten the dough with hands. It's so soft, a rolling pin isn't necessary. Use a biscuit cutter or other round shape to cut out rolls. Place them spaced out a bit on the pan; it should produce 12 to 15 rolls, depending on the cutter. Lightly cover pan with plastic wrap and let it sit for an hour, or until rolls have doubled in size.
- Preheat oven at 350-degrees. Bake the rolls for 10 to 15 minutes, watching them for desired brownness. Let cool a few minutes before serving.
- Completely cooled rolls can be frozen in gallon freezer bags for several months. Sealed rolls will keep well at room temperature for at least 6 days.
- OM NOM NOM!