


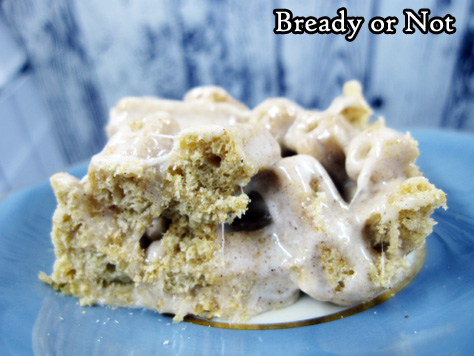
Bready or Not: Chocolate Peanut Butter Bars [cake mix]
These Chocolate Peanut Butter Bars are so good that people won’t even guess that it uses cake mix.
![Bready or Not: Chocolate Peanut Butter Bars [cake mix]](https://www.bethcato.com/blog/wp-content/uploads/2019/05/Double-Choc-PB-Bars6_sm.jpg)
I, personally, don’t see any shame in using cake mix. It’s a convenient base ingredient to doctor up.
![Bready or Not: Chocolate Peanut Butter Bars [cake mix]](https://www.bethcato.com/blog/wp-content/uploads/2019/05/Double-Choc-PB-Bars10_sm.jpg)
Chocolate and peanut butter is such a classic pairing. You can use any number of chocolate cake mixes for this (it was tested with a 15.25 ounce box), but I recommend devil’s food cake. It has a nice depth to it.
![Bready or Not: Chocolate Peanut Butter Bars [cake mix]](https://www.bethcato.com/blog/wp-content/uploads/2019/05/Double-Choc-PB-Bars8_sm.jpg)
If you’re in America, you might find a premade bag of peanut butter and chocolate chips at stores like Walmart. If you can’t find that, just use separate bags of those kinds of chips and measure out a cup of each.
![Bready or Not: Chocolate Peanut Butter Bars [cake mix]](https://www.bethcato.com/blog/wp-content/uploads/2019/05/Double-Choc-PB-Bars14_sm.jpg)
At my husband’s work, some of his co-workers considered this among their all-time favorite recipes. That is high praise indeed.
![Bready or Not: Chocolate Peanut Butter Bars [cake mix]](https://www.bethcato.com/blog/wp-content/uploads/2019/05/Double-Choc-PB-Bars4_sm.jpg)
![Bready or Not: Chocolate Peanut Butter Bars [cake mix]](https://www.bethcato.com/blog/wp-content/uploads/2019/05/Double-Choc-PB-Bars6_sm-150x150.jpg)
Bready or Not: Chocolate Peanut Butter Bars [cake mix]
Ingredients
- 1 box chocolate cake mix 15.25 oz
- 3/4 cup unsalted butter melted
- 1/2 cup milk
- 1 cup creamy peanut butter
- 1 bag peanut butter and chocolate chips or 1 cup of each kind of chips
- 1/2 cup chopped peanuts
Instructions
- Preheat oven at 350-degrees. Line a 9x13 pan with foil and apply nonstick spray.
- In a big bowl, combine the cake mix, melted butter, and milk. Spread half of batter on bottom of the pan. Bake for 15 minutes.
- Place peanut butter in a microwave safe bowl and warm to be spreadable. Pour over the baked bottom crust and spread to edges. Sprinkle the peanut butter and chocolate chips on top, followed by dollops of the reserved cake batter. Finish with the chopped peanuts.
- Bake for another 20 minutes, until the visible portions of the peanut butter layer look set. Cool completely, refrigerating if desired.
- Use foil to lift onto cutting board to slice into bars. Store in a sealed container at room temperature.
- OM NOM NOM!
Book Blog: The Okay Witch by Emma Steinkellner
I review everything I read and post reviews on Goodreads and LibraryThing. That’s not enough. Good books are meant to be shared. Therefore, I’m spotlighting some of my favorite reads here on my site.
The Okay Witch by Emma Steinkellner
out now; Indiebound, B&N, and Amazon
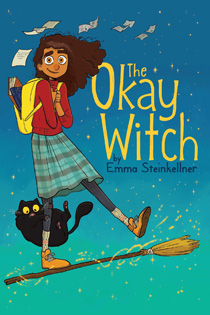
I received an ARC of this book via NetGalley.
The Okay Witch is more than okay. It’s absolutely charming. I adored this graphic novel and everything about it–art, story, characters, EVERYTHING. Moth is thirteen and doesn’t fit in at school–and when she suddenly discovers she has magical powers, that doesn’t exactly help much. This is a story packed with genuine heart. The tone is light, but there are heady issues addressed with a delicate hand. Moth is a wonderful, relatable heroine, but the entire cast is fantastic–including a talking cat who threatens to steal the whole show. I loved, loved, loved how inclusive it is. A subplot involving the said talking cat and a beloved actually made me get teary-eyed at one point.
I mean, really. Start reading because it’s about magic and a smart girl and because the art is fantastic, and keep reading because you find everything about this book is fantastic. This is not only a 5-star read for me, but I’m adding it to my nomination list for the Norton Award.
Read MoreBready or Not: Coconut Cream Cheese Pound Cake
This stunning Coconut Cream Cheese Pound Cake is gorgeous and delicious, and will win over even people like me that are not big coconut fans.
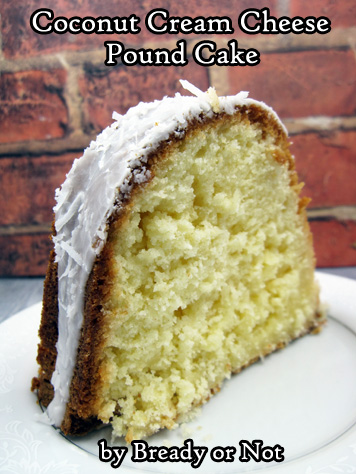
This cake works for me because the cream cheese creates a rich, tender crumb, and the coconut adds a lovely chewiness to it all.

The cake ends up being chewy, but not too chewy; sweet, but not cloyingly. Really, that makes this great as a breakfast, brunch, or dessert cake.
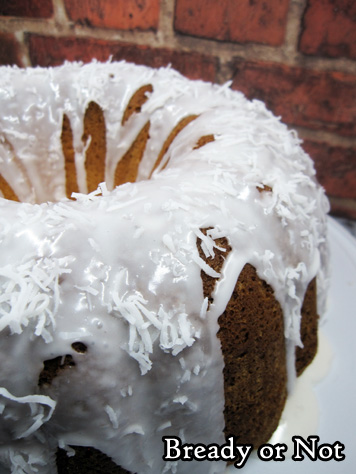
I highly recommend reserving some coconut to sprinkle on top, too. It adds a certain oomph.
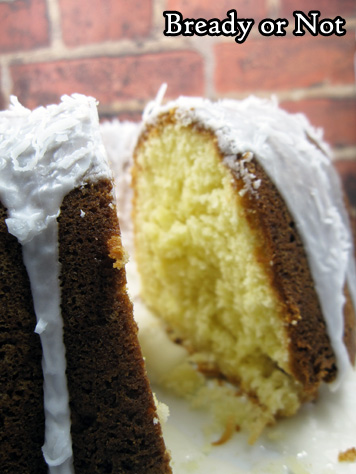
Serve this as cake alone, or like with any pound cake, it would be lovely alongside fresh fruit.

Modified from Cookies and Cups.
Bready or Not: Coconut Cream Cheese Pound Cake
Ingredients
Cake
- 1 cup unsalted butter 2 sticks, room temperature
- 8 ounces cream cheese 1 box, room temperature
- 3 cups white sugar
- 6 large eggs room temperature
- 2 teaspoons vanilla extract
- 1 teaspoon kosher salt
- 1 teaspoon baking powder
- 3 cups all-purpose flour
- 2 cups shredded coconut
Glaze
- 2 cups confectioners' sugar
- 2-3 Tablespoons milk
- extra shredded coconut
Instructions
- Preheat oven at 325-degrees. Coat a 10-cup bundt pan with nonstick spray or butter.
- In a large bowl, beat butter and cream cheese together until smooth. Add sugar and mix until light and fluffy.
- Add eggs one at a time, followed by the vanilla extract, salt, and baking powder. Gradually mix in the flour until just combined, then fold in the coconut.
- Pour batter into pan and distribute evenly. Bake for 75 to 80 minutes, until it passes the toothpick test.
- Cool pan for 20 minutes, then invert the cake onto a wire rack to completely cool. Move to a plate or cake platter.
- To make the glaze, stir together the confectioners' sugar and milk to form a smooth yet thick consistency. Pour or spoon glaze over the top, then sprinkle with additional coconut.
OM NOM NOM!
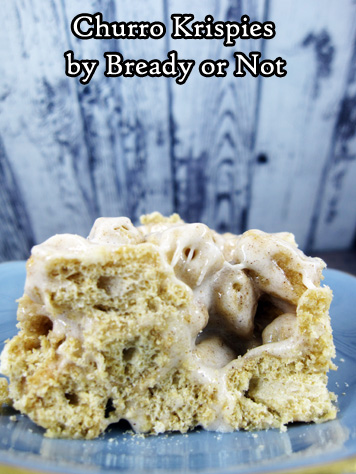
Bready or Not Original: Churro Krispies
Use the new Churros Cereal to make a fast no-bake treat in the mode of Rice Krispies!
As the Once-and-Future High Priestess of Churromancy in the Holy Taco Church, I cannot observe a product like Churros Cereal and simply walk by. No, I must experiment with it in the kitchen.
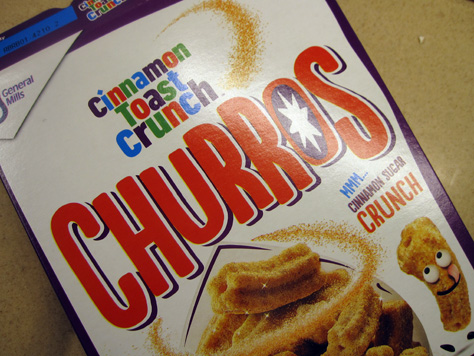
I resolved to adapt this cereal in the mode of Rice Krispies. The first thing I discovered: the box contains more cereal than needed for this process. Measure out 1.5 cups of the cereal to use in some other way, like for cereal (I know, a shock) or eat it straight, because the large pieces actually work well for that.
The bulk of the box’s contents, though, get coated in a mix of butter and marshmallows to create an ooey, gooey, delicious treat.
Yeah, there’s absolutely nothing healthy about this, but it sure tastes good.
Bready or Not Original: Churro Krispies
Ingredients
- 6 cups Churros Cereal
- 4 Tablespoons unsalted butter
- 10 ounces jumbo or mini marshmallows 1 bag
Instructions
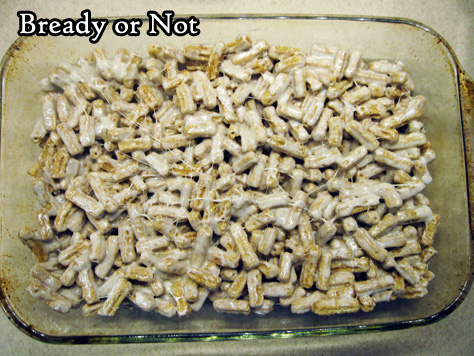
- Prepare a 13x9 pan with nonstick spray. There are about 7 1/2 cups of Churros Cereal in the box, so measure out 1 1/2 cups to set aside for some other use.
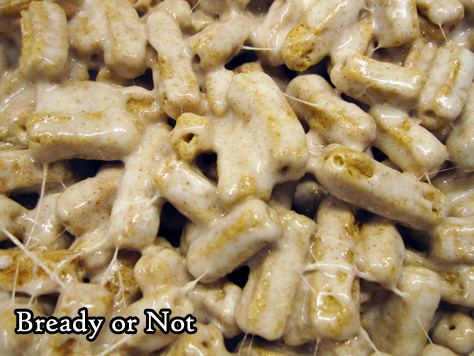
- In very large microwave-safe bowl, watch closely as the butter and marshmallows are heated on HIGH for 1 minute. Stir well. Heat for another 30 seconds and stir again; heat more if necessary. But once it stirs to be smooth, proceed immediately to the next step.
- Add the 6 cups of Churros cereal to the bowl and completely coat.
- Promptly pour the sticky mess into the prepared pan and use waxed paper or a greased spatula to press it down. Cool completely before cutting. Serve out of dish or pack into a sealed container with waxed paper between stacked layers. Best eaten the same day.
- OM NOM NOM!
CoKoCon 2019 Schedule
![]()
CoKoCon takes place over Labor Day weekend at the Doubletree at MetroCenter in north Phoenix. I’ll be there Friday until Monday morning, with a packed schedule of panels. This is a fantastic small con. If you’re in the area, grab a membership and come by.
I have one scheduled booksigning time on Sunday but really, so long as I don’t need to rush to a panel or to eat, I’m happy to stop, talk, and sign stuff. There’s an awesome local bookseller on-site named Duncan who will have lots of my books for sale, too.
Yes, I will have cookies BUT note that if it’s like last year, I cannot feed people in common areas or the con could get in trouble with the venue. I can only share cookies in the con suite or in party rooms.
A mobile device-friendly version of my schedule can also be found here and includes full descriptions. Changes to my schedule will be posted on Twitter and Facebook.
Friday, August 30
5pm
Selling Yourself: Author Branding for Fun and (Hopefully) Profit
Canyon 3, 5pm – 6pm
8pm
Twisted Tropes: Writing Stale Tropes Like Unicorns and Vampires in Fresh New Ways
Canyon 3, 8pm – 9pm
Saturday, August 31
10am
Book Discussion: All Systems Red
Lobby Pit, 10am – 11am
11:30am
A Courtesy of Compliments
Terrace, 11:30am – 12:30pm
1pm
Steampunk Round Table
Terrace, 1pm – 2pm
7:30pm
Writing and Gaming: How RPGs and Video Games Influence Your Writing
Canyon 3, 7:30pm – 8:30pm
Sunday, September 1
11:30am
Author Self-Care: Spoon Management
Canyon 3, 11:30am – 12:30pm
1pm
Signing: Beth Cato and Judith Starkston
Dealers’ Room, 1pm – 2pm
2:30pm
How to Critique
Canyon 3, 2:30pm – 3:30pm
6pm
Surviving Historical Fiction Research
Canyon 3, 6pm – 7pm
#SFWAPro
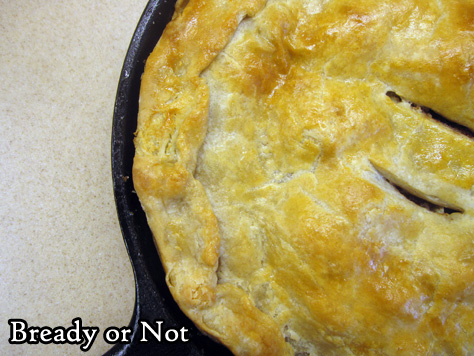
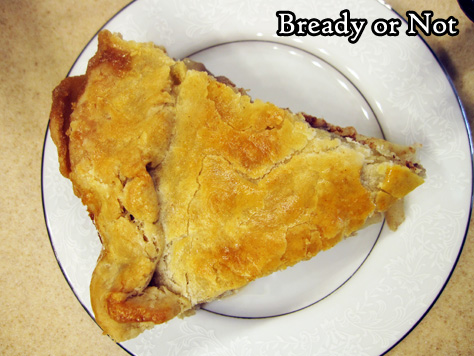
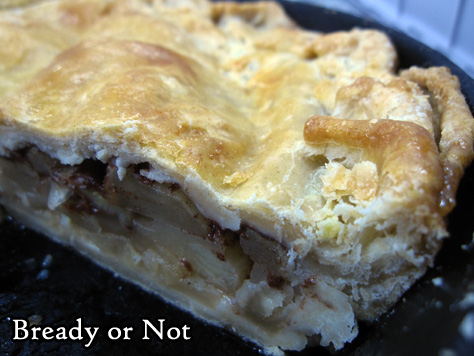
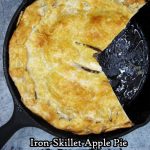
Read MoreBready or Not Original: Iron-Skillet Apple Pie with Ginger Liqueur
A trusty cast iron skillet bakes up a beautiful apple pie in this delicious recipe.
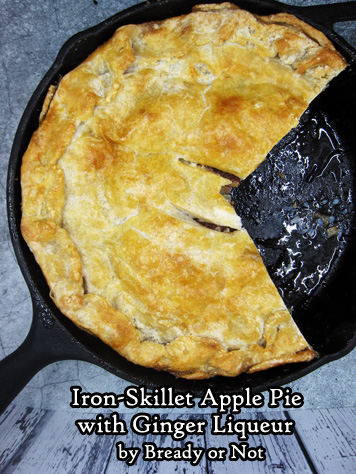
This pie is also special because it includes a drizzle of ginger liqueur. I posted a recipe a few weeks ago on how to make a cheap, sublime version at home in under a week.
The ginger liqueur does add some lovely nuance to this pie, too–the complexity and freshness come across in a different way than, say, using some lemon juice on the sliced apples as I sometimes do to prevent them from browning.
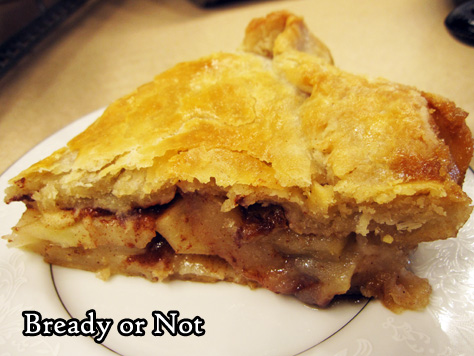
The whole process of this recipe is pretty neat, too. The biggest dose of sweetness is actually at the bottom of the pie, as butter and brown sugar are baked into the bottom crust!
I had to make this recipe three times to finally figure out the right balance of ingredients and how best to bake it. The second try was the most disastrous, as I ended up with the dreaded soggy bottom.

Do be sure to follow the advice to use a rimmed cookie sheet in the oven. It’ll catch the overflow from the skillet and save you from suffering a soggy bottom.
Click here for my Homemade Ginger Liqueur Recipe
Bready or Not Original: Iron-Skillet Apple Pie with Ginger Liqueur
Ingredients
Skillet base:
- 1/4 cup unsalted butter half cube
- 1/2 cup brown sugar packed
Pie:
- 2 prepared rounds of piecrust dough bought or made
- 1/4 cup white sugar
- 2 teaspoons cinnamon
- 2 teaspoons flour
- 5 Granny Smith and/or Honeycrisp apples peeled, cored, and sliced
- 1/4 cup ginger liqueur
For top:
- 1 egg slightly beaten with 1 teaspoon water, for egg wash
Instructions
- Preheat oven at 350-degrees with a large rimmed cookie sheet in the oven. [THIS IS IMPORTANT. The skillet will likely overflow as it bakes and the hot cookie sheet will also reduce the likelihood of a soggy pie bottom.] Add butter to skillet and place in oven until butter is melted. Remove skillet; stir in brown sugar, then return to oven until sugar starts bubbling, about 10 to 15 more minutes.
- In the meantime, in a small bowl combine the white sugar, cinnamon, and flour. Set aside.
- Roll out one of the pie crusts, if not already done. Carefully lay crust inside hot skillet so that bottom and sides are covered. Pour apple slices inside. Drizzle liqueur over the apples, followed by the dry ingredients.
- Roll out second pie crust. Lay atop the mounded pie. Wary of the hot pan, tuck the crusts together as much as possible. Cut several slits in the top of the pie.
- Brush egg wash over the top crust. Set pie on top of hot cookie sheet in oven.
- Bake until pie is golden brown and apples are tender when jabbed with a fork, about 45 to 50 minutes.
- Let cool at least 30 minutes before cutting. Store covered with foil, at room temperature or in fridge.
- OM NOM NOM!
