


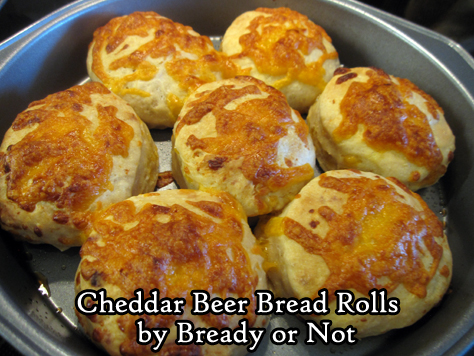
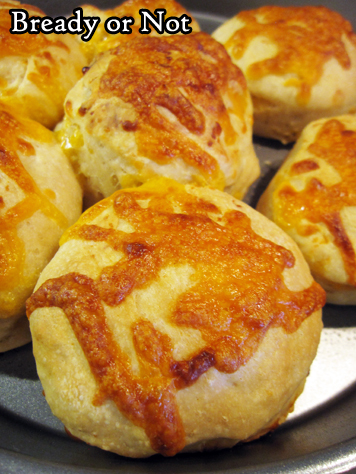
Bready or Not: Cheddar Beer Bread Rolls
These Cheddar Beer Bread Rolls taste as good as they look. Seriously.
When the pandemic sent everything topsy-turvy in spring 2020, my husband ended up working from home more often. That meant I needed to feed him more often.
So, like so many people, I started baking more bread. These rolls were among the first of my experiments, and they were a major hit.
The original recipe from New York Times Cooking made a huge batch of rolls. I needed enough rolls to feed one guy, with a extras frozen for later.
I rewrote the recipe to delicious results. I used a Guilt Lifter beer to make these, which lent a refreshing hoppy flavor. A heavier and darker beer will create heavier and darker flavor. Try different beers to suit your tastes and match your meal.
Bready or Not: Cheddar Beer Bread Rolls
Equipment
- 2 8-or 9-inch cake pans
- 2.5-inch round cutter
- plastic wrap
- basting brush
Ingredients
- 2 Tablespoons unsalted butter divided
- 3 cups all-purpose flour or bread flour
- 1/2 Tablespoons instant yeast
- 1 teaspoon coarse kosher salt
- 2 Tablespoons honey
- 1 cup beer room temperature
- 1 cup shredded cheese 120 grams
Instructions
- Divide the two tablespoons of butter in half, separating them to soften at room temperature.
- In a stand mixer with a bread hook attachment, stir together the flour, yeast, and salt. Follow up with 1 tablespoon of softened butter, honey, and beer. Mix on low speed for 4 minutes, scraping the bowl as needed. Increase the speed to medium for another 2 minutes, pulling the dough from the hook a few times. Add about half the cheese, reserving the rest to go on top later. Mix the cheese until it's distributed through the dough.
- Lightly grease a large bowl. Transfer the dough there and cover with plastic wrap or a towel to let it rise until it's about doubled in size, about an hour.
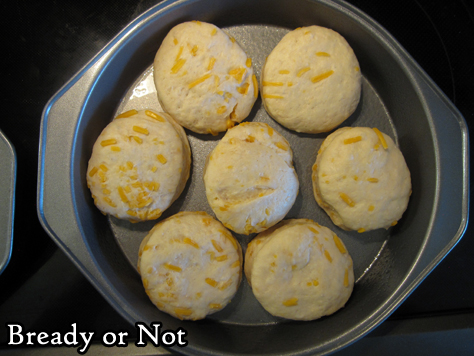
- Grease the two cake pans. Prepare a lightly floured surface and tip the dough onto it. Pat the dough out into a thick, even layer. Use the cutter to slice out rolls. Place them not quite touching in the pans. Reform scraps as much as possible to shape into more rolls. The rolls likely won't quite fill both pans.
- Cover pans with plastic wrap and set in a warm place to rise again for 35 to 45 minutes. They may not increase a lot in size, but they should look puffy.
- Preheat oven at 400-degrees.
- Pull out remaining pat of butter and cheese. Brush the soft butter over the rolls, and follow up with a sprinkling of cheese. Try to keep the cheese from touching the edge of the pan, where it could burn.
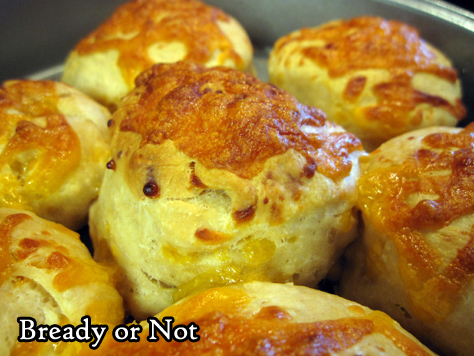
- Place both pans in the oven and bake until the rolls are browned and cheese is melted, 15 to 20 minutes. A digital thermometer in a center roll should read 190-degrees at minimum.
- Let cool for at least 10 minutes before (carefully) pulling apart and serving.
- Rolls can keep in a sealed bag at room temperature for up to 2 days. They can also be frozen and thawed for later enjoyment. They taste best hot. For best results, wrap them in foil and bake at 400 for about 10 minutes to warm them through.
OM NOM NOM!
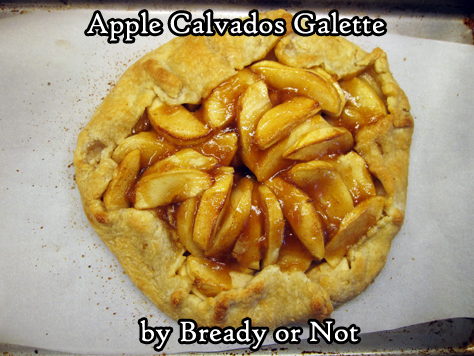
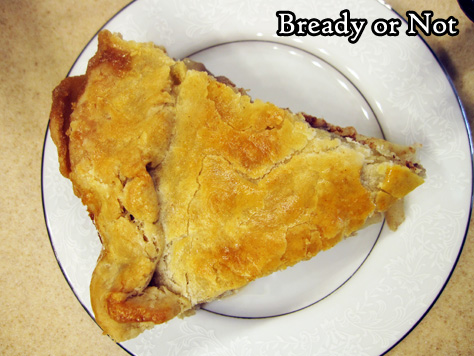
Bready or Not Original: Apple Calvados Galette
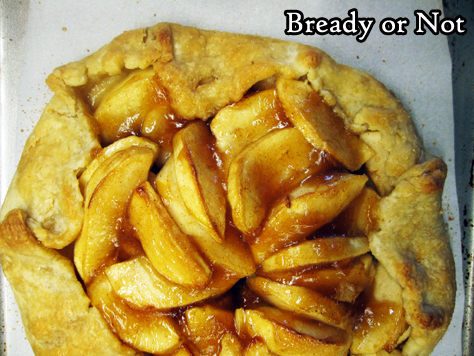
This Apple Calvados Galette is a perfect dessert for one or two people. Plus, it’s rustic and pretty to behold!
Calvados is an apple brandy made in Normandy. The price point of it can vary quite a bit. Feel free to use another kind of apple brandy in the recipe.
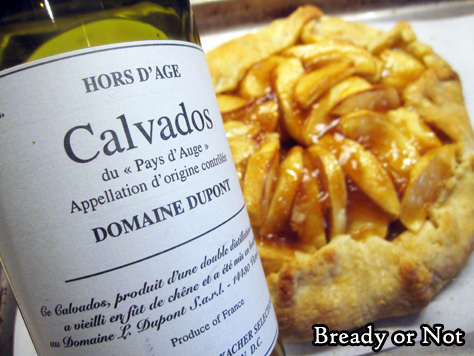
The delicious, original aspect of this treat is that you use the calvados to make a quick stovetop jelly that you then coat the apples with at the end of the bake time.
The alcohol flavor doesn’t linger. What you get is a concentrated sweet flavor of apples, right atop the fresh apples.
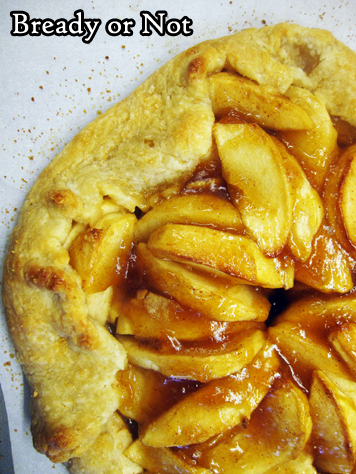
The baked galette keeps for days wrapped up in foil in the fridge. A quarter slice is the perfect amount for breakfast or dessert, and it’s not anywhere near as bready and dense as a full piece of pie.
Bready or Not Original: Apple Calvados Galette
Equipment
- baking sheet
- parchment paper
- basting brush
Ingredients
Galette
- 1 single-layer pie dough store-bought or homemade
- 4 medium apples such as Gala, Fuji, and Ambrosia
- 1 Tablespoon lemon juice
- 1/3 cup calvados or other apple brandy
- 1 Tablespoon cornstarch
- 3 Tablespoons brown sugar packed
- 1/2 teaspoon ground cinnamon
Glaze
- 1 Tablespoon pure maple syrup
- 1 Tablespoon maple sugar or turbinado sugar
Instructions
- Preheat oven at 400-degrees. Line a baking sheet with parchment paper.
- On a lightly floured surface, roll out the pie crust to about a 10-inch diameter circle. Transfer it to the baking sheet and set in fridge while the other ingredients are prepared.
- Peel, core, and thinly slice the apples, placing them in a large bowl. Pour in the lemon juice, calvados, cornstarch, brown sugar, and cinnamon. Toss the apples to coat them completely.
- Pull out the chilled crust. Begin to arrange apple slices in the middle, fanning them out and stacking them, but leaving a 2-inch border of dough around the outside. DO NOT DISCARD THE LIQUID IN THE BOWL! Once the apples are arranged, fold the dough over to partially cover the apples.
- Start baking the galette for 15 minutes. While that is cooking, pour the leftover liquid into a small pot on medium-high. Stay close to the stove and stir liquid often. As soon as it gels, which is right at right about boiling temperature, remove it from heat. Set aside.
- Reduce oven temperature to 350-degrees. Bake galette for another 20 minutes.
- Pull out the galette. Drizzle the gel over the exposed apples in the middle of the galette then use basting brush to coat every nook and cranny. Measure out maple syrup. Use same brush (no need to wash it) to coat the top crust, then sprinkle maple sugar or coarse sugar over it to add a crystalline crunch.
- Bake for another 10 to 15 minutes, until apples in middle are fork-tender.
- Let cool slightly before cutting–a pizza cutter is ideal. Leftovers can be kept wrapped up in foil in the fridge for days.
*OM NOM NOM!*
It’s fruitcake-making time!
Yes, the subject line is serious, because YES, fruitcake can be delicious–especially if you make it yourself and control the whole process! Follow my Mini Fruitcake Loaves recipe and you’ll see what I mean. Bake these babies now and you’ll have plenty of time to ripen them (that means brushing them down with a simple sugar mix once a week to soak in flavor) in time for holiday festivities.
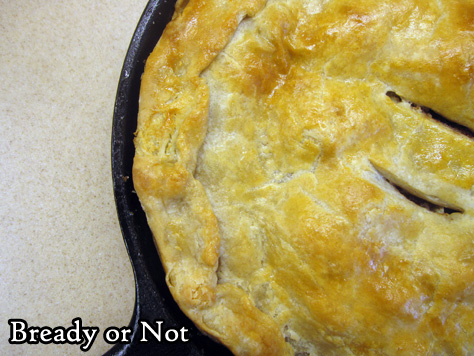
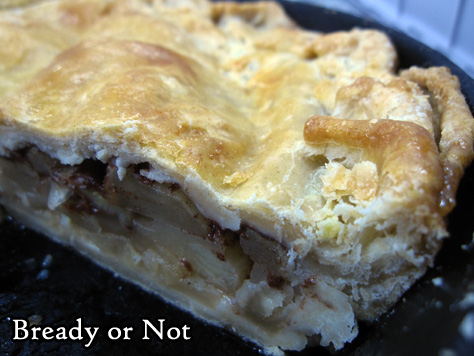
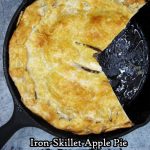
Read MoreBready or Not Original: Iron-Skillet Apple Pie with Ginger Liqueur
A trusty cast iron skillet bakes up a beautiful apple pie in this delicious recipe.
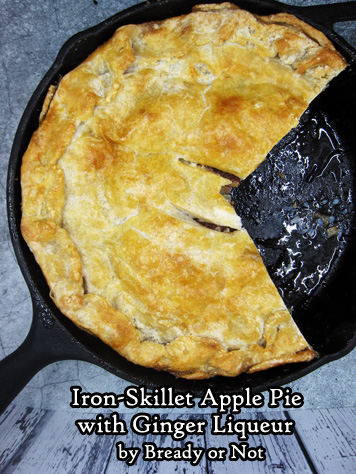
This pie is also special because it includes a drizzle of ginger liqueur. I posted a recipe a few weeks ago on how to make a cheap, sublime version at home in under a week.
The ginger liqueur does add some lovely nuance to this pie, too–the complexity and freshness come across in a different way than, say, using some lemon juice on the sliced apples as I sometimes do to prevent them from browning.
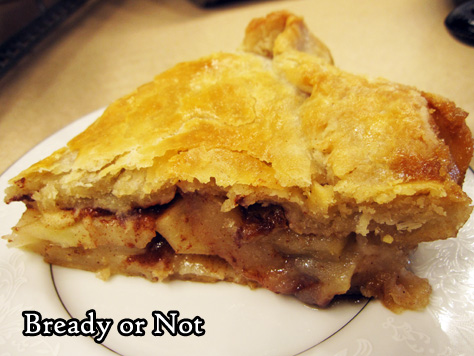
The whole process of this recipe is pretty neat, too. The biggest dose of sweetness is actually at the bottom of the pie, as butter and brown sugar are baked into the bottom crust!
I had to make this recipe three times to finally figure out the right balance of ingredients and how best to bake it. The second try was the most disastrous, as I ended up with the dreaded soggy bottom.
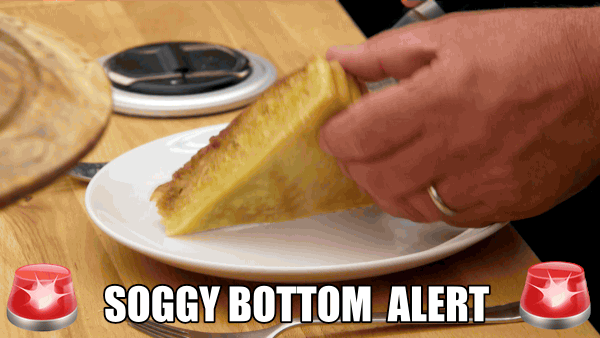
Do be sure to follow the advice to use a rimmed cookie sheet in the oven. It’ll catch the overflow from the skillet and save you from suffering a soggy bottom.
Click here for my Homemade Ginger Liqueur Recipe
Bready or Not Original: Iron-Skillet Apple Pie with Ginger Liqueur
Ingredients
Skillet base:
- 1/4 cup unsalted butter half cube
- 1/2 cup brown sugar packed
Pie:
- 2 prepared rounds of piecrust dough bought or made
- 1/4 cup white sugar
- 2 teaspoons cinnamon
- 2 teaspoons flour
- 5 Granny Smith and/or Honeycrisp apples peeled, cored, and sliced
- 1/4 cup ginger liqueur
For top:
- 1 egg slightly beaten with 1 teaspoon water, for egg wash
Instructions
- Preheat oven at 350-degrees with a large rimmed cookie sheet in the oven. [THIS IS IMPORTANT. The skillet will likely overflow as it bakes and the hot cookie sheet will also reduce the likelihood of a soggy pie bottom.] Add butter to skillet and place in oven until butter is melted. Remove skillet; stir in brown sugar, then return to oven until sugar starts bubbling, about 10 to 15 more minutes.
- In the meantime, in a small bowl combine the white sugar, cinnamon, and flour. Set aside.
- Roll out one of the pie crusts, if not already done. Carefully lay crust inside hot skillet so that bottom and sides are covered. Pour apple slices inside. Drizzle liqueur over the apples, followed by the dry ingredients.
- Roll out second pie crust. Lay atop the mounded pie. Wary of the hot pan, tuck the crusts together as much as possible. Cut several slits in the top of the pie.
- Brush egg wash over the top crust. Set pie on top of hot cookie sheet in oven.
- Bake until pie is golden brown and apples are tender when jabbed with a fork, about 45 to 50 minutes.
- Let cool at least 30 minutes before cutting. Store covered with foil, at room temperature or in fridge.
- OM NOM NOM!
Bready or Not Original: Homemade Ginger Liqueur
Make ginger liqueur at home in a matter of days, and save a lot of money over buying the store stuff!

I’m frugal. I wanted to try an apple pie recipe that called for ginger liqueur, so I priced it. Um, no way was I paying for a $40 bottle when I needed just a smidge.
Therefore, I utilized the powers of the internet to find a way to make my own ginger liqueur. I ended up combining a couple recipes, and to great result. I used Kirkland brand vodka, from Costco, which made this even more of a bargain.
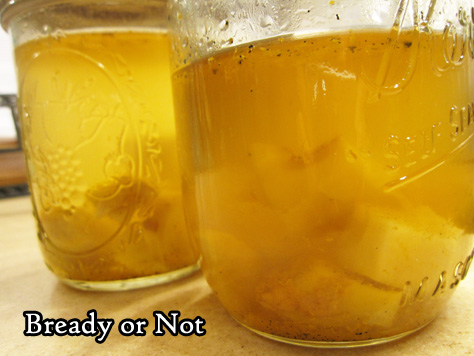
The result of the infusion is sublime. Citrus hits the palate first, followed by the ginger, leaving the mouth tasting fruity, zesty, and refreshed.
Use this ginger liqueur in baking (that apple pie recipe will be up in a few weeks!), drink it straight, or mix it into cocktails. It’ll be delicious no matter how you drink it, and–thanks to the vodka–it will keep indefinitely.

Bready or Not Original: Homemade Ginger Liqueur
Ingredients
- 4 ounces ginger root peeled and diced
- 1/2 cup caster sugar
- 1 vanilla bean halved
- 16 fluid ounces vodka
- orange zested
Instructions
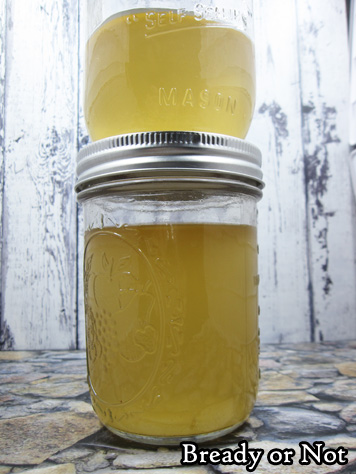
- Combine all ingredients in a large jar or bottle with a good lid. Shake to mix. Let steep for 2 days, shaking the jar a few times a day.
- Strain out the solids using a coffee filter or cheesecloth. Rebottle it and let it sit a day or two more to mellow before using it.
- Store sealed. Drink straight, use in mixed drinks, or in recipes. Should keep indefinitely.
- OM NOM NOM!
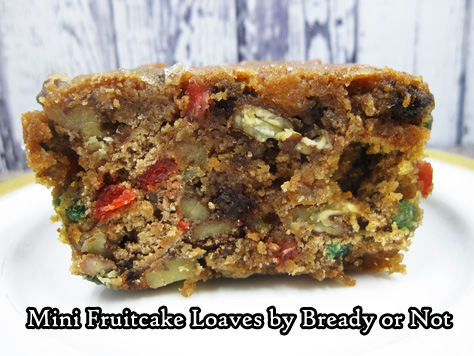
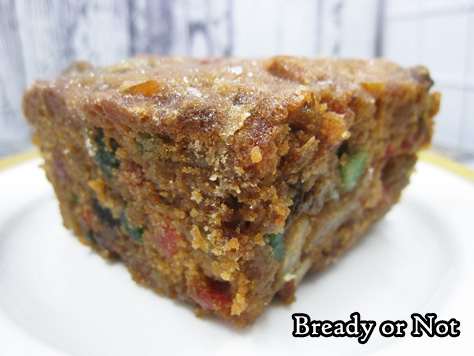
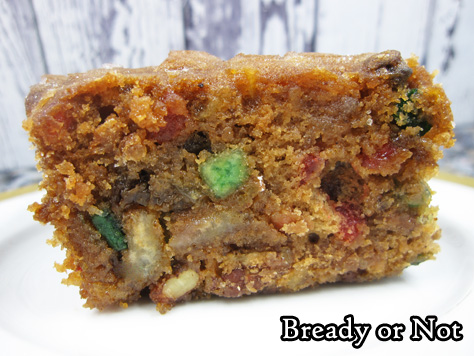
Bready or Not Original: Mini Fruitcake Loaves
Welcome to MACADAMIA NUT MONTH! Why is this Macadamia Nut Month? Because next month on the 23rd, the final book in my Blood of Earth trilogy comes out! Macadamia nuts are a big product of Hawaii, and Hawaii is a major setting in Roar of Sky. Plus, macadamia nuts are awesome.

If you love these nuts, get ready to bliss out. This month includes recipes for:
White Chocolate Macadamia Nut Pie
White Chocolate Macadamia Nut Cookies
Lemony Macadamia Nut Bars
Mini Fruit Cake Loaves to make now for the holidays (macadamia nuts optional) (today)
Fruitcake is one of the most maligned holiday foods out there, but people do love it. My dad sure does. I wanted to make him a fruitcake that proved how awesome they could be.
The recipe you see today is one I’ve been experimenting with for a few years now. One problem that I had with a lot of existing recipes is that they make a ton of fruitcakes. Therefore, I wanted to find the right recipe to cut in half for easier fridge storage and eventual transportation to California.
I used a highly-rated King Arthur Flour recipe and tweaked it a ton. I printed out guides of fruitcake-making advice and incorporated that information, too.
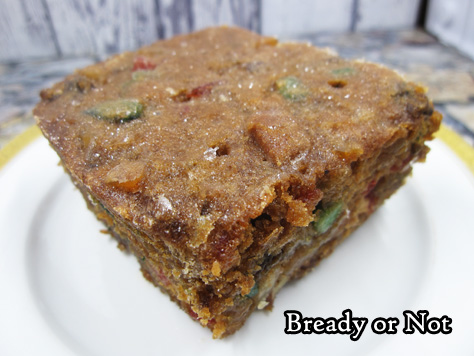
My dad doesn’t like fruitcakes that are heavy on nuts. Therefore, I place more emphasis on the fruit. Customize the kinds of fruits and nuts to your preference. I often use a combination of pre-made “fruitcake mixes” from the grocery store along with dried golden raisins, chopped apricots and dates, etc. Whatever I have in my cupboard or can grab on sale.

The same with the nuts. If you hate walnuts, don’t use walnuts. Include just one nut or use a wide variety, just make sure they are chopped up. You don’t want huge pieces.
The use of cocoa powder seems odd, but it’s there to add color. That’s a holdover from the original King Arthur Flour recipe. I was afraid that it would add a chocolate flavor, but it doesn’t at all. There are so many other complex flavors going on, it doesn’t stand out.
The liquid to macerate the fruit can be alcohol or standard fruit juice. My preference is to get some help from good old Captain Morgan. In the simple syrup, you can also omit the rum, if you so choose.
If you have any questions about this fruitcake recipe, feel free to comment on this page or reach out via social media. Just don’t wait too long–if you want these loaves ready for the holidays, you’ll need to bake them soon!
Bready or Not Original: Mini Fruitcake Loaves
Ingredients
Fruit:
- 1 lb + 4 ounces fruit 20 ounces total, dried and/or candied, including fruitcake mixes, raisins, chopped dates, cherries, apricots, crystallized ginger, etc
- 6 Tablespoons rum or brandy, apple juice, or cranberry juice
Batter:
- 1/2 cup unsalted butter 1 stick
- 1 cup brown sugar packed
- 1/2 teaspoon salt
- 1/2 teaspoon cinnamon
- 1/8 teaspoon allspice
- 1/8 teaspoon nutmeg
- 1/2 teaspoon baking powder
- 2 large eggs room temperature
- 1 1/2 cups all-purpose flour
- 1 Tablespoon cocoa optional, for color
- 2 Tablespoons corn syrup
- 1/4 cup apple juice or water
- 1 cup nuts chopped, one kind or a variety: almonds, pecans, walnuts, macadamia nuts, etc
Simple Syrup Glaze:
- 1 cup white sugar or caster; or for deeper flavor, turbinado
- 1/2 cup water
- 1/2 Tablespoon rum optional
Instructions
Prepare the fruit:
- Combine the fruit with the liquid of choice in a non-reactive bowl; cover and let rest overnight, at minimum.
Prepare simple syrup:
- Combine the sugar and water in a small saucepan. Heat until the sugar is dissolved. Stir in the liquor, if using. Cool completely. Keep stored in jar in fridge to brush the loaves over the coming weeks.
Make loaves:
- Preheat oven at 300-degrees. Place the butter and sugar in a large bowl and beat together, followed by the salt, spices, and baking powder.
- Beat in the eggs, scraping the bowl after each addition.
- In a separate bowl, whisk together the flour and cocoa.
- Add the flour mixture and the corn syrup to the butter mix. Scrape bowl well, then add the juice, the fruit with its liquid, and the nuts.
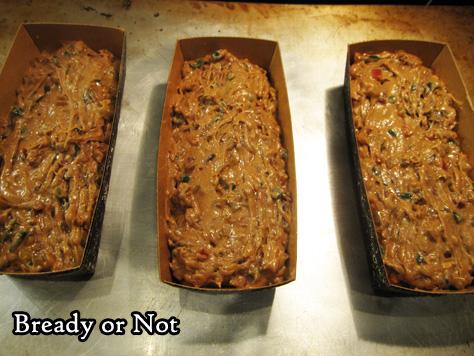
- Apply nonstick spray to the mini loaf pans; pan measurements vary, but this recipe should use 3 to 4 pans. Spoon batter into the pans, filling them about 3/4 full.
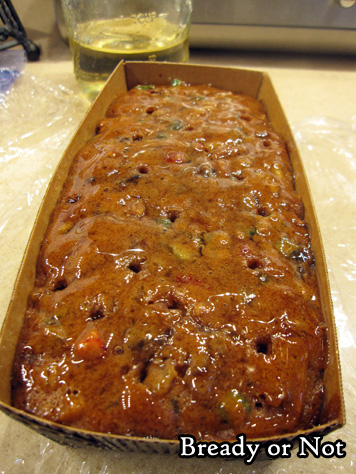
- Bake for about 1 hour to an 15 minutes. Cakes are done when a toothpick stuck in the middle comes out clean. If desired, poke the cakes throughout with a skewer to allow more liquid to seep in. Brush tops with simple syrup for the first time.
- Allow loaves to completely cool, then wrap them tightly in plastic wrap. Store in the fridge or in a cool, dark location.
After baking:
- Once a week for the next six weeks, unwrap loaves to brush with more simple syrup (making more in needed).
- After 6 weeks of ripening, the cakes can be eaten, stored in fridge longer, or frozen.
- OM NOM NOM!
