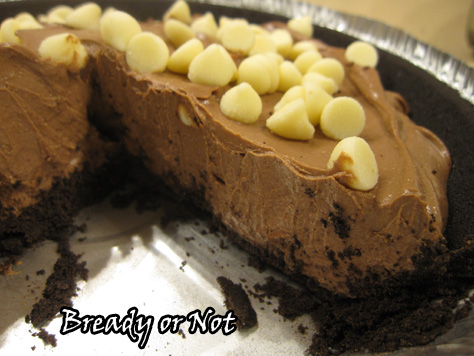
Bready or Not: Healthier Mint Chocolate Pie
Do not be afraid of this pie. Do not look at the main ingredient and go, “NOT GONNA GO IN MY MOUTH, NOPE NOPE.” I say that, because I was leery about this recipe, too, because I generally do not like tofu.
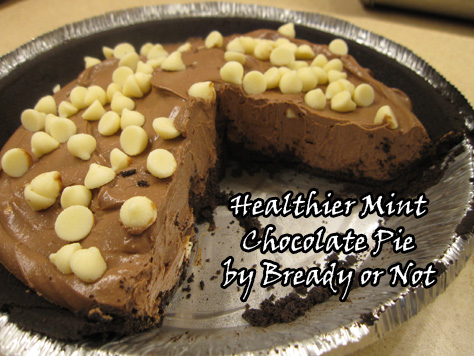
Yes, tofu. Stay with me.
The thing with tofu is, it takes on whatever flavors it is with. So if you dump a whole bag of chocolate in with the tofu, you don’t taste the soy byproduct. (This is why the adjective in the title is “Healthier” not “Healthy.”) Think of the tofu as scaffolding. It’s there to hold up the tastier stuff.
The original recipe comes from Chocolate Covered Katie, who is a great resource for healthier recipes. I’ve made this pie three times now and have adapted it a great deal from the original:
– tofu blocks around here come in 14 ounce, not 12.3.
– my first try, a chalky taste from the tofu was still evident, though it wasn’t bad. I upped the cocoa to mask that.
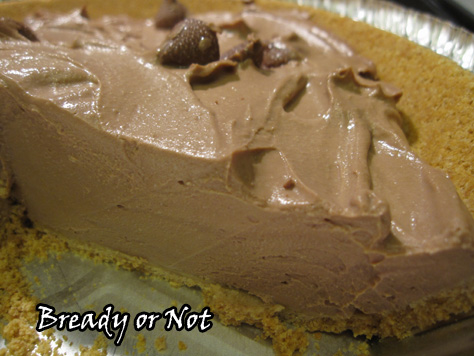
– increased the peppermint extract, as I couldn’t taste it at all in the original. I also tried this by using mint Hershey’s Kisses as part of the chocolate chip measurement, which was great.
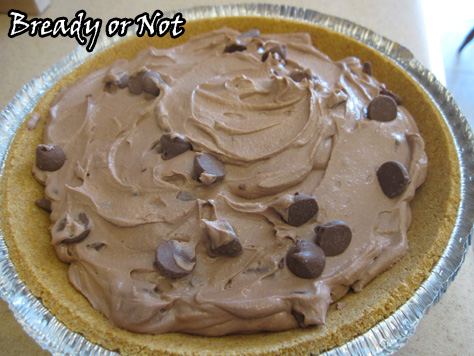
This all mixed up in my Vitamix in a matter of minutes. Then you dump everything into a premade graham cracker or Oreo crust, top with more chips if you want, then let it set for a few hours.
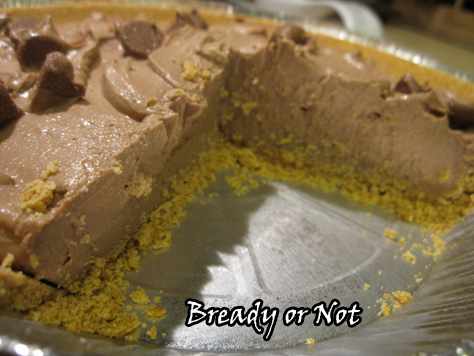
There’s just something awesome about a smooth, cool pie in the summertime, and if it’s a bit healthier than the average pie… even better!
Bready or Not: Healthier Mint Chocolate Pie
Ingredients
- 1 ready graham cracker crust or Oreo crust
- 14 ounce firm tofu
- 4 tsp cocoa powder sifted
- 1 tsp pure vanilla extract
- 2 Tablespoons milk almond milk works
- 1/8 tsp salt
- 2 teaspoons peppermint extract
- 8-10 ounces chocolate chips optional; also can mix in Hershey's Mint Kisses or other mint chips; reserve some chips for the top
- 2-3 Tablespoons maple syrup or agave or other sweetener
Instructions
- Set aside some of the chocolate if you want it for the top or mixed in. Melt the bulk of the chocolate.
- Add all of the other ingredients into a food processor or blender and pulse until very smooth.
- Scoop it into a prepared pie crust; it will be very thick. Place in fridge for several hours to set.
- Pie will keep perfectly well in fridge, covered, for up to a week.
OM NOM NOM!
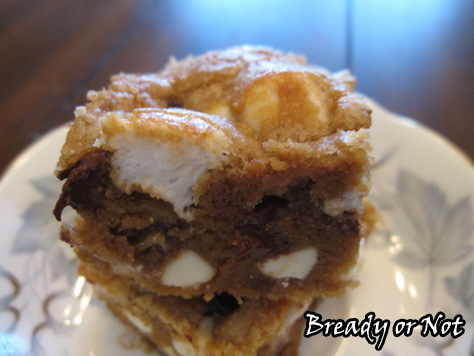
Bready or Not: Biscoff Fluffernutter Bars
Air conditioning is what makes Phoenix habitable, but even that has limits. We keep our air set at 82-degrees. This keeps us comfortable but is still not quite cool enough for some stuff in our kitchen.
The chocolate chips in my pantry go soft. Miniature candy bars, stockpiled from holiday clearance sales, goes outright melty. Marshmallows and caramels begin to fossilize. I keep some things in the fridge but I can’t get all of it in there.
This means I obviously need to start baking and use up the stuff while it’s still good.
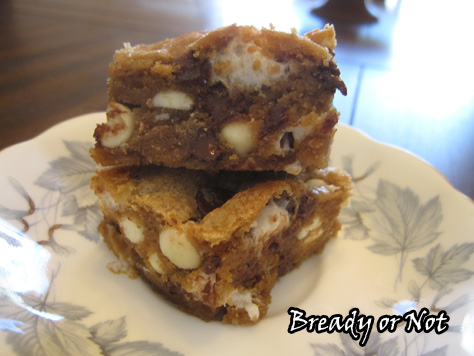
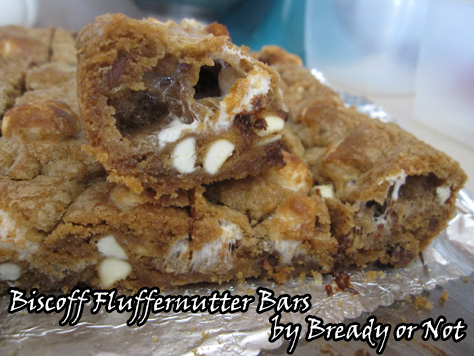
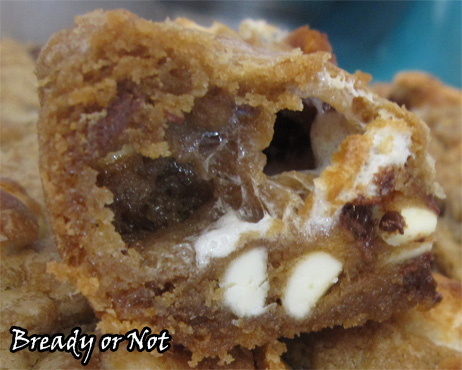
Traditional fluffernutter bars use peanut butter. You can certainly do that here–or use any nut butter–but I used my good ol’ Biscoff spread because, as you all know, I’m obsessed with the stuff. It makes everything taste like cookie dough. What’s not to love? I also used half a bag of mini marshmallows (you’ll find out what I did with the other half in another recipe) and a bag of chocolate chips.
You know what’s cool about using marshmallows in a recipe like this? CAVERNS. It creates pockets of invisible sweetness. Look! See?
My husband took this to work and it was, um, popular. The whole 9×13 pan’s worth of bars just kinda vanished and he had recipe requests.
I don’t believe in secret recipes. Share the love. If that love happens to involve chocolate, Biscoff spread, and marshmallows, all the better.
Recipe greatly adapted from Back for Seconds.
Bready or Not: Biscoff Fluffernutter Bars
Ingredients
- 1 cup unsalted butter softened
- 3/4 cups creamy Biscoff spread or nut butter
- 1 cup brown sugar packed
- 1/2 cup white sugar
- 2 eggs room temperature
- 1/2 teaspoon salt
- 1 teaspoon baking soda
- 2 1/4 cups all-purpose flour
- 2 cups chocolate chips
- 5 ounces mini marshmallows half bag
Instructions
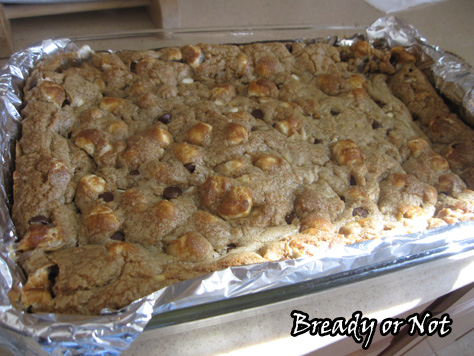
- Preheat oven to 350-degrees. Prepare a 9x13 pan with aluminum foil or parchment and apply nonstick spray.
- In a mixing bowl, cream together the butter, Biscoff spread (or nut butter), and sugars. Add the eggs and blend in, followed by all of the dry ingredients. Gently fold in marshmallows and chocolate chips. It'll be thick.
- Spread the dough into the pan and even out. Bake for 20 to 25 minutes, or until lightly browned on the edges. The center will jiggle slightly from the marshmallows but it will set after it cools.
- Cool completely and cut into squares. Store in a tightly sealed container.
OM NOM NOM.
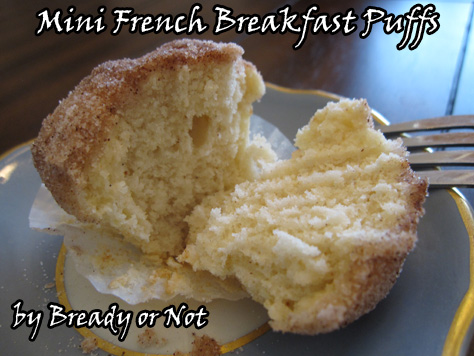
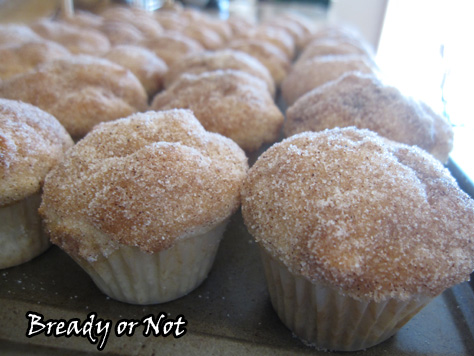
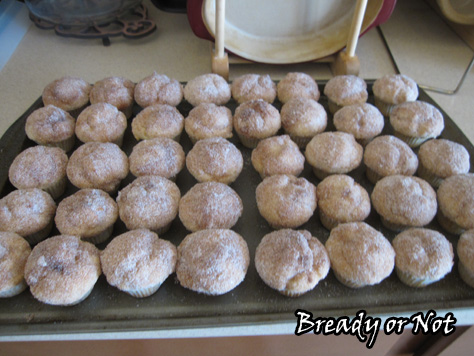
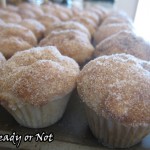
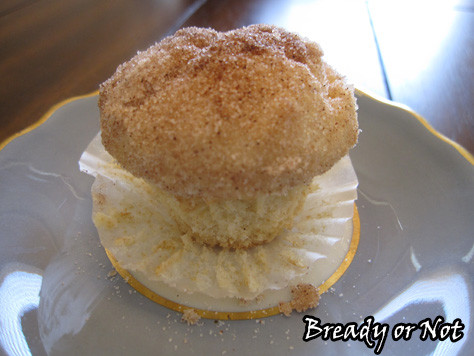
Bready or Not: Mini French Breakfast Puffs
Every so often, I like to mention how much I love the Pioneer Woman. I own all three of her cookbooks. I’ve followed her online for years and printed out many of her recipes. I’m also an enthusiastic watcher of her television show.
The original of this recipe was featured on her show a while back. The breakfast puffs reminded me greatly of a “mini muffin pan donut” recipe I tried a few years ago. It was one of those recipes that’s really good fresh, but goes stale by the next day. Since Ree Drummond emphasized that her version stayed good and was excellent to freeze as well, I figured I needed to give her variation a try.
This being me, though, I still had that old recipe on my mind. I modified her recipe to amp up the spice, cut down the coating (it made way too much!), and adjusted everything for a mini muffin pan.
This created puffs that were much more friendly for my husband to take to work and share with a lot of co-workers… and for me to try one without having to eat an entire big honkin’ muffin.
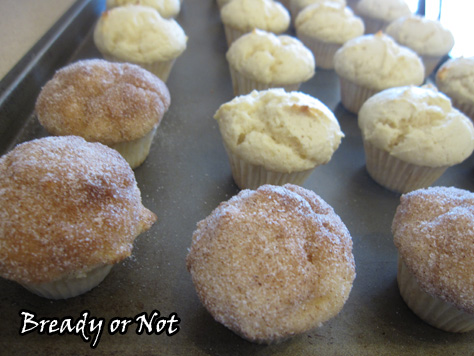
In mini size, this makes about 40. They rose beautifully, with the texture light and cakey. Unlike the old recipe, they were just as tasty the next day, and as promised, they froze and thawed wonderfully!
The perfect bite-sized breakfast muffin. Betcha can’t eat just one.
Modified from the original French Breakfast Puffs by Ree Drummond.
Bready or Not: Mini French Breakfast Puffs
Ingredients
Ingredients
- 3 cups all-purpose flour
- 3 teaspoons baking powder
- 1 teaspoon salt
- 1 teaspoon ground nutmeg
- 1 cup white sugar
- 2/3 cup shortening
- 2 eggs room temperature
- 1 cup whole milk almond milk works
Coating
- 1/2 cup unsalted butter
- 1/2 cup white sugar
- 2 teaspoons ground cinnamon
Instructions
- Preheat the oven to 350-degrees F. Prepare the mini muffin pan by using liners (highly recommend the liners) or spray thoroughly with non-stick coating.
- Stir together the flour, baking powder, salt and nutmeg. Set aside.
- In a different large bowl, cream together the sugar and shortening. Add the eggs and mix again. Measure the milk. Alternate adding the dry ingredients and milk into the sugar mix until everything is just combined.
- Use a tablespoon scoop or spoon to dollop batter into each cup. It should be about 2/3 full. Bake until golden, 14-18 minutes. Remove the muffins from the pan and set aside as you ready the next batch.
- While that's baking, start the coating. Melt the butter in a microwave-safe bowl. Combine the sugar and cinnamon in another bowl.
- Dip the warm muffin tops in the butter and then in the cinnamon-sugar mixture.
Keep in a sealed container at room temperature. They can also be frozen for later enjoyment.
OM NOM NOM!
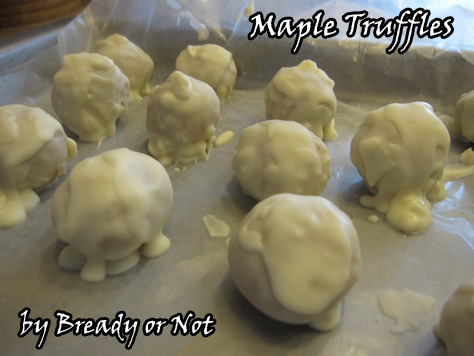
Bready or Not: Maple Truffles
Every time I make truffles, I always end up raving to my husband, “I HATE MAKING TRUFFLES.”
The chocolate is always so slow to melt. I usually end up burning myself in some small way. My truffles never look as pretty as other truffles I see online (yes, I’m judging myself by my truffle beauty, dangit).
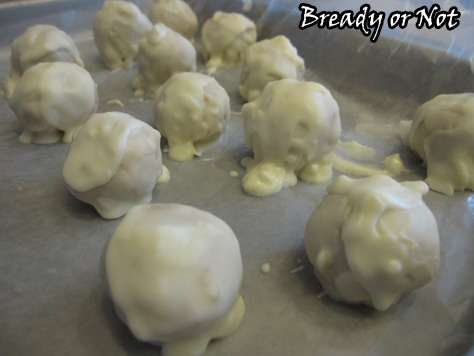
However, I always end up making truffles again because my husband’s co-workers go absolutely bonkers for them. They are referred to as “Mrs. Cato’s Balls.” Yeah. Go ahead and snicker.
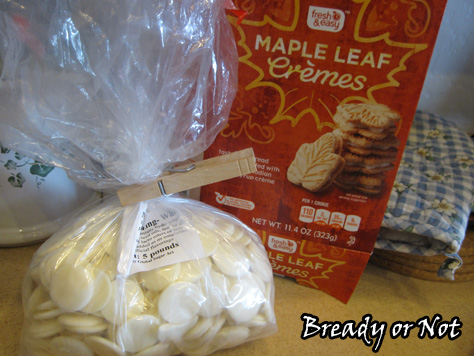
The standard home truffle uses Oreos. This is my unique version, done using maple creme cookies. You could also substitute Golden Oreos and add more maple flavor.
Everything is better with maple.

Bready or Not: Maple Truffles
Ingredients
A Bready or Not Original Recipe
- 8 ounces cream cheese 1 block
- 1 package of maple creme cookies or substitute Golden Oreos, and add more maple flavor
- 3/4 teaspoon maple flavor
- 11 ounces white chocolate or white candy melts
Instructions
- Bring cream cheese to room temperature, or place unwrapped block in a bowl and zap in microwave until softened, about 20 seconds.
- Pulverize the cookies. Use a blender to rend them to crumbs, or put cookies in a gallon zipper bag and crush them with a rolling pin.
- In a large bowl, combine soft cream cheese and crumbs. Begin to mix together, add maple flavor, then mix until completely combined and fully beige. Arrange a shelf in your freezer that will fit a mid-size cookie sheet; line the cookie sheet with wax paper. Use a tablespoon or teaspoon scoop or a spoon to form truffles, then use hands to compress the balls more. Set them all on the wax paper, then place in freezer for at least 30 minutes.
- Choose your method of melting the chocolate: the microwave or a double boiler. The latter has the advantage of keeping the chocolate warm. Carefully dip the cookie balls into the chocolate to completely cover. Let set. Often it's best to do a second coat.
With any leftover chocolate, use a spoon to form lumps on the wax paper, and add nuts, candies, etc, or dip crackers or fruit from your kitchen.
Keep truffles stored in fridge; they will stay good for weeks.
OM NOM NOM.
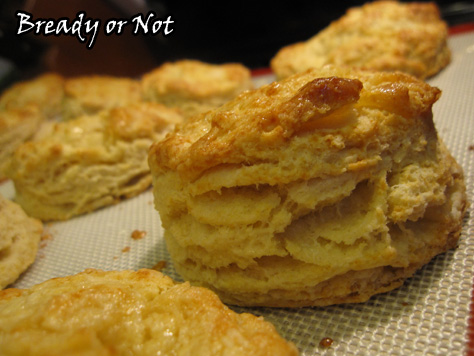
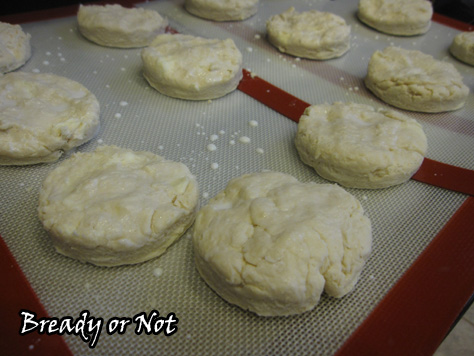
Bready or Not: Buttermilk Biscuits
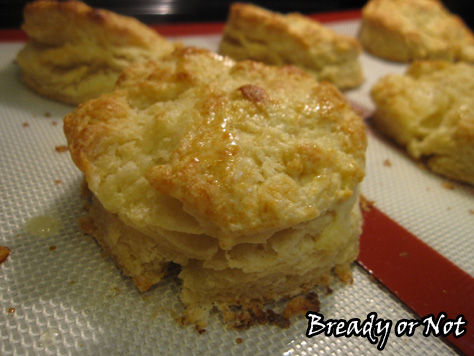
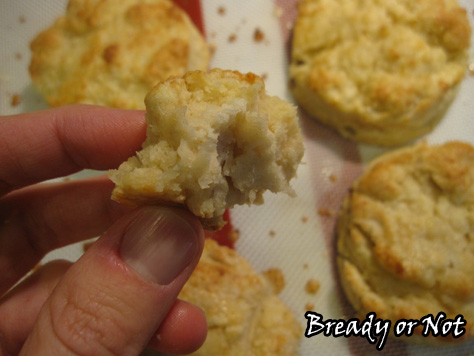
I failed at buttermilk biscuits. For years. This grieved me. This recipe, finally, is the one that has repeatedly produced lofty, flaky, perfect biscuits.

This is an important heritage thing. My dad is from Alabama. He is of the firm belief that every meal should come with a side of bread, and buttermilk biscuits are about as good as it gets.
My husband’s family isn’t much different. Grandpa and Grandma Cato are Arkansas born and bred. We go to visit them, and we are fed an “Arkansas breakfast.” That means enough food to go out into the woods and chop down trees all day and not be hungry until dusk. That breakfast always, always, always includes buttermilk biscuits with sausage gravy.
Biscuits. Serious business.
I found this recipe from Bakergirl and have modified it slightly; she in turn got it from Bobby Flay. I wish I could hug this recipe. You have no idea how pleased I am to have a biscuit recipe that works.
A few notes on this:
– I do homemade sour milk for the buttermilk by mixing a tablespoon of lemon juice in with milk (I’ve also done a mix with half & half) and letting it curdle for 15 minutes before using it.
– the recipe also works just fine if you happen to have buttermilk powder.
– it produces more than a single cookie sheet of biscuits.
– they are fabulous to bake and the freeze. It’s always nice to have some stashed in the freezer!

Bready or Not: Buttermilk Biscuits
Ingredients
- 4 cups all-purpose flour
- 4 teaspoons baking powder
- 1 teaspoon baking soda
- 1 teaspoon salt
- 12 Tablespoons unsalted butter cold, cut into cubes
- 1 1/2 cups cold buttermilk or substitute sour milk
On top:
- 1/4 cup milk brush on tops before baking
- 2 Tablespoons butter melted, to brush on tops after baking
Instructions
- Preheat oven to 450-degrees. Prepare baking sheets by lightly greasing them or using parchment or baking mats.
- Combine the dry ingredients: flour, baking powder, baking soda, and salt. Gradually cut the butter into the flour mix, using a pastry blender or forks until it resembles coarse meal.
- Add the buttermilk and combine until it just comes together. Don't overwork it! The butter needs to stay in small lumps; that creates the flaky layers.
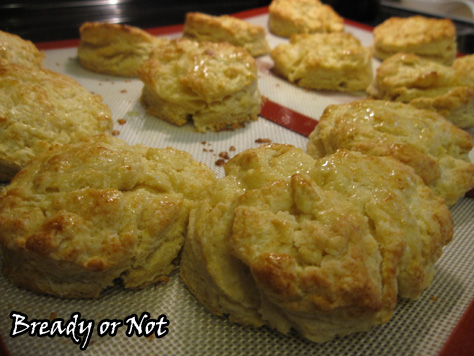
- Lightly flour about a square foot of counter. Press the dough out to mostly fill the space, with the dough still about 3/4-inch thick. Use a 3-inch round biscuit cutter to punch out shapes and place on baking sheets. Brush a little bit of milk on the tops of the biscuits.
- Bake for 12 to 15 minutes or until they turn golden brown. Remove from oven and immediately brush melted butter on the tops.
OM NOM NOM!
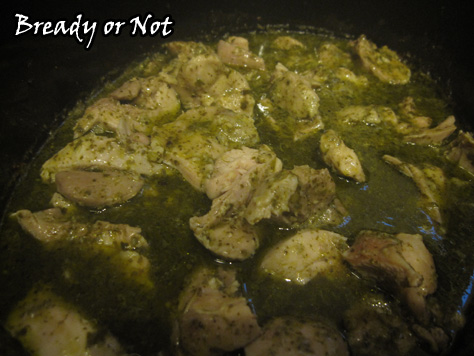
Bready or Not: Crock Pot Pesto Ranch Chicken Thighs
I present to you one of my very favorite chicken crock pot recipes, one I previously shared at Novelocity.
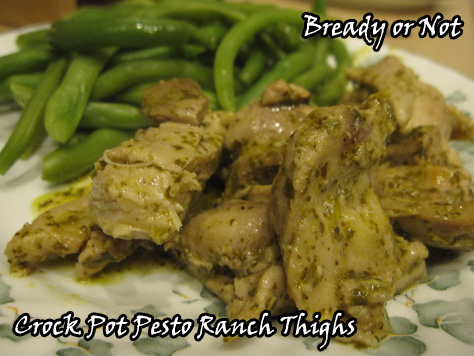
Seriously, I’ve been making this about once a month for a few months now. My husband even requests it. This is impressive since he 1) does not like ranch dressing 2) does not eat pesto.
There’s something about the combination in this recipe, though, that is just plain savory and delicious.
This is my go-to meal when I’m on a writing deadline. It mixes up in five minutes and cooks itself over the afternoon, and produces chicken to feed us–quite happily–for days.
Modified from Picky Palate.
Bready or Not: Crock Pot Pesto Ranch Chicken Thighs
Ingredients
- 8 boneless skinless chicken thighs 2-3 pounds, thawed or mostly thawed
- 6-8 ounce pesto jar
- 1 packet ranch dressing dry seasoning mix or 3 Tb ranch dressing mix
- 1/2 cup chicken broth
Instructions
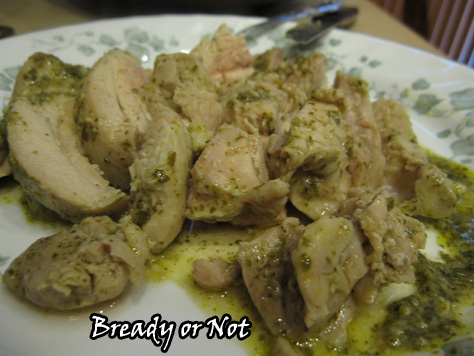
- Place chicken thighs, pesto, ranch dressing (dry from the packet) and broth into crock pot. Stir gently to coat chicken and combine everything.
- Place lid on top. Cooking tip: It tends to cook in half the time you set on the crock pot, i.e., a 6-hour high setting means the chicken should be done in about 3 hours, depending on how many thighs are in there and how thawed they were to start. Leave thighs whole or chopped. (If you chop, add them into the pot again on warm for 15 minutes so they can soak up more flavor! It's also a great way to make sure they are cooked through--just chop the meat and cook on high a while more.)
These thighs are great with veggies, or in a salad, or cold out of the fridge. They also freeze wonderfully.
OM NOM NOM.