


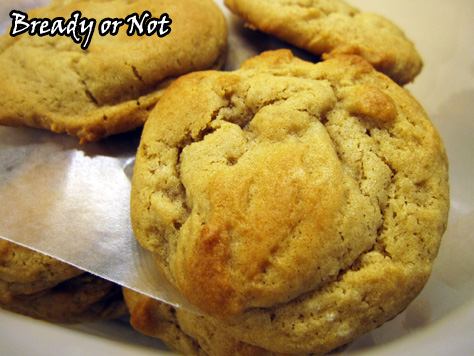
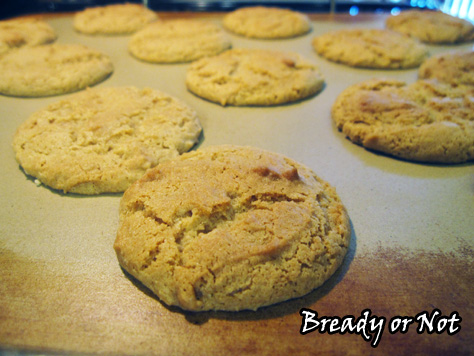
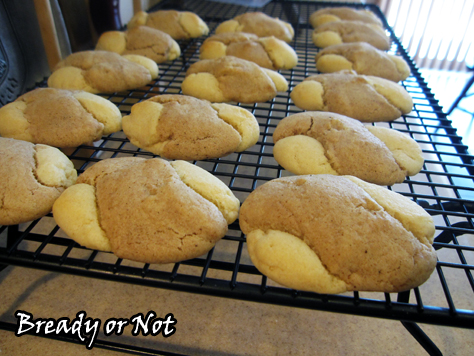
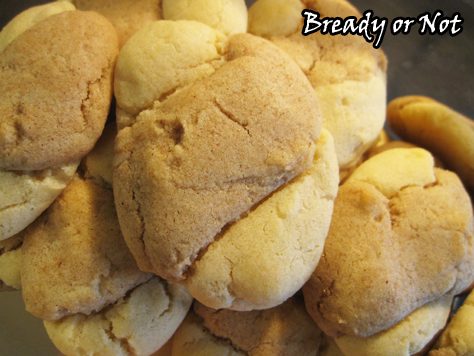
Bready or Not: Soft Lemon-Ginger Cookies
Lemon and ginger join forces in these luscious cookies!

I found the original recipe in a compilation from Taste of Home. I immediately thought, hey, that looks good but it needs more ginger… and more lemon.
Because if it’s a lemon-ginger cookie, it should scream flavor, right?
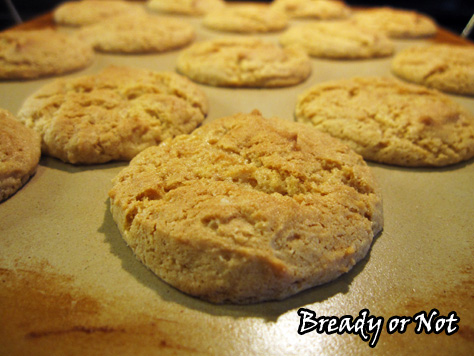
And these do, all bound up in a soft, chewy form. These taste delightfully fresh. Perfect for summer, really.
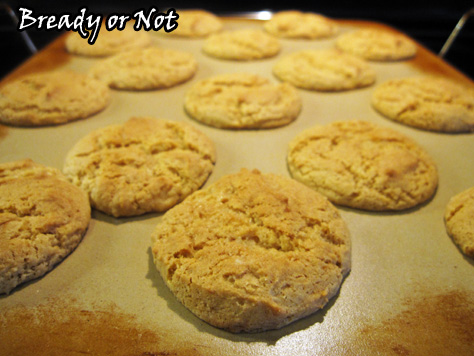
… oh, these would be perfect for the holidays, too. They do have ginger, after all. Make them whenever you want. The dough can be made a day or two ahead of time and kept ready in the fridge!

Bready or Not: Soft Lemon-Ginger Cookies
Ingredients
- 1/2 cup unsalted butter softened
- 1 cup brown sugar packed
- 1 egg
- 3 Tablespoons sour cream
- 1 1/2 teaspoons lemon extract
- 1 teaspoon vanilla extract
- 1 3/4 cups all-purpose flour
- 1 teaspoon baking soda
- 1 teaspoon cream of tartar
- 2 teaspoons ground ginger
- 1/4 teaspoon salt
Instructions
- Preheat the oven at 350-degrees.
- In a large mixing bowl, whip together the butter and brown sugar until it gains a fluffy texture. Beat in the egg, sour cream, and extracts.
- In another bowl, sift together the flour, baking soda, cream of tartar, ginger, and salt; make sure to press any lumps out of the cream of tartar and ginger. Slowly mix the dry ingredients into the other bowl.
- Drop by rounded teaspoons onto a baking sheet. Bake for 10 to 12 minutes, until the cookies are lightly browned and no longer jiggly. Watch out--they can overbake quickly. Let them rest on the cookie sheet for just a few minutes, then transfer to a rack to cool.
- OM NOM NOM!
Read More
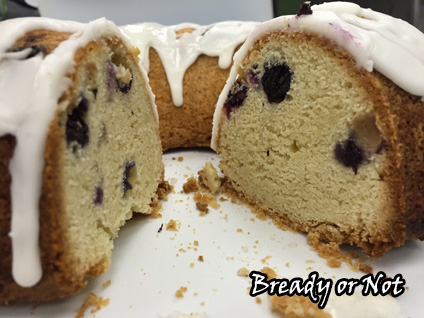
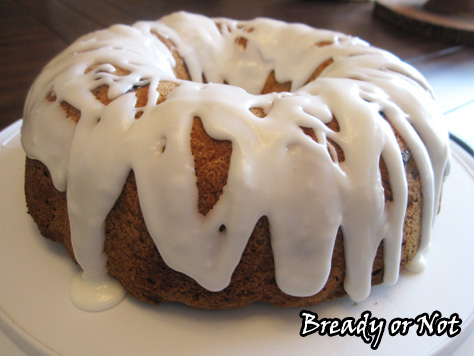
Bready or Not: Blueberry Pound Cake with Lemon Glaze
Blueberries are in season, so let’s get baking!
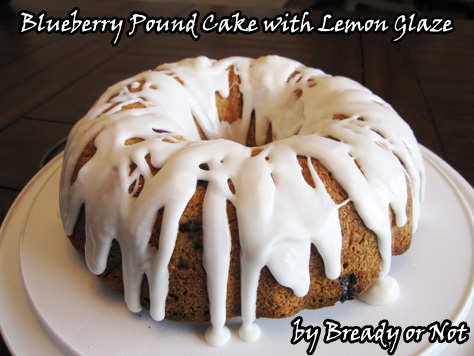
This cake is sheer perfection. This has the tender texture of a pound cake, with added sweetness from dapples of blueberries.
Oh yeah, and then there’s the glaze. When I was meddling with the base recipe, that version felt so… naked.
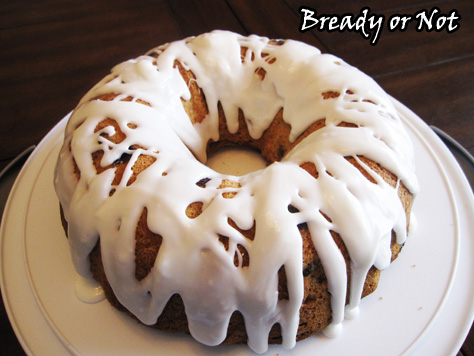
The lemon glaze adds a bit more sweetness, and a tartness that contrasts perfectly with the blueberries.
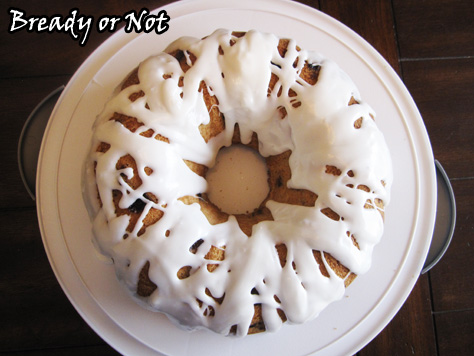
The glaze looks gorgeous, too!
This cake is perfect for breakfast, brunch, or dessert. Whenever the heck you want it, really.
Modified from Through Her Looking Glass.

Bready or Not: Blueberry Pound Cake with Lemon Glaze
Ingredients
Cake
- 6 ounces blueberries washed, drained, and patted dry
- 3 cups flour divided
- 1 teaspoon baking powder
- 1/2 teaspoon salt
- 1 cup unsalted butter 2 sticks, room temperature
- 2 cups white sugar
- 4 large eggs room temperature
- 1 1/2 teaspoons vanilla extract
Glaze
- 1 1/2 cups confectioners' sugar sifted
- 1 Tablespoon + milk
- 1/2 teaspoon lemon extract
Instructions
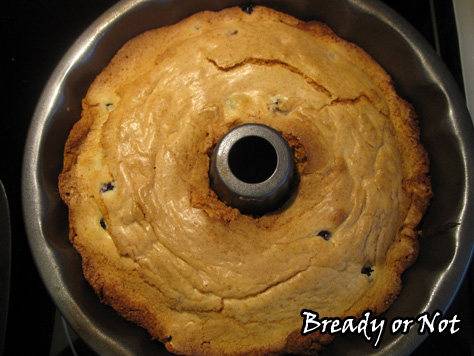
- Preheat oven at 350-degrees. Prepare a 10 or 12-cup bundt pan by applying Pam with Flour or buttering well and dusting with flour.
- In a small bowl, gently stir the blueberries with 1/4 cup flour. This will keep the blueberries from sinking in the batter as it bakes. Set bowl aside.
- In a medium bowl, stir the remaining flour with the baking powder and salt. Set aside.
- In a mixing bowl, cream the butter and sugar together until fluffy. Add the eggs one at a time, followed by the vanilla. Beat it until fluffy again.
- Slowly mix in the dry ingredients until just blended. Follow that by gently folding in the blueberries.
- Use a rubber spatula to pour the batter into the ready pan. Bake for 50 minutes to 1 hour, until it passes the toothpick test.
- Let the cake cool for about 10 minutes, then invert it onto a rack to completely cool. Once the cake is at room temperature, mix the glaze. Add enough milk to give it the desired pourable consistency. Drizzle it over cake.
- Store cake in fridge.
- OM NOM NOM!
Read More
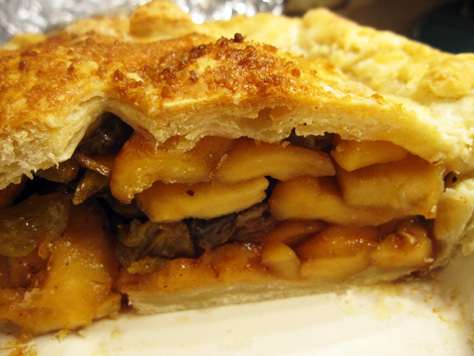
Bonus Bready or Not: Dried Apple Pie Feature at Unbound Worlds
Just in time for this week’s holidays (Independence Day! And heck, Canada Day, too!) I’m sharing a special recipe over at Unbound Worlds. I combined a bunch of 19th-century recipes to create my own recipe for Dried Apple Pie. A century ago, that was the handiest way to make apple pie all year-round no matter where you lived. This is how my character Ingrid Carmichael learned to make apple pie from her mother.
It’s actually a pretty simple recipe, too–all you have to do is re-hydrate the apples in some apple cider or juice! You’re spared the pain of peeling the apples, too. Check out the recipe and post at Unbound Worlds.
#SFWAPro
Read More
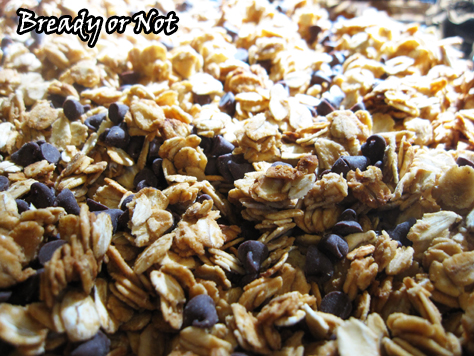
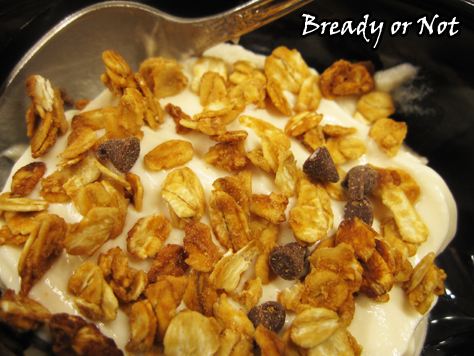
Bready or Not: Peanut Butter Chocolate Chip Granola
Homemade Peanut Butter Chocolate Chip Granola is delicious and oh-so-much cheaper than buying the pre-made stuff from the store.
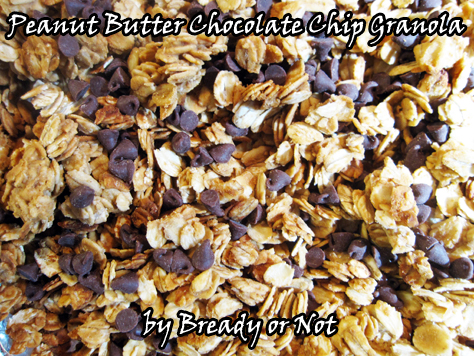
My son is autistic and has a very limited diet. With the help of feeding therapy, we have gradually introduced him to new foods and new combinations of textures. He has eaten yogurt for years, and it turned out he really liked the addition of granola on top.
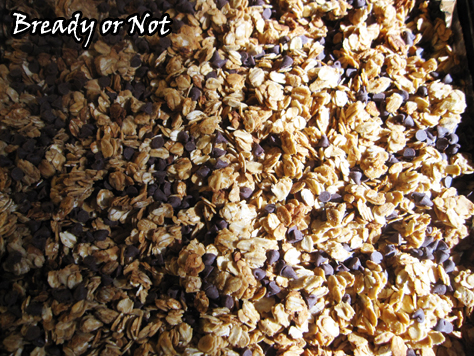
Me being me, I saw the prices of granola at the store and decided I’d start making it myself. My son loves peanut butter and chocolate, so I knew that it’d be a great combo for him.
When I didn’t see an existing recipe that I liked, I decided to make my own. This is the result.
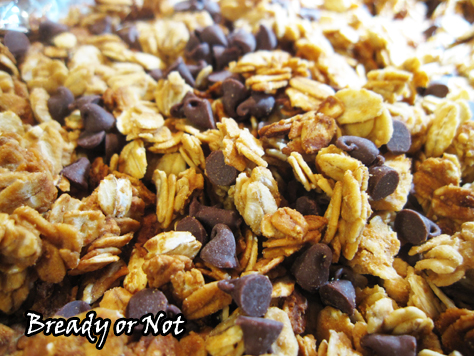
This granola is quick to mix together and quick to bake, too. Just be careful to NOT overbake. It’s easy to do, since it’s hard to tell how crisp the granola will get after you remove it from the oven.
If you eat gluten-free, use GF oats and check your other ingredients!

Bready or Not Original: Peanut Butter Chocolate Chip Granola
Ingredients
- 2 1/2 cups old fashioned rolled oats
- 1/4 cup creamy peanut butter
- 1/4 cup honey
- 1 teaspoon vanilla extract
- 1/3 cup mini chocolate chips
Instructions
- Preheat oven at 275-degrees. Line a large, rimmed cookie sheet with aluminum foil and rub with butter or apply nonstick spray.
- Place the oats in a large bowl. In a small bowl, microwave the peanut butter and honey for 30 seconds; the peanut butter should be starting to melt. Stir them together, then add vanilla extract.
- Pour the peanut butter mix over the oats; stir until the oats are completely coated. Spread the granola on the foil-lined sheet and bake for 15 minutes. Stir. Bake for another 10 to 15 minutes, then set out to cool. Note that it will continue to crisp up as it cools, so don't overbake!
- Once the granola is cool, mix in the chocolate chips. Store in a sealed container.
- OM NOM NOM!
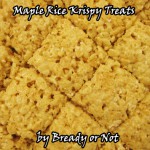
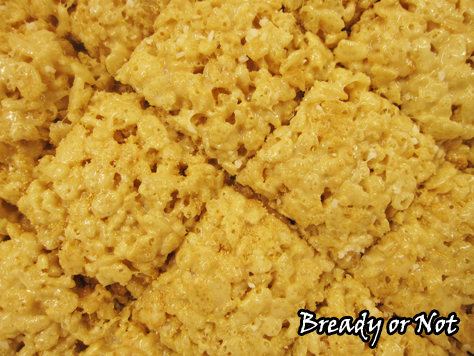
Bready or Not: Maple Krispy Treats
Regular Bready or Not readers know that I espouse that everything is better with maple. Case in point: Rice Krispy Treats, now with maple.
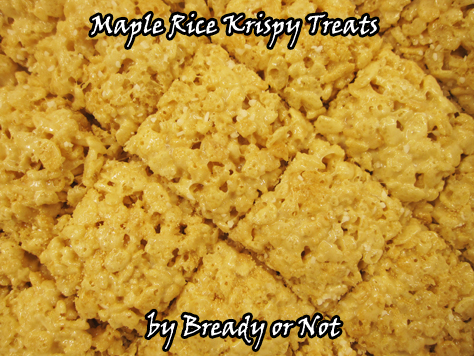
I had to make this several times to get the right flavor and balance. An onerous task, I assure you. In the end, I created an original recipe that’s perfect for maple lovers.
This recipe can be made in the microwave or on the stovetop. Just make sure you’re using a large bowl or pot, as you need room to stir in a lot of cereal, and take care when heating. Burned marshmallows are a bad, bad thing.
If you do this in the microwave, which is my preference, you will have ready to eat treats in under 30 minutes.
Even more importantly–for people in hot environs like me–you won’t heat up the house when it’s already a zillion degrees outside. That makes this the perfect summer recipe.
Did someone scoff at that because of the maple flavor? Pfft. Maple flavor knows no season. If it’s tasty and you like it, make it, no matter what the calendar says.

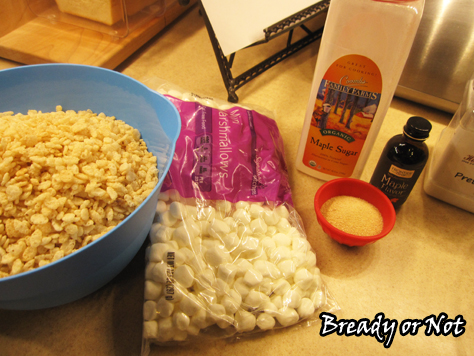
A Bready or Not Original: Maple Krispy Treats
Ingredients
- 6 tablespoons unsalted butter
- 2 Tablespoons maple sugar or use brown sugar and more maple flavor
- 2 teaspoons maple flavor
- 10 ounces miniature marshmallows 1 bag
- 1/4 teaspoon kosher salt
- 6 cups Rice Krispies or similar puffed rice cereal
- sprinkle maple sugar optional, or kosher or pretzel salt for the top
Instructions
- Line an 8-inch square pan with aluminum foil then coat the surface with butter or non-stick spray. Stage the maple sugar, maple flavor, and marshmallows so they are ready to add quickly.
- These treats can be made in the microwave or on the stovetop. Either method: on low, gradual heat, melt the butter in a large bowl.
- Once the butter is melted, remove from heat and stir in the maple sugar and maple flavor. Add marshmallows and stir. This will just barely start to soften the mix, so continue to heat gradually until the marshmallows become smooth goop; in the microwave, use 20 second zaps and stir well between each pass. Stir until no white streaks remain. Remove from heat again, if needed.
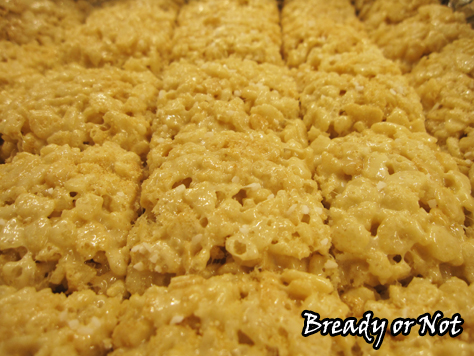
- Add the cereal and 1/4 teaspoon salt. Mix until everything is coated, then pour into the prepared pan. Quickly spread it to the corners and evenly press it down with a rubber spatula. (If the goop sticks to the spatula too much, quickly use nonstick spray on it or rub it with butter.)
- When the cereal mix is even, sprinkle coarse salt and maple sugar on the top, if desired.
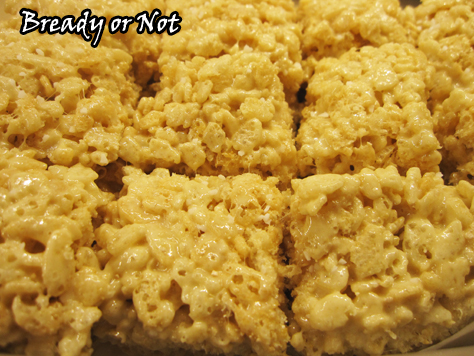
- Let the pan cool for at least 15 minutes. Slice into bars while everything is still in the pan, then use the foil to lift them all out at once. Store for up to two days in a sealed container, with waxed paper between layers to prevent sticking.
- OM NOM NOM!
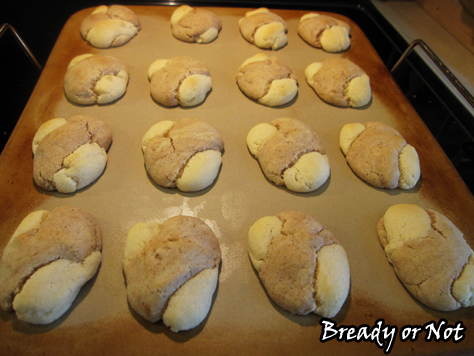
Bready or Not: Cinnamon Twist Cookies
These Cinnamon Twist Cookies give you an opportunity to play with cookie dough.
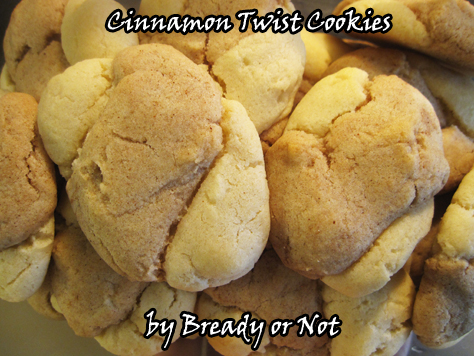
You divide the dough in half and mix cinnamon into one half. Then you twist the doughs together, creating delicious braided cookies!

This would actually be a great recipe to involve kids or grandkids! Just keep in mind that the cookies spread as they bake, so you don’t want them too large.
This is one the first cookie recipes I claimed as “mine.” I found it on the Betty Crocker website back in my newlywed days when I was hunting for new cookies that would please my husband.
I made these cookies all the time for about five years, and then the recipe became buried in my growing collection of clippings and print-outs. I was stunned to realize recently that I hadn’t made these cookies in years.

These cookies keep well for several days and they’re durable to pack and bring with you places. They have a kind of snickerdoodle vibe going with that kick of cinnamon, but they’re not messy at all.
Most importantly of all, they are delicious.

Bready or Not: Cinnamon Twist Cookies
Ingredients
- 1/2 cup unsalted butter 1 stick, room temperature
- 1 cup white sugar
- 2 teaspoons vanilla extract
- 1 egg
- 1 3/4 cups all-purpose flour
- 2 teaspoons baking powder
- 1/2 teaspoon salt
- 1 teaspoon ground cinnamon
Instructions
- Preheat oven at 375-degrees.
- In a large bowl, mix the butter, sugar, vanilla, and egg. Stir in the flour, baking powder, and salt.
- Divide dough in half. Stir cinnamon into one half until it's mixed in and brown.
- Grab equal pinches of both kinds of dough, place them side by side, and gently twist into a short rope. Place on cookie sheet, with several inches around each to account for expansion. Repeat with remaining dough.
- Bake 8 to 10 minutes, until the cookie is set with the pale dough just tinted brown. Let cookies cool on wire rack. Store in a sealed container for several days.
- OM NOM NOM!
Read More
